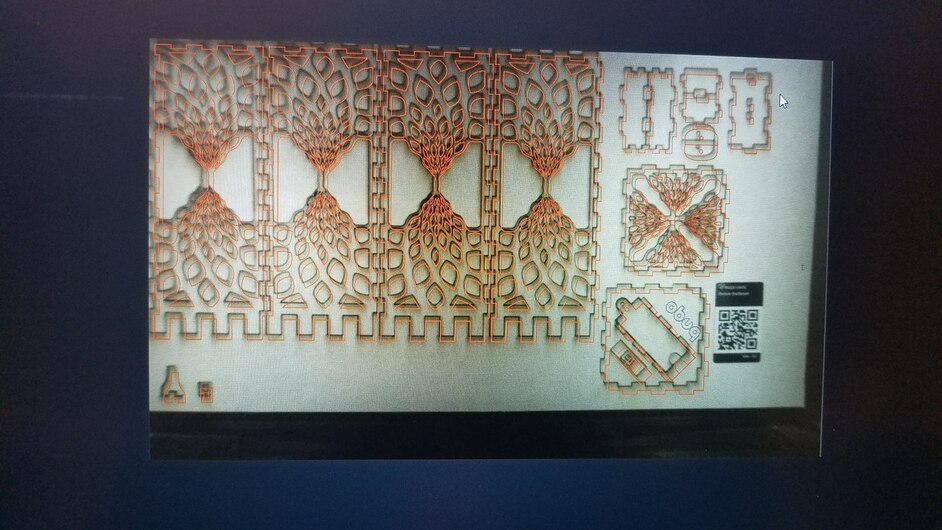
Hello, we are having alignment issues and they seem to be getting worst. At first it was a little off and lining something up to engrave after a cut was a bit hard but today is just worst.
Has anyone had these issues or know how to fix it?
This was a few weeks ago:
The camera’s alignment is never going to be 100% accurate. You don’t want to have to depend on it for aligning a cut.
You can include both the cuts and engrave in the same SVG file. When you pull it in to the GFUI there’ll be two tiles in the window on the left (because cuts are vectors and engraves are filled objects or bitmaps, so it can tell the difference). When you hit PRINT the GF will perform the operations in the order they appear in that window. You can drag to rearrange the tiles to change the order. Alignment won’t be an issue because you won’t need to touch the part between cutting and etching…
Each unique color or layer or image type (vector vs. raster) in the source artwork will appear as a separate tile in the GFUI.
If this doesn’t address your problem, maybe I’m not understanding your question correctly?
That amount of misalignment has only ever happened to me when I accidentally bumped the head after the machine was on and calibrated. Is there any chance that this is what happened? It wouldn’t take much of a bump. Does it go back to normal if you turn off the machine, turn it on and allow it to re-calibrate?
Hi Randy, yes I usually cut and engrave at the same time but there have been a few times when I have extra pieces I like to go back and engrave them or maybe cut an additional piece. This is where my alignment issues come into play. Thanks for your response.
I might have bumped it without even realizing. It usually goes back to normal and it looks as if it moved/misaligned after the cut was made. I will check it again today, thanks!
Why not use the GF magic to stitch and skew-compensate a mosaic of bed pictures. If registration marks were implemented on the inside of the GF they could be referenced to provide a bed image that has provides a properly aligned preview.
We’d like to have you try a few troubleshooting steps for us:
Turn off your Glowforge.
Check for small pieces of debris or dust.
Check the lower door to make sure it closes all the way. It may require some force to open, but open it, wipe any dust off the edges, and close it all the way.
Remove the tray and clean any dust or debris from the surface underneath. Pay careful attention to remove all debris from the four dimples where the tray rests.
Check the lid to make sure it closes all the way. Small particles of material, such as dust or debris, can prevent it from closing completely.
Check the surface your Glowforge is on to make sure it’s flat. Ensure it is not twisted slightly and that there is no debris propping up one side of the machine.
Turn your Glowforge back on.
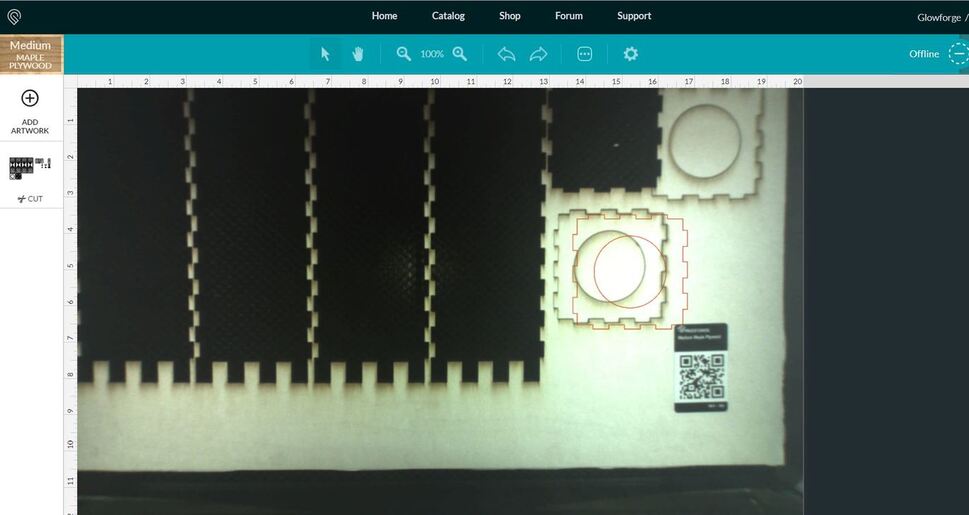
We included an extra piece of Proofgrade Draftboard with your materials shipment for troubleshooting. Place the Proofgrade Draftboard in the center of the bed and print the Gift of Good Measure using the default settings.
When the print finishes, leave the lid closed and wait until the fans stop and the picture updates. Without moving your artwork or your material, take a screenshot of the Workspace to show us the difference between the artwork placement and the actual print placement. Make sure to include the rulers in your screenshot and show as much of the bed as possible.
Mac: Press Shift-Command-4 and click and drag a box around your image. You’ll find the screenshot file saved on your desktop.
Windows: Click on the Start Menu and type “snipping tool”. Open the Snipping Tool > New then click and drag a box around your image. Click the Save icon and name and save your file.
Send us the screenshot along with the date and time of the print, and we’ll investigate.
It’s been a little while since I’ve seen any replies on this thread, so I’m going to close it. If you still need help with this, please either start a new thread or email support@glowforge.com.