Background. Cleaned everything - all fans, rails, crumb tray, lens, mirror etc.
Never before have I taken the belt off, used an Alan key and removed. Easy peasy. Put back on and belt was loose. Oddly machine worked well. Then decided to get it tightened up. Put right hand side pulley wheel back on first and then belt the way I always had before. Belt now feels right, like it should. Not loose.
Problem. On occasion now maybe 1 in 8 uses the alignment is off. To the left a bit. Cut a monogram and it squished the left side of the letter as if the design was pushed inward and now when I print a row of items it is all shift to the left and sometimes the design itself is split in 2 and part of it shifted. or the design looks on the screen as it it will fit the material then it is shifted.
Support will be along soon, but just an FYI, you don’t need to loosen the pulley to take the belt off for cleaning. Just follow the instructions on the support site.
I hadn’t done it this way up until this time. I’ve struggled to get the belt back on and it looked like it would be easier. Possibly I went too far to the right and it’s too tight. Thanks geek2nurse
First, could you confirm which one of your machines is experiencing this trouble? Could you please confirm the serial number of your unit for me? The serial number can be found on the back of the Glowforge, printed on a sticker near the AC adapter on the right-hand side. It will look something like ABC-123-4.
If possible, could you include the approximate date and time of the “Made with Love” print?
Next, I’d like to have you perform a specific test for us to investigate further. This test will allow us to review the precise variance your Glowforge is experiencing.
Turn off your Glowforge.
Check for small pieces of debris or dust.
Check the lower door to make sure it closes all the way. It may require some force to open, but open it, wipe any dust off the edges, and close it all the way.
Remove the tray and clean any dust or debris from the surface underneath. Pay careful attention to remove all debris from the four dimples where the tray rests.
Check the lid to make sure it closes all the way. Small particles of material, such as dust or debris, can prevent it from closing completely.
Check the surface your Glowforge is on to make sure it’s flat. Ensure it is not twisted slightly and that there is no debris propping up one side of the machine.
Turn your Glowforge back on.
Place the Proofgrade Draftboard in the center of the bed and print the Gift of Good Measure using the default settings.
When the print finishes, leave the lid closed and wait until the fans stop and the picture updates. Without moving your artwork or your material, take a screenshot of the Workspace to show us the difference between the artwork placement and the actual print placement. Make sure to include the rulers in your screenshot and show as much of the bed as possible.
Mac: Press Shift-Command-4 and click and drag a box around your image. You’ll find the screenshot file saved on your desktop.
Windows: Click on the Start Menu and type “snipping tool”. Open the Snipping Tool > New then click and drag a box around your image. Click the Save icon and name and save your file.
Send us the screenshot along with the date and time of the print, and we’ll investigate.
My machine did it again this morning at 8:41 am (EST) I was printing "knit tags and you will be able to see from the photos the design split, it keeps going and is cutting fine. Notice the C is Cassandra, it splits…
Thank you for taking the time to work through those instructions, and for sending over the photos my colleague @jeremyh inquired about.
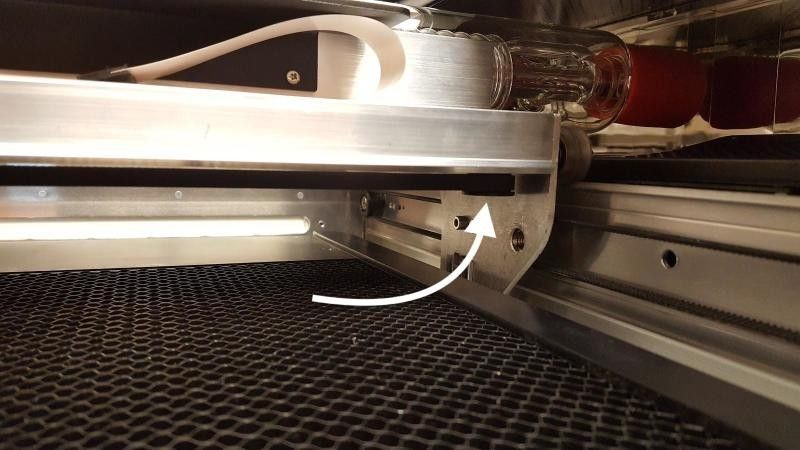
Based on the resent trouble you experienced with your print, this can sometimes occur if the belt underneath the laser arm slips while printing. I’d like to take a look at a photo of the belt and pulley assembly to make sure everything is correct. Could you please send us a photo of the pulley under the laser arm, like the example below?
Thank you for posting those photos. I apologize for the slow reply.
I can see that the plastic piece of the pulley is damaged and has slid down exposing the metal bearing. This is the likely source of the trouble you’ve been experiencing.
I’ve just sent you an email with the next steps to order a replacement pulley. We’ll continue to work on this with you there, so this post will be closed.