Just ran a test since the alignment update was rolled out and… still unimpressed. I would hope there could be some sort of way to get the laser to “print” a file like this and make adjustments accordingly. Until this is figured out, I don’t see how one can make much use of the expansion slots, as aligning cuts accurately is currently impossible.
2 Likes
My understanding is that pass thru alignment of material was never intended to be done with the lid camera. The head camera, though used for focusing, has not yet been enabled for precision material alignment.
4 Likes
Ah. Thank you. Looking forward to that. Ok, let’s leave that issue aside and wonder aloud if there could be some better way to calibrate individual cameras using a pre-set file like this for the laser to etch in a piece of paper and then compare reality to what is shown on-screen, and warp and shift accordingly…?
2 Likes
Seems reasonable. Such a procedure has been discussed at length before. We know they are still working to improve the alignment but have no idea what they are planning.
BTW: a small amount of alignment error can be worsened or improved by adjusting (slight shimming) corners of the GF. Few of us have truly flat surfaces. A wood desk is rarely flat. Don’t shim so much as to mess with the lid flush fit.
8 Likes
Good advice, I’ll toy with that, thanks!
1 Like
Usually just a small amount of correction but every bit helps.
2 Likes
Just out of curiosity, what are you using for material height? Standard copy paper is only going to be 3-4 thousandths thick. I believe the minimum material height the UI currently accepts is .01”.
1 Like
when you’re shimming, are you shimming to make the crumb tray/bed level? the sides/back of the unit level? or the lid level? or is it just trying to get all of those as close to level as possible? i’ve put the level in multiple places across the top of mine and the sides/back are in slightly different level than the lid. both are very close to level, but out slightly differently.
In theory the level shouldn’t matter. Just flatness. But I was ignoring flatness and adjusting here and there to put my preview image closer to where the cut line appears. Minor adjustments only. And it matters a great deal that you have the correct material thickness to judge by the preview image.
You can tell the UI to retake the bed image by selecting the little gear icon.
2 Likes
Yeah, I was using the minimum input of .01. Should be close enough to not be accurate in some areas and inaccurate in others. The non-level bed seems like it might be the worst culprit here, I’ve noticed the body of the glowforge allows for far too much flex (which is obvious when it’s really out of flat and the lid sticks, which I do shim a little to adjust)
I’m sorry it took me so long to reply!
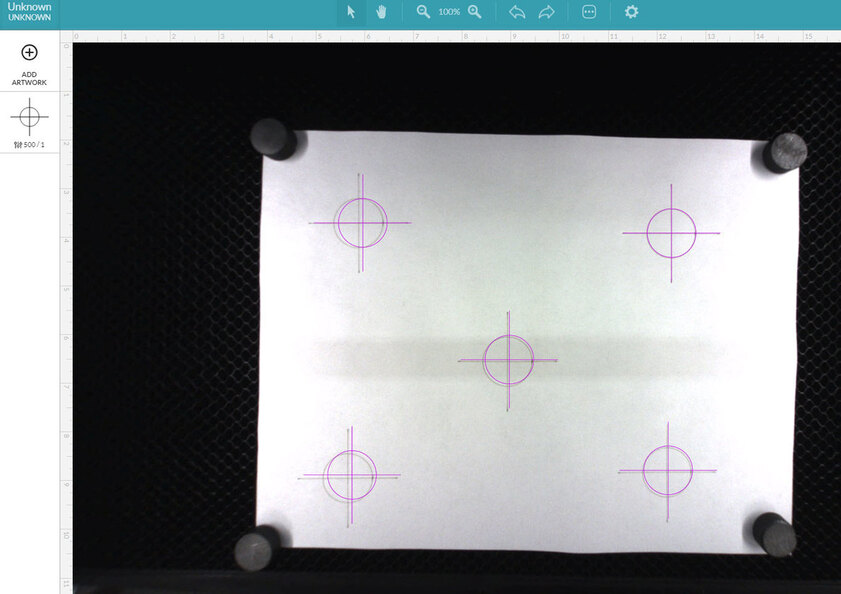
The software on your Glowforge is responsible for ensuring that the print lands on the material in the same place as the preview. When you’re done with a print, let a new image load. If the print appears on screen far from where it was supposed to go, you may have an alignment problem.
Most alignment problems come from the material being closer or farther from the camera than expected. While the software is still improving, you can take these steps for the most accurate alignment results:
- Use Proofgrade™ materials.
- If you don’t use Proofgrade materials, use a precision set of calipers to measure your material, and enter the thickness in the “uncertified materials” dialog.
- Use material that is not warped or tilted.
- Place your design near the center of the bed.
- Clean the area underneath your crumb tray, particularly the four indentations on the floor.
- Reboot the machine. Alignment can drift over time, particularly if you bump the head of your Glowforge while removing material.
Should you finish all of these steps, and find that you have an alignment error of more than 1/4", please contact us so we can investigate.
Thanks for your suggestions. I’ll share them with the rest of the team.
Yeah… I was excited to hear about the alignment improvements in the December update. So far, I haven’t seen anything to indicate that it has actually improved. All updates should have rolled out to all machines, right?
Proofgrade materials, no schmutz under the feet, etc.
Thanks for letting us know, @publicsculpture. I’m sorry it took us so long to get back to you.
Could you please do the following?
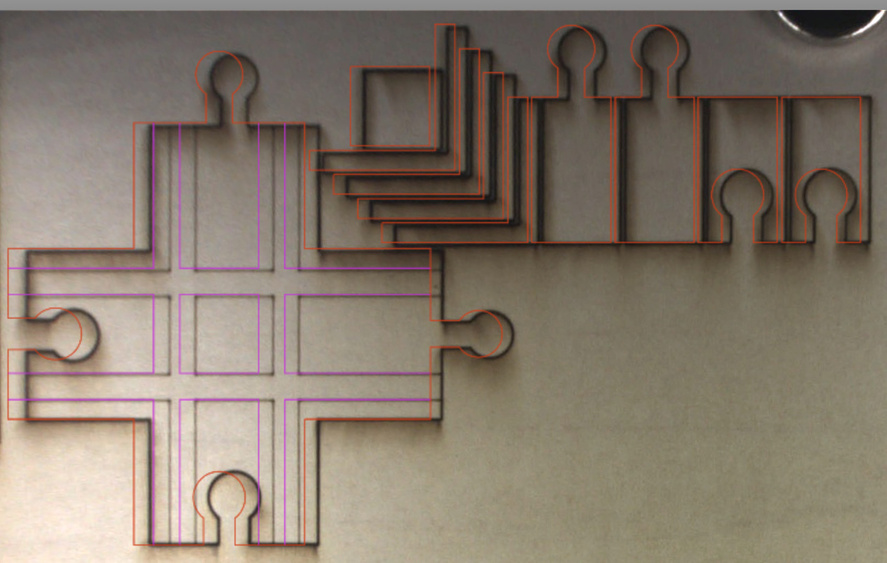
- We included an extra piece of Proofgrade Draftboard with your materials shipment for troubleshooting. Place the Proofgrade Draftboard in the center of the bed and print the Gift of Good Measure using the default settings
- Take a screenshot
-
- Mac: Press Shift-Command-4 and click and drag a box around your image. You’ll find the screenshot file saved on your desktop.
-
- Windows: Click on the Start Menu and search for the Snipping Tool. Open the Snipping Tool > New then click and drag a box around your image. Click the Save icon and name and save your file.
-
- When the print finishes, without moving your artwork or your material, take a screenshot of the workspace to show us the difference between the artwork placement and the actual print placement. Make sure to include the rulers in your screenshot and show as much of the bed as possible.
- Send us the screenshot along with the date and time of the print
Thank you in advance!
Sorry @vee , just saw this. It’s doing better now. I think the crumb tray had somehow ridden out of the grooves on just one side. For future designs, I’d suggest a more “positive” lock when the crumb tray is in the right position. It seems too easy to knock out of whack. Thanks for responding.
2 Likes
Thanks for following up to let me know! That’s good to hear. And thanks for your feedback - I’ll pass that on to the team.
I’m going to close this thread - if the problem reoccurs, go ahead and post a new topic. Happy printing!