My recent cuts on PG maple plywood have not been cutting all the way through on the first try (when using PG settings). I decided today to do all the troubleshooting, including a test cut on the draftboard.
all materials held down by multiple neo magnets, so warp should not be a factor
crumb tray removed, divots cleaned, tray replaced and level
all lenses cleaned per guide instructions
Just tried again on draftboard at 5:35 EST without success.
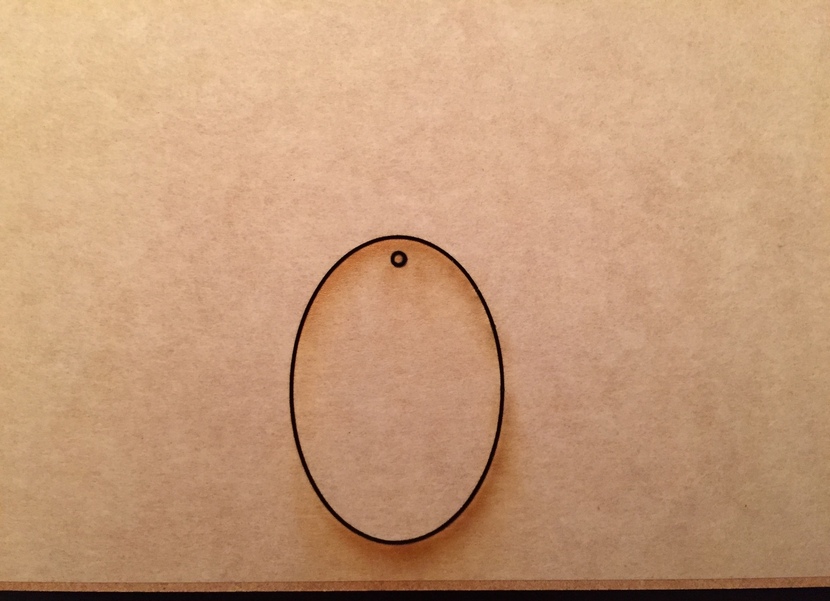
Item being cut was a simple oval, nothing fancy.
Did I miss anything? Has something changed that I’m not aware of?
I am having the same problem . While Cleaning the Laser I noticed excessive play in the mount and that the wheels (bearings) they allow the laser cut head to travel right or left where sloppy and that the cap head Allen bolts on the the two front Wheels had worked loose tightening those up has removed the slop doing a test cut now to see if this fixed the problem… I would have thought they would had put lock tight on those bolts.
I extracted the logs to investigate the problem you reported and there appears to be a problem with the auto-focus. I’d like to see what the bottom of your print head looks like.
Please remove the print head as described in step 1 of the cleaning guide.
Do you notice anything dirty or damaged with the print head camera or red laser diode?
Please take some pictures of the bottom of your print head and post them here, or send them in to support@glowforge.com.
I took off the print head and noticed that the two windows on either side of the lens looked cloudy - I guess I didn’t notice them before & I didn’t see them referenced in the cleaning guide. I wiped them with a Zeiss wipe and just ran the same test oval - success!
Maybe add cleaning these windows to the guide?
Thanks for your responses - I think everything is back to normal now.
I think that’s #6 on the instructions provided above:
Inspect the Head Window and the Laser Window
Check the windows for damage. You can find one window on the left side of the printer head, and another just over the left rail. Shining a bright flashlight at an angle onto the window may help you to see more clearly.
If you see damage, write support.
Otherwise, wipe the window clean with a Zeiss wipe.
Guess I’m confused. The head has a Head Window (which is on the left side of the head when installed), then bounces off a mirror (that’s installed/accessible under the magnetic top), then goes through the lens which is in the bottom of the head.
The two windows here (on either side of the lens) are the ones that were cloudy - cleaning them is the only thing I did differently between the unsuccessful cut and the successful cut. Not sure of their function - but apparently it’s important for them to be clean!
I’m glad you resolved it! I’m going to close this thread - if the problem reoccurs, go ahead and post a new topic. Thanks for letting us know about this!

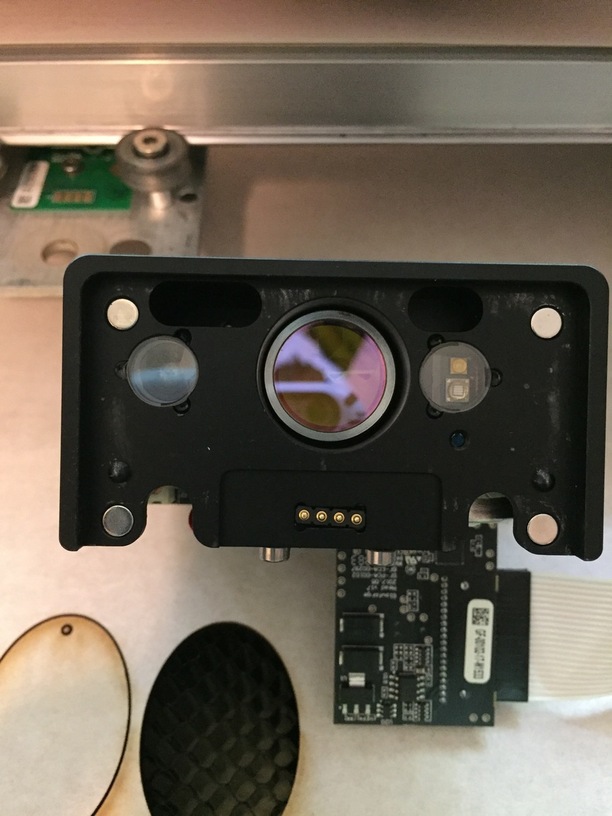
 (picture is worth a thousand words! I believe one shoots the red beam out and the other is the head camera.