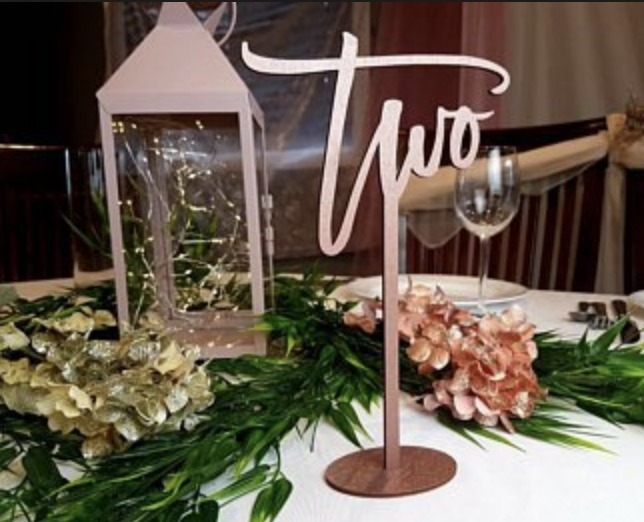
I am looking for some one with the no how on how to make a set of wedding table numbers for me with bases , similar to the one in the photo. I just cannot seem to figure out the right dimensions for the base  I will buy the files if some one can create them? I would love the number as shown in the photo and then the numbers done in a script font spelt out. Any one that could help i would love to be able to do these
  I have googled and googled but no luck
8 Likes
How much time do you have?
This is a really simple thing to make, and I m sure you could learn to do it within a few hours with the right nudge.
Your problem is that time isn’t elastic, if you’re really pressed, then yeah I’d say hire it out. But if you have few days, I’m sure you cold get this done in no time.
I’ll post a very simple workflow next.
7 Likes
OK so the basic steps:
Get inkscape (or use whatever else you like)
Draw a long skinny rectangle as your vertical riser (draw it exactly to scale), set it to the side.
Use the text tool to type the word “One”. Select the font to be your cursive script, there are lots of cursive fonts out there. I’d say use the font explorer (linked below) that I’ve posted many times to see what you already have, and if none of them work, just google cursive font, you’ll find one.
Now that you have your text in the font you want, scale it up to be the size you want, keeping the maximum glowforgeable area in mind.
Now convert the text object to outlines. Use “object to path”. This will give you a grouped cluster of letter objects.
Ungroup the letters. Now you have a bunch of separate letter path objects.
Select the letters, and choose Path->union. This will make them one merged path. Tahdah, now you have your word as one cuttable object.
Copy and paste the skinny rectangle from before. Align this new copy with your word object. Do the path->union trick to join them too.
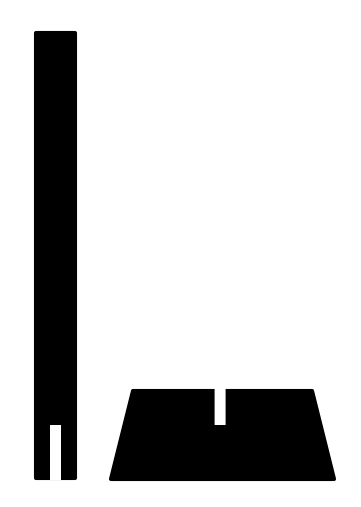
Now you have a T-shaped word upright You just need to make your base.
Draw a circle (or whatever shape base you want) at the size you want. Draw a rectangle that’s as wide as your vertical riser and as tall as your material is thick. To make this a snug fit, I’d say back off the both width and height by about 0.005". This will make it fit securely.
These will be handled (moved around on the table and transported), so assemble the base to the vertical element with wood glue holding it in place.
That’s it. Writing this up took longer than it would to actually make it. The first couple will probably be fairly slow, but you’ll speed up.
Things to consider:
Materials: Stick with plywoods, they’ll be much stronger with your delicate font parts.
Dimensions: be careful, don’t make skinny pieces much smaller than about 0.05" (0.1", even better) thick… they’ll be too likely to snap accidentally, and you wont have time to fix them n the big day.
Font explorer link:
12 Likes
As far as the slot fit? You’ll need a pair of calipers. Measure the absolute material thickness. For example, .1875”. You’ll then make a rectangle in the base that is .1875” by X — X will just be whatever you want the rest of the slot size to be. It could be .1875” also, which would be square. Or, widen it a bit, say to .219” (this is using the “golden ratio” - that would make your support a rectangle. And the golden ratio might make it nice proportionally.
I would start with those figures. Cut a base, cut a small support stand (say an inch tall) and just check your fit. It may need to be kerf corrected because of the thinner base, but perhaps not. The slotted stuff I’ve done has worked well without kerf correction.
6 Likes
Thank you for taking the time to write this ! Time is on my side so no hurry . I was able to try this but it was not a perfect fit  Would you be willing to make a little video ? I could pay you for that , i learn by site a lot better , sad to say ?
Hi  are these numbers your giving me actual ones I can enter into adobe illustrator? I cannot for the life of me get the numbers right for the base.
You can definitely put them straight into Illustrator. But, they were just examples.
You’ll really need a pair of calipers to measure the thickness though, since the slot will need to match the thickness in one direction.
If you don’t have calipers but are using Proofgrade, someone can probably post up exact thickness of the material you’re working with and it should be really close.
I have learned the hard way that even proofgrade can vary sheet to sheet enough to mess up a snug fit. Quick solution – make a tester piece with a few different tries at base hole size and test a stand from each sheet of material. Then make the bases using the dimensions you found work best.
Another variation on stand design is more robust to small variations in material thickness and provide more surface area for a friction fit. This generates an X-shaped base and uses slots that are the material thickness.
2 Likes

I like that idea . Is that easier? I tried to do the circle base but some where un even and more wobbly. Maybe I made the tabs attached to the numbers different
Thanks you guys. Ok so these slits that are showing i need to make them the material width ? I am using 1/4 birch plywood ?
This is where the calipers come in. Nominal thickness isn’t actual thickness.
The chances of your wood being .250” (1/4”) are very slim. I’ve seen wood sold as quarter inch range from .18” to .250”.
Proofgrade will vary also by a small amount. A little glue in the slots is what I would recommend either way.
Agreed! Calipers are really the best way to do this, but even without, if someone posts their PG thickness for the material, you should be able to find the tight fit with just a couple of test cuts/slot size modifications.
1 Like
In the event the OP doesn’t have a sweet cursive font, these two sites are my go-tos.
Medusa Story is a thick one or Shafeer is a thinner one or Novia is in between.
Also a huge repository.
Most all are free. Creative Fabrica has a bunch as well but they’re chargeable except when the font is being featured as a freebie.
1 Like
Thanks I have my fonts picked out , I just don’t know how to make the stands
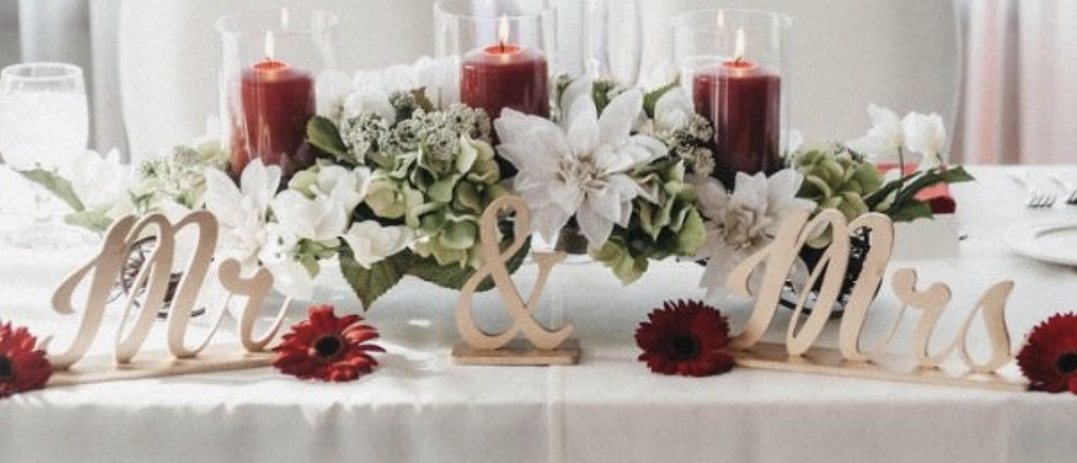
The couple also wants something like this Mr & Mrs . I have the letters cut out but is this glued to a base or the tabs as well? My next quest is would making circle tabs be easier ?
3 Likes
Tabs on those would be the way to go
1 Like
This topic was automatically closed 32 days after the last reply. New replies are no longer allowed.