Ask and You Shall Receive

In our home, we don’t have a lot space, but we do have a lot of boxes :sweat_smile: (I’m a huge fan of Amazon Prime, especially considering the free shipping aspect, and my tendency to randomly buy something new every other day).

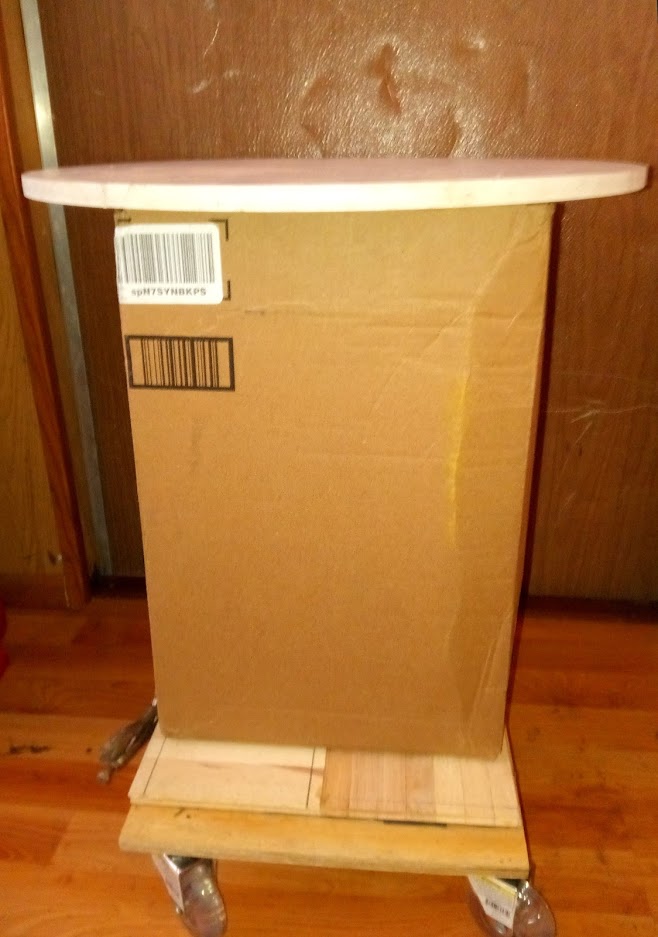
Anyway, our pile of boxes have continued to grow recently, some of which are large, and my stock of cardboard for laser cutting is sufficient enough that I’m not I’m the need of keeping these boxes. A little over a year ago I decided to use one of the boxes as a sort of side table by our TV temporarily… temporarily until today that is. Often my wife asked me to do something about it, but it never really mattered or bothered me enough to fix it, and in order to not use it as a side table, it would have to be replaced. Well, a month ago I ordered a large photo printer and didn’t want to throw the box away because it was nice double thick stuff (you can begin to see my laziness when it comes to deciding what to do with ordered boxes).

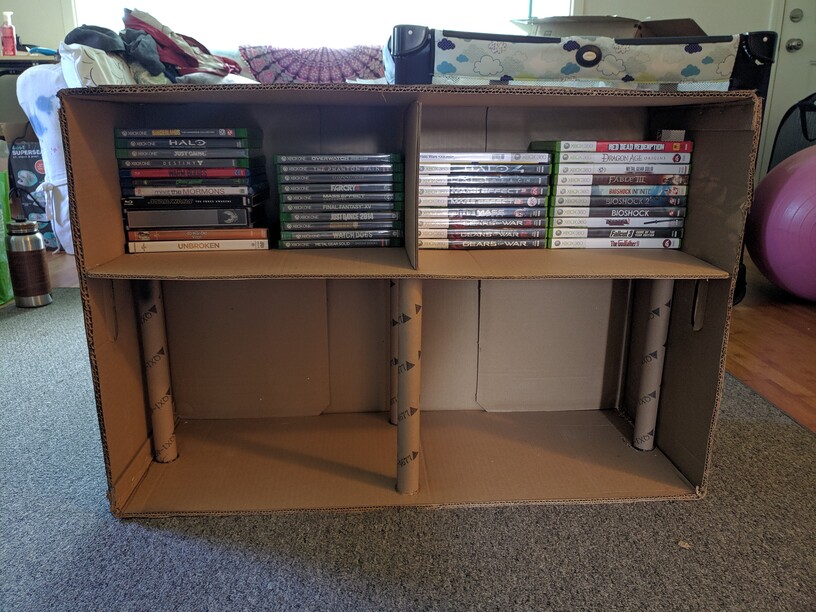
I was finally sick of how much space that box and others were taking up, and when I thought about what to do with it, it occurred to me that it could be useful in another way. It was going to replace the other box I had been using :rofl: It was such a nice box, and I really didn’t want to break it down to go in our recycling can, nor did I want to chop it down into laserable size (because of laziness), so I had a vision on what it could look like as a little shelf. I couldn’t keep the box original, my wife definitely would have complained probably just as much if I did, so I gathered my primer and spray paint and blacked out the exterior. Hot glued some supports in, and put the pieces together.

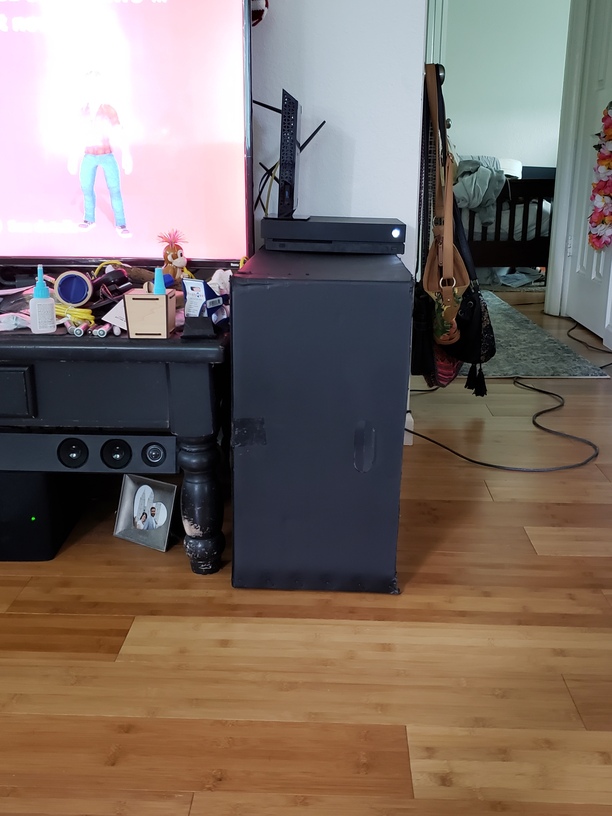
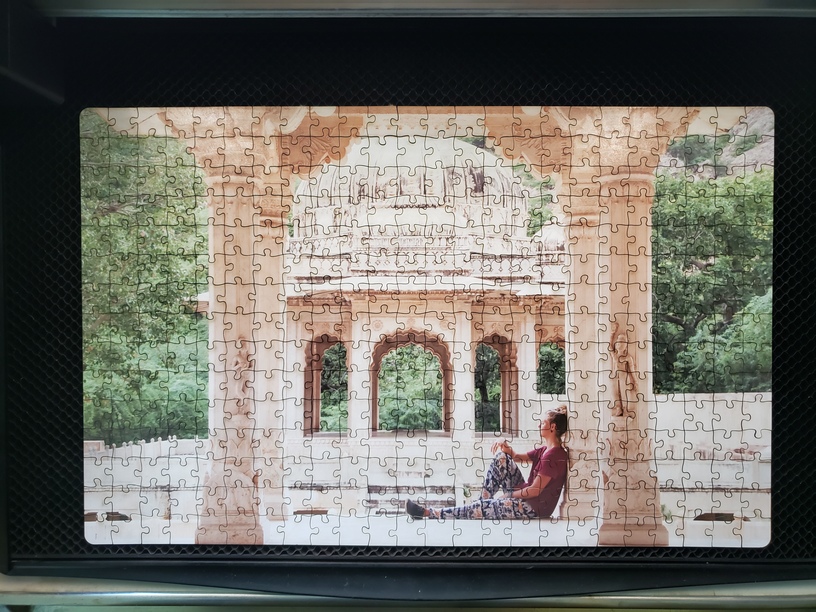
Anyway, we would probably still have the other “ugly box” there if not for the Glowforge, because I only bought the printer to laser cut photo puzzles, so I thought I’d throw this in the everything else category. My wife actually likes this a lot, so plus one to me!

15 Likes

Looking forward to seeing what you do with your printer and Glowforge combo.

Well here are a couple pictures for you!

18 Likes

Thank you.

I think you need to spray paint the inside of the box as well…
Speaking as a wife who would still see a cardboard box walking up to it.

1 Like

Well done! Love the puzzles! how did you get them to cut without smoke staining???

The trick is that it is opposite to a hallway wall, so unless you get down to it’s level, you can’t directly see into it :stuck_out_tongue_winking_eye:

Oh boy, well it took a lot of testing. It comes down to the thickness and density of the chipboard, and I found that multiple passes with different settings works the best. For example, I have two thicknesses of chipboard both labeled medium thickness, but my larger stuff is thinner by about .015", not as dense as the other stuff, and creates a decent flame when cut with the same settings I would use for the smaller boards.

That flame is what I was having trouble with, as it was burning the photo itself. I could get through in one pass, but it required more power, so I thought I could tweak the speed, but then it wouldn’t cut through if it went fast enough not to burn anything. If I used the full power of the laser, even if I found the right speed, the photo itself cracked from the stress That’s when I realized that if I kept the speed high, but divided the power into multiple passes, then I had better luck. So the first pass creates a channel, whereas the second one is the fine cut.

The puzzle of my friend leaning against a pillar actually took 3 passes, so I still need to mess with my settings a little bit more, because the thickness of the chipboard isn’t uniform. The laser was glad to cut through sections of the board, but others were still connected. The third pass left soot which smeared, so I’d rather not use the third pass if I don’t have to, it just comes down to the board. This highlights the importance of making sure not to move anything when seeing if it cut through
Jigs work wonderfully for that purpose, but I need more testing for those as well because it was creating a heat pocket in the top corner and burning the worst there, probably due to me leaving about an eighth of an inch between the outside cut and the jig, so I’ve used mine for placement, but then removed it before the cuts.

To go a little more in depth about thickness and density of the boards, my theory is that the thicker, denser stuff, absorbs more of the heat of the laser, distributing it rather than creating a hot spot. I’m able to use one pass on those with minimal smoke damage, but it’s been the larger puzzles that people have wanted, guess that just means I’ll have to keep testing until I find perfection :sob:

Regardless, I still get a small amount of residue on the photo on both, which is only a real problem when I’m working with whites; the darker photos tend to hide the crimes a little better. I also need to test a couple of different cleaning techniques to see what works the best.

5 Likes

Hah. This wife would say that if we can get a fancy laser and printer, we can get a piece of furniture to put them on! I do appreciate the ingenuity, though.

I do have to question if it’s actually less work to prime/spray paint and glue in supports vs. just cutting it up…

3 Likes

Shhh, I don’t want to think about any of those things you said :rofl: Both of those things occurred to me, but in looking at replacements and remembering that we are now earning a lot less income than before, the box shelf seemed great! Part of the reason I married my wife is her simplistic view on things - it’s usually me that wants the nice new stuff - evidenced by the fact that I bought a fancy laser and printer haha.

The paint was more fun, and I was able to get rid of paint that I’ve had for far too long :grin:

3 Likes

The fact that you and your wife are on the same page is all that matters! And trust me, I get the budget. We lived a long time with temporary furniture and we are slowly phasing it out. When I hit 40, I started to draw the line!

3 Likes

Back in our Air Force days when at times we spent months in temporary housing with most of our belongings in storage somewhere, I made a lot of furniture from cardboard moving boxes. :slight_smile:

4 Likes

I had similar issues that I needed a raised platform I could move about. Long ago with a table mill, a friend had cut out big circles and I got the scraps that was several foam PVC circles so I backed the box with a number of folded cardboard pieces to add extra strength and was even able to move the box with the Glowforge from that door to the middle of the house where it lives It also is used for various tabletop tools to use as and where needed.

IMG_20190217_101754

7 Likes

Recycling at it’s finest! We also need a some sort of coffee table, maybe I’ll get extra creative next week :rofl:

4 Likes

The hipsters call it “upcycling”… but yeah, creative use of what you got on hand to do what you need to do, right now. :slight_smile:

3 Likes

It’s always good to think outside the box.

4 Likes

Had to think inside as well . with so many vertical supports the table is much stronger than it appears.

4 Likes

I use a film over my puzzles before cutting. I think it’s a vinyl transfer film (the film isn’t vinyl). This requires me to weed each piece, but the image is always clean. More work on the backend, but I do my cuts in one pass.

2 Likes

I’ve considered masking them, but the weeding is off-putting. The puzzles I’ve been doing have been over 300 pieces, so taking the masking off individually would be pretty time consuming. The smoke on the pieces isn’t all that bad, just haven’t done any more testing to perfect it.

1 Like

I completely understand. A 200-300 piece puzzle can be time consuming to weed. I’ve been using Gorilla tape to help with that. Just throw a strip on it and peel the pieces from the tape instead of the other way around. Much easier. :wink:

1 Like

Genius! I may try adding masking, in that case. I haven’t used tape in a while because I use plastic razor blades to help with the weeding usually.

1 Like