I understand your desire to use the laser for marking a metal, but the industry standard of having the name incised (it’s usually “sand” blasted) into the stone is my first thought. There is the permanence of having it “chiseled in stone”. Nothing says more about enduring remembrance than having text gouged out of rock IMHO.
Although the use of mixed materials is appealing, I myself would probably slab the top of the basalt flat (I really like that choice of stone! It’s primordial, a dense igneous stone from the depths of our mother Earth), maybe at an angle, and maybe even polish that face, take it to a monument company to have it accomplished. It will take millions of years for stone to errode, nothing I can think of is more permanent than that.
If I was set on a metal embellishment Then I would reduce (melt) bronze and pour it into the bowl of the stone and have it deeply engraved, and use something like liquid nails to affix it.
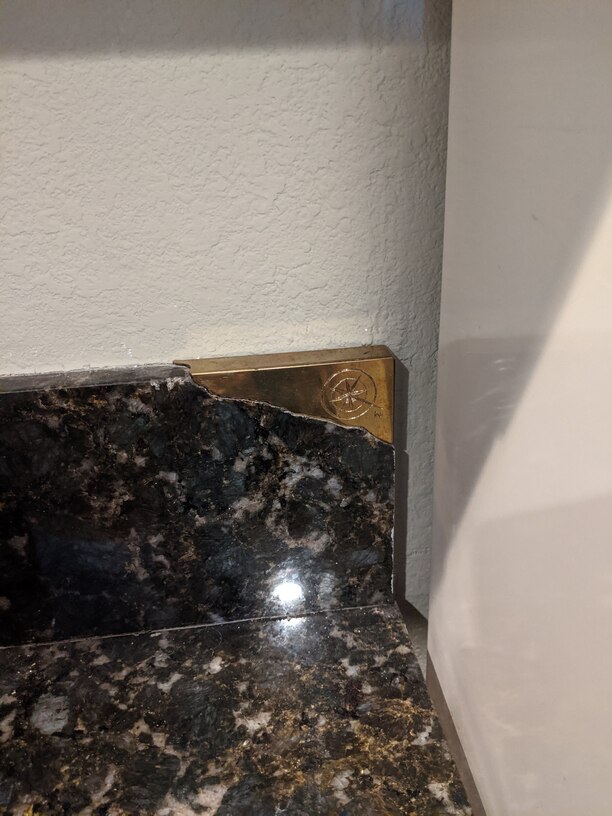
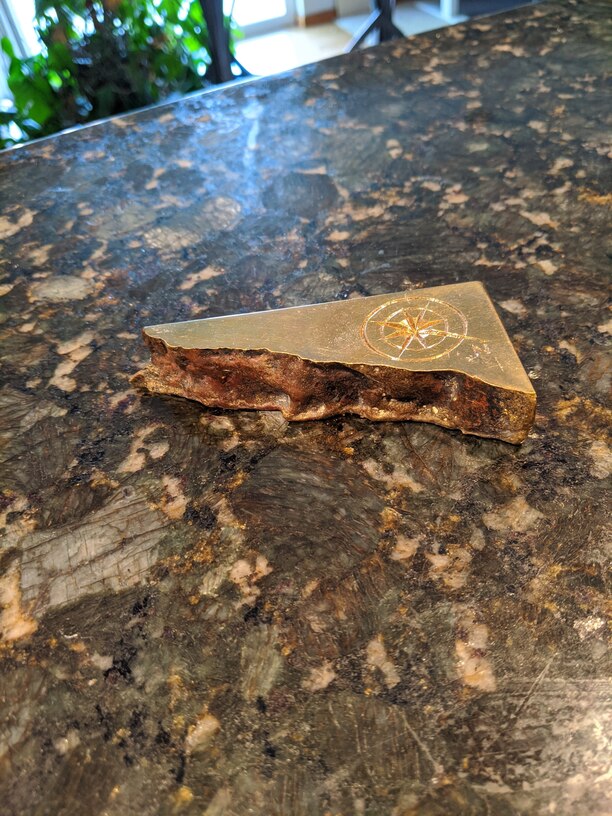
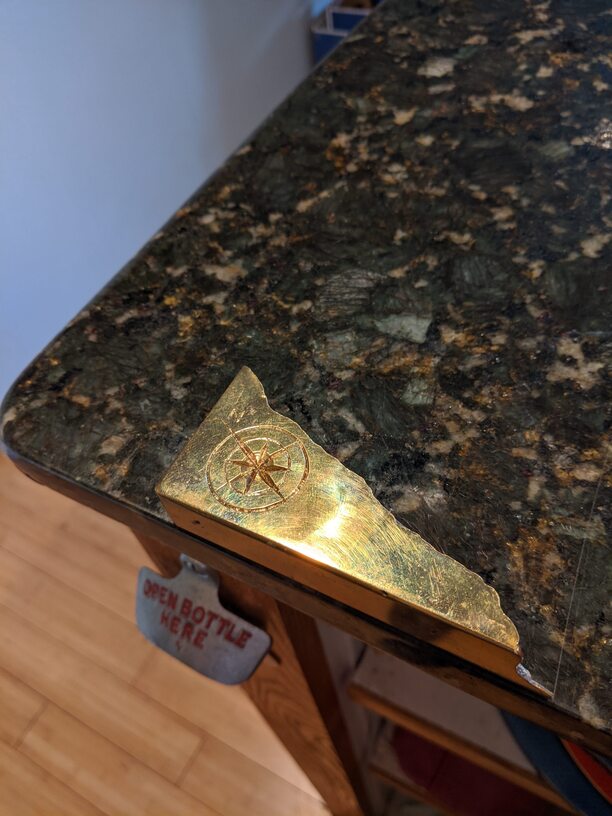
Wandering a bit from the topic, I installed Verde Butterfly granite on my bar and got a deal on a slab because it had a broken corner. I needed every inch of the length, and figured I would just cut a tile to fit the cut off break, but being me, I decided it presented an opportunity, and I really didn’t want to cut off the length that was perfect.
I formed it up so I could pour casting wax on the break which would perfectly conform to the irregularities of the fracture, and cast the wax burnout from a refractory mold in brass.
the topography of the break keyed the metal to the stone. It just sits there.
Trying to fit a deeper purpose to the crazy idea I hand engraved a primitive compass rose on it.
When lined up flush with the edge of the bartop it points true north. Kinda like something that was a clue in a treasure hunt.
I have known you long enough to recognize a creative spirit (otherwise you wouldn’t be here), and I’m quite sure whatever you decide on for the wonderful Idea of a tribute to your parents will be nothing short of marvelous.
My best advice is to not rush into it. let the idea stew, and at some point, it will be clear exactly what your heart is pointing you toward.
Sorry, but I’m going to require an image of the result!
17 Likes
I love what you did with that corner in brass on the granite. It reminds me a lot of the way Japanese craftsmen repair cracks in bowls with gold…making the repair part of the inherent beauty of the piece.
I do appreciate your suggestions, but I have my heart set on NOT chiseling (or engraving) text into a shiny type of stone…in fact, I don’t want anything that’s polished looking at all. The titanium which I’ve decided to use is the closest thing to shiny that will be used. Josh Kopel has given me some good information about using the titanium.
And apparently, unbeknownst to me, I have already take your advice on not rushing into it…it has now been 6 years since my mother passed and 5 since we interred both her and my dad’s ashes with a makeshift marker to commemorate them. I’ve had this same idea now for all that time and I’ve ‘stewed’ long enough (meaning basically I’ve been lazy about doing it).
And, you know me well, too…of course, I will post an image when I finally get it done. Thanks, David.
10 Likes
Gesundheit!
@Xabbess I am learning a lot from following this discussion. I am sure the final result will be very special, not just for the thought and effort, but because you are making it yourself.
3 Likes
Thank you…aside from the fact that it’s my own post, I’ve enjoyed learning lots of stuff, too. I’m going to a nearby town next week to see if I can find just the right piece of basalt to buy. That will really finally commit me to doing this project and I will update here as it progresses.
7 Likes
Just this afternoon bought the basalt ‘bowl’ for the marker. Now on to working on the Titanium. Updates and photos to follow.
10 Likes
Update…
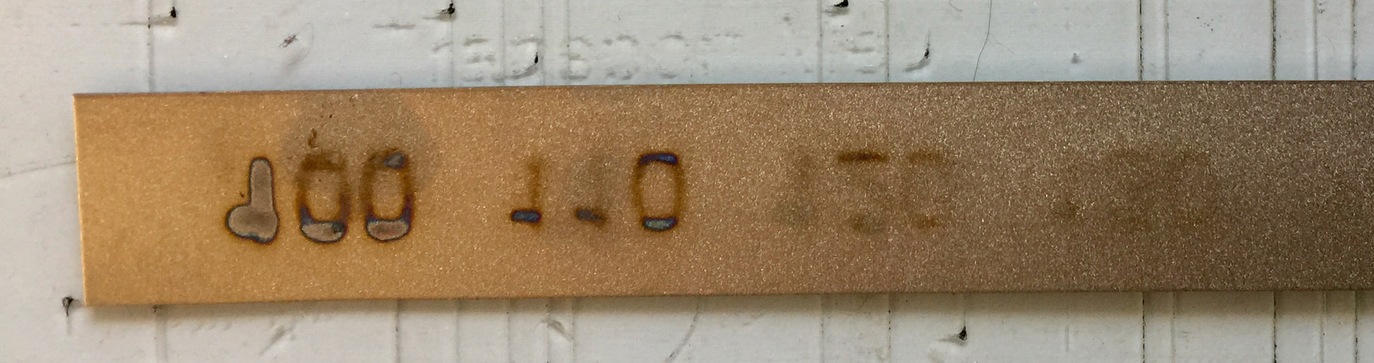
Testing on engraving Titanium.
There’s some type of medium that can be purchased to bring out the ‘rainbow effect’ on Titanium, but it’s sold in a large quantity and was expensive. My project is so small it wouldn’t have warranted buying any.
The numbers are the speeds starting at the lowest possible, at full power, and 270 LPI
At the lowest speed, it also did something to the back……
These are the closeups….they only look blue because of the LED light that I was using to take the photo. (The 100 speed looks like embroidery)
They become more pale as the speed increases………
(sorry this one’s blurry)….and although more pale, you can actually see the rainbow effect starting to show. I may try one of these last ones at two passes to see what happens.
As far as readability goes, my vote goes to 130 - 140 in the first photo.
Any thoughts / ideas are welcome.
8 Likes
What’s the thickness of this strip?
This was an engrave, not score, right? The “130” looks like a score.
1 Like
I forgot to mention that…26 ga…using my calipers .0405". Not scored but engraved
1 Like
Very strange how that one produced an “outline” - or is it just a trick of the light?
1 Like
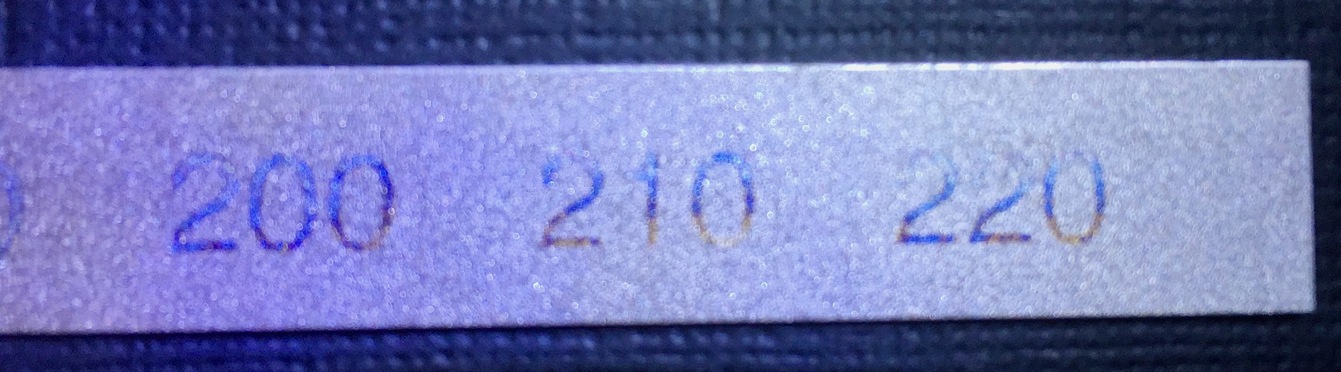
Last test for today…
.
200, 210, 220 on the right were same settings as above, but 2 passes. The 200 looked very good, so thought I’d up it to 3 passes…the one far left…doesn’t look even as good. No rainbow effect at all either, though. Sort of odd and different outcomes.
1 Like
No light tricks…it does look like it’s outlined. Looks pretty cool in the photo, but not so much in real life.
1 Like
The 200 2 passes looks good. How’s it look vs the 140/150 single pass? Those looked good in the first set of pictures.
Try heating it from the back with a propane torch. I’m wondering it that will colorize it like it does steel.
3 Likes
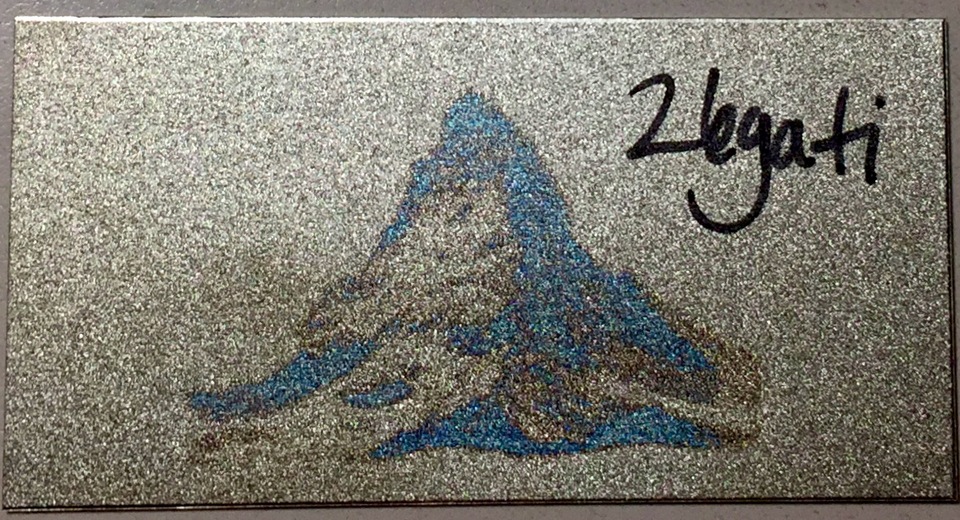
Well, this has been like eating peanuts. I couldn’t stop. After testing text/numbers, I needed to test an image. This tickles me beyond belief…this 1" Matterhorn…brought out the colors with 1 pass. Thinking that more must be better, I did two passes…pretty unremarkable. There’s something about not all the speed and power in the world bringing the best out in Titanium. That’s a scientific theory, you know…ha ha!
one pass
two passes
3 Likes
The 130 & 140 are comparable to that 200 2 pass one…so seems like no need to do the extra time. I have a little culinary torch is all…do you think that might work? And at what point do you heat it?
It might. It’s basically the same thing (butane instead of propane). I have no idea what it will do but on steel you can get all sorts of colors by “painting” it with a torch - how long you leave the torch in place is what dictates the colors.
If it works you might try your laser engrave tests again post-torching.
You’re heading down a rabbit hole 
4 Likes
OK…I will try that. Just have to figure out what to lay the Ti on to hit it with that much heat…maybe the crumb tray…or no?
I’d do it on a brick or a rock. Could use a 2x4 even just so long as you don’t let it get cherry red. Experiment with it. You don’t need to make the metal glow. It really is like painting with the torch.
5 Likes
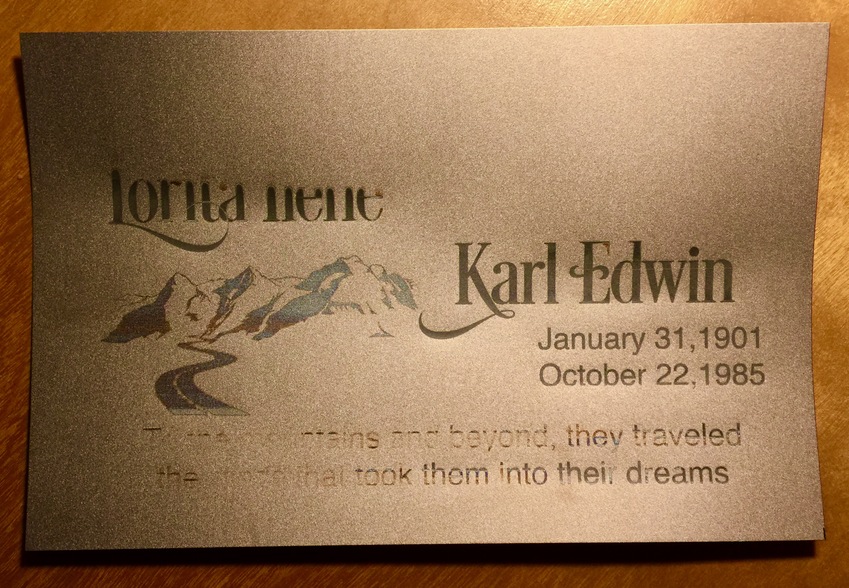
Ongoing saga…and I could use some suggestions. I did copious testing and thought I had all the engrave settings dialed in for the titanium. @jamesdhatch mentioned that the Ti might warp when under the laser…which it does. He also said not to worry about it too much since my plan is to form it into the stone basin, anyway…so I didn’t. When the engraving began on the bottom of the piece, it began to curve upward and many parts of the text were missed completely or very pale compared to the rest.
Center…the image and one of the names engraved just beautifully. Then…heading up to the top of the piece, text began missing again and the top part was curved slightly upward. I finally stopped it 3 hours into a 4 hour run.
My theory is that the warping messed with the focus. Does that sound feasible? I put the sheet on my Seklema mat, but it wasn’t strong enough to hold the sheet flat.
A few different thoughts on a resolution to this;
• Try to stagger the places to be engraved
• Use my bigger magnets to try to hold it flat
• Engrave the center parts, (ignore the rest), refocus on the bottom and engrave
then refocus again and engrave the top.
Help! Would love to hear from anyone who can help me with this thought process.
Would it be possible to make a frame around the piece that is secured to the honeycomb tray. As you discovered, the Seklema mat is not strong enough, and I worry about how many magnets would be required to hold it down. With a frame holding it down, you could do a section at a time and refocus as you have suggested. If a frame won’t work, perhaps sandwiching the metal in between two clamped pieces of wood could hold it flat enough. The parts that engraved look terrific, but watching 3 hours of work start to fail has got to be painful.
5 Likes