There have been a slew of tickets opened in Problems & Support regarding designs (both GF- and user-supplied) “disappearing” from the GFUI (app.glowforge.com). In many cases, the root cause has been the unintentional deletion of design elements while “clearing” the app for a new print.
The problematic workflow seems to be:
- Open existing design (or create new one and import artwork)
- Edit placement and settings
- Iterate through 2 & 3 until perfection is achieved
- Prep for next job by selecting and deleting all elements in the app window
- Rinse, repeat.
As many folks have discovered, Step 5 above is not the optimal way to prep for the next job. Why not? Because it actually deletes the objects from the autosaved instance. I’m not prepared to argue the pros and cons of autosave (I’m definitely in favor of it, though  ) – my hope is to share a practical approach that keeps your design files intact.
Here’s what works for me (YMMV, of course):
- Open existing design (or create new one and import artwork)
- Edit placement and settings
- Iterate through 2 & 3 until perfection is achieved
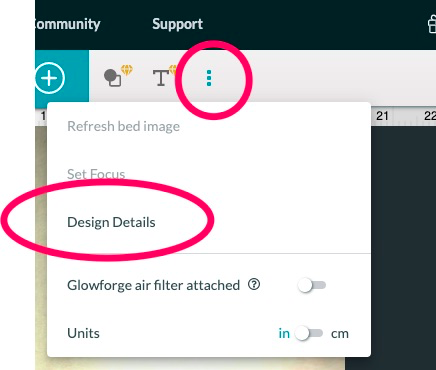
- Prep for next job by clicking the black
 icon or Home in the app window
 - Rinse, repeat.
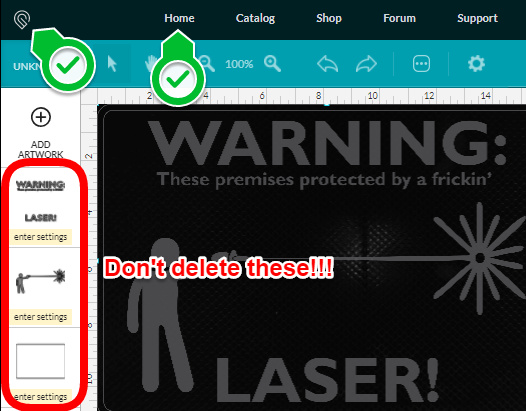
Here’s an example where I’ve loaded one of my designs. To move on to the next job, I’d either click the icon or “Home.” If I delete the design elements, they are removed from my GF library until I manually reload the file “from scratch.”
If I delete one of the free designs, e.g. the Founder’s Ruler, the only way (at this time) to recover that fileis to email Support. Again, I’m not arguing pros & cons, I’m just saying how it works. 
To be honest, here’s the way I thought this through…
When I’m editing a Word document, I don’t delete all the text to start a new one – I save my work, then use File|New. Same in Excel, etc.
When editing a design in AI, AD, Inkscape, F360, etc., I’d never simply clear all the elements and start a new drawing – I save my work and open a new, blank design file.
Likewise, when I’m finished working on a design in the GFUI, I click on the icon or Home to start a new job (autosave already took care of saving it for me  ).
).
In many cases, users have deleted elements that they didn’t want to print during the current job. Instead of deleting them, I park them just outside the allowable cutting/engraving zone, as shown below:
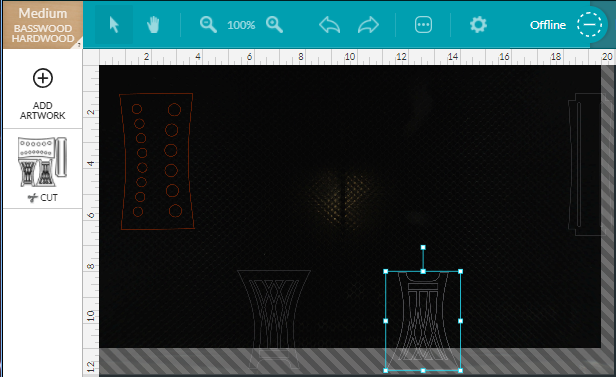
In this case, the red piece will be cut, but the three grey pieces won’t, because they are slightly out-of-bounds. If I later want to print those pieces, I just move them back in-bounds.
I hope this helps!