I received my Glowforge today and I’m positively bursting with the possibilities it presents for projects, household solutions, and the interoperabilities t will have in making things with my existing 3D Printer and the other tools in my workshop!
That said, I’ve spent the evening using a piece of Proofgrade Medium Draftboard and the laser will engrave just fine, but won’t get anywhere close to cutting through it with the presets. I’ve actually had to go into the custom settings and set it to make three passes to get through (and even still, the paper on the back is intermittently intact).
I’ve followed the instructions in other threads, using a Zeiss Lens Wipe to clean the optics and mirror and making sure that my bed is in the grooves at the bottom.
I’d love to know what I’m doing wrong so the device works right with its correct settings. Help me, Glowforge Community, you’re my only hope!
Few questions:
Have you run the ‘Gift of Good Measure’ and what happened?
Have you run the calibration?
Have you tried the new set focus which is located under the gear?
Thanks for the quick reply! I have run multiple copies of the gift of good measure. Actually, I have run four of them so far, with two failing because it did not get through with one or two passes on the cut. Number three succeeded, but only after I finally reached three passes and it broke through. Number four succeeded in the same way.
I admit that I have not run calibration or tried the new set focus option. I went back through the onscreen setup guide and didn’t see anything about calibration. I will look into that immediately.
One thing you might want to check is to remove the white ribbon cable and check the pins and connection there. Some instructions for how to go about that are here:
Another thing to check is the mirror orientation, and check the lens to make sure it is inserted in the correct orientation.
Checking the lens orientation:
Go through those checks and if you find anything out of whack let the support team know so they can tell you what to do next.
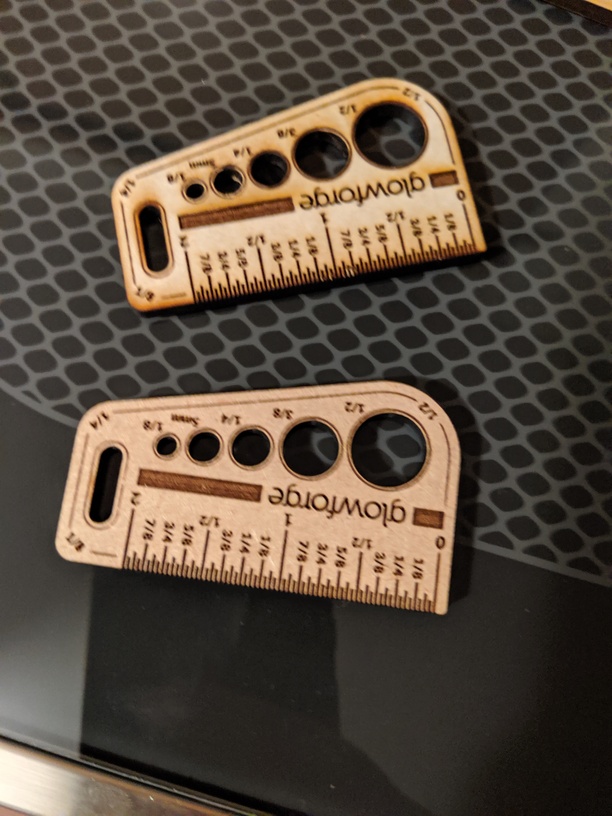
Bottom one took three cutting passes to cut through. The top one had 3 passes, but one sent one at a time so I could check it in between them to see if it had gone through (hence the bit of discoloration on the edges)
An update, I’ve tried the set focus feature and it didn’t help. Still took three passes to cut through. As for calibration, I don’t see it in the menu of the cut app. Am I missing it somewhere?
I’ve examined the ribbon and all 20 pins look fine from both sides. I can also confirm that my mirror is in the correct orientation, my lens is the right way up, and my optics all remain clean and free of blemishes.
Sorry you are still having trouble. Hoping GF support will pipe in here soon if some of us don’t get you sorted out.
Have you taken your lens out and checked it carefully, making sure it was on the right way and reseated it? Make sure you follow the instructions that @Jules gave you above. She is MUCH more knowledgable then me.
We were typing at the same time. The lens is what I was thinking at this point. Honestly, I have only had mine about 3 months now myself. I just read everything I possibly can, so was just trying to help out.
Thanks anyway for the assistance! To make things even more wonky, I just tried cutting a different pattern from the store (the medal) and it cut through on a single pass. Then I did the metric measuring tool… Took more than 1 again.
I’m considering an exorcist as I wait to talk to support. Is this thing rated to handle holy water?
Might try clicking the … menu and then Reset Design. If anything got changed around, that will reset to original. Just from looking at your pics above, I can tell you the lens isn’t in backwards. It would be much more out of focus if it were.
I assume the tray is in and seated correctly - it should lock into the divots pretty well. And the honeycomb should go all the way to the front of the machine - the plastic tray to the back. And the material should be sitting on the tray - not propped up on the edge or anything.
I’m so sorry for the challenging start! Thanks for sharing such great details, and I’m glad to see the community has already come through to offer such helpful tips. I’d like to make sure that this sheet of Proofgrade Draftboard is to our specifications. Could you please send a photo to illustrate the thickness of the Proofgrade you mentioned? If you have calipers or another accurate way to measure, please include measurements of the material thickness. If you have another sheet to use as a comparison, that can be helpful, too.