Burning of acrylic edges

I took photos and labeled them by the Glowforge model name of my machine. Please let me know if you need anything else. The prints were both done at 7:30am today.
Glowforge 9

Glowforge Pro

I forgot to mention that I did see a white mark on the inside of the top lens of the first photo of Glowforge 9.

Thank you so much for the details. I’m looking into it now. As soon as I have more information I’ll update this thread.

I extracted the logs to investigate the problem you reported, and I noticed that both prints were run with manual settings to include two passes.

Can you try once more using the default Proofgrade settings and let me know what the results look like?

I’m not sure how items are getting changed to have cuts use two passes with out myself ever changing the settings to do two passes. Attached are the new photos of the new Gift of Measure design.

Hello? I asked for help on this subject on Sept 25th. I took photos and did multiple tests and posted the photos I was asked for. It’s been over a month since this started and 17 days with zero response. Can I please get help on fixing this issue of the uneven engraving, burnt edges and wondering why I have to use different settings between my 2 pro models?

Can someone please help? I have waited for an answer since my original post on Sept 25th. Why does it take almost 2 months and multiple requests to get help?

Can I get help please?

Can I get help?

@pip - any further information? Checking to make sure this thread didn’t get lost.

1 Like

Oh my goodness! I’m so sorry I dropped this thread. I have no excuse, only my embarrassment and apologies.

I went back and reviewed both of the Gift of Good Measure prints from 12 Oct 2020. They both look as I would expect. The slight differences in the soot is based on the layout and orientation on the material.

Now that we’ve found Illustrator sometimes duplicates lines, and to keep an eye out for that, and the default settings only use the single pass, are you still having trouble with print results?

If you have any photos (and the date/time of the print), I’d be happy to check the corresponding logs and see what I can find out.

I’m so sorry again that this thread was lost. I’ll keep a much better eye on it from now on.

Yes, I am still having the same exact issues as noted on Sept 25th. I will copy and paste that below.

One Pro Model cuts and engraves great.
The other Pro model #9 has had issues since I received it.

-Burning edges when cutting acrylic.
-Uneven engraving.
-Charring.
-Having to use totally different engraving settings on #9 vs my other machine even though both of my machines are Pro models.

  • When I line up a new job, I click Ready and each time the image jumps locations slightly. Then I have to cancel the job, move the object back to a safe location and process it again.
    -Engravings have pixelated edges vs sharp clean lines like the other machine

I basically have to use #9 and the machine that is just my back up or use it to cut out the objects with little detail or little importance and leave my other machine to run all of the detailed engraving and acrylic cutting.

Sept 25th Post:
"Since my latest replacement (#9 this year) I have been trying my best to just make my projects work with this machine that was delivered. This machine has been randomly burning the edges of acrylic. This project ran for 45 min, resulting in processing something I need to throw away because I can not give this quality to anyone purchasing my items.

Another issue is when I line everything up in the Glowforge dashboard, using the space available on the wood or acrylic. I press READY and start the job. The job ends and I see it made a big jump and everything cut out was moved from what was shown to me on screen and a lot of times the items are wasted because it ran into a past cut out or off the edge of the board. I understand there might be 1/8 inch move, but these moves are much larger than that and very unpredictable of when it will happen.

Another thing that I have noticed is that I have two Glowforge PRO models. When I figure out my settings to make custom depth engravings to place wood or acrylic into them, it isn’t the same for both machines. When I do these same exact settings on the other machine that has issues, it will burn much deeper and completely through the wood or acrylic, frying it. This results in me having to figure out completely different engraving settings depending on which PRO model I use. Both models have the same bulb and power, so I don’t think there should be a difference in having different settings when they are the same Glowforge models?

The details of the cuts and engravings are also different. The oldest Glowforge ( less than a year) cuts and engraves really well. The newest glowforge replacement has jagged lines, uneven engravings and burns the edges.

Can this be fixed, please?"

Your title issue, as well as these issues have been addressed. (Duplicate cut lines in the files causing charring and manual settings.) Your prints of the Gift of Good Measure in your post #28 show no differences between the machines.

The Glowforge is not adding extra cut lines, those are created by the newer versions of Illustrator when you save an SVG that has stroke lines that are not centered. Make sure all of your stroke lines are centered, (it’s not the default in AI). Your older files will likely still have the duplicate line problem. You’ll need to check each of your older files by opening them in Illustrator, clicking on View> Outline and then zoom in to see if there are two lines really close together. Delete one if there are two, then resave the file.

In order to address this issue, support will need to know how you are using the machine to see if you are doing it correctly.

  1. Are you using Set Focus?
  2. Did you run the Calibration routine for both machines?

The way that Set Focus works is: You click on Set Focus then click on the center of your design on the screen. The view will “temporarily” be corrected at that spot. Then you shift the design over until it falls on the material where you want it.

When the job is done, the screen view is going to shift back to the original view, including shifting the design on the screen. But the design will land where you wanted it to on the material, which is the point of the process. It might look like it jumped a long way, but if you click on Set Focus there again, you will see that it actually performed the job where you wanted it to.

Set Focus temporarily corrects the fisheye effect at the spot where it is clicked, then resets back to neutral when the job is over. (It’s a bit confusing at first, but you get used to it.) The point is you use Set Focus first, THEN shift the design for placement. A lot of people use it wrong. You can use it as many times as you need to before running the job if you have items scattered around the bed. Once you have clicked and placed in a location, do not shift that design again.

You are going to need to show some pictures of this effect, because it could be caused by a number of things. (Some of which you can fix.)

The jagged edges and uneven engraving might be caused by a slightly loose belt underneath the laser arm, or broken wheels on the Carriage Plate. Or it might be debris or junk on the tracks causing a physical hangup. Or you might be using different LPI values on each machine in the settings. But without seeing the results to analyze, it’s hard to tell you what to check next.

Still, because I am not on the forum much these days, and won’t be following up with this…
Since you have two machines, check the belt tension on one machine versus the other and see if there’s a difference.

1. To adjust the belt tension…follow the instructions below:
(You will need a 3mm hex key.)

You can lay a small flat mirror on the bed and see underneath the laser arm easily. (Always turn a machine off when working on it.) :slightly_smiling_face:

2. To check the wheels on the Carriage Plate you can see them by removing the head. (Make sure the machine is off.) Inspect them closely and move the plate by hand slowly left to right to see if they are hanging up on anything like debris. Usually it’s a good idea to clean the tracks while you can, just wipe them down with a slightly damp cloth.

22
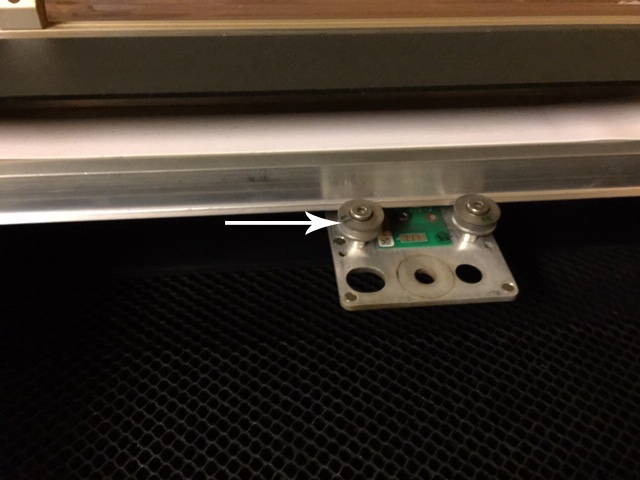
(Your wheels will be a different color. This is a first run production model.)

3. If you are still noticing a difference between the two machines after you have checked those things, you will need to run the exact same file, with the same settings, on the same sheet of material in each machine. (Gift of Good Measure is usually used, on Proofgrade, because it is standardized.) Then post pictures of the results so the cut lines and engraving can be analyzed. Front and back. That will enable support to see what needs to happen next.

If the problem is always happening on acrylic, you can use Proofgrade acrylic for the test. If it’s only charring on one machine, you might need to clean the Air Assist fan, or make sure that it is functioning properly. (Instructions for that are here: Clean the Air Assist Fan.)

I know this is a lot of tests to run through, but you actually have multiple issues going on simultaneously…some of them were file related, some might be procedure related, and some might be machine related. You will need to check each of these items to narrow down what needs fixing and what needs to be changed procedurally.

Two months is too long to fiddle around with this. Run through each of the tests I listed, answer each question asked (and tell support the results), and hopefully you can make some progress on it.

Good luck.

3 Likes

I’m sorry, but the issues have in no way been solved.

Yes, the one single project of the Block O pictured at the beginning of this post had burning on the edges that were caused by a surprise double line. That issue was created because single stroke lines in illustrator that weren’t all center aligned, were exported as SVG files and they were then given a surprise double line after the export. But, the burnt edges still occur as I stated above on other simplistic shapes such as a small rectangle that is cut out of Glowforge Acrylic. There are no double lines on those other objects. The same objects I can cut out on my other Glowforge and have clean edges with no burn. The air assist fan was clean on #9, so that should be ruled out as well as the cause.

The uneven engraving on Machine #9 gives waves of char through my objects giving items a leopard looking pattern. It has done this since I received this replacement. The same exact files that I run on my other pro Model, engrave perfectly. If I have a lot of engraving, I have just learned to not use model #9.

There are items that I engrave deeply into wood or acrylic to inset other wood or acrylic shapes into them. All wood and acrylic are Glowforge products. On my good Pro model, it engraves great. With the same exact settings and using files that are already in my Glowforge Dashboard, model #9 will burn all the way through the wood or acrylic. So, I always have to change between different strength settings depending on which pro model I am using. This has happened since I received #9.

I do not use Set Focus. I actually didn’t know what that was until it was mentioned above by Jules. So, between Model #9 and #1-8 that I have had, I have done the same exact thing. I upload my files to the dashboard, press OPEN, I move them to the area of the wood board or acrylic I want to cut and engrave and I press READY. With #9 I press READY and after it PREPARES MY FILE, the image jumps to a new location and almost every time I have to press cancel print and move the image back to a safe area. Then it doesn’t jump again until after the print completes. It does this no matter where I place an image or whether the image is large or small. The image jumps almost every single time, but this issue only happens on machine #9.

I have not run the calibration on both machines. I have never heard of this before, until it was mentioned by Jules above. I would gladly run this routine along with the other tests given above. However, for the past 3 days I have not been able to use #9 because the laser head SCANS and then moves to the center of the machine and then the laser head goes to the right side and makes a slamming and grinding noise. Then I receive a BUMP alert. It acts as though there is a lot more room to the right of the laser head but then it crashes into the right side instead. I have cleaned the lenses. I have wiped down the tracks. I have read several other people’s threads on how they had the same issues. I have changed out glowforge woods to see if after I start it, it will give me a different result. I have restarted it with no product on the bed. I have restarted with no tray in the machine. I have restarted with the lid open. Nothing has helped for 3 days. Just now as I write this, I tried again (probably the 20th try in 3 days) and it magically worked… No idea why. I see others are having the same issue on the support page. Is there a good reason why, or is there a glitch in an update? I’m hoping this stops happening. I have been slammed with orders, which is great. But with #9 being forced to be used as a back up machine because of it’s issues and then also recently not working for days for unknown reasons, this has really made completing orders rough. Plus I had to write another long letter and now have to do a bunch of tests on a machine that hasn’t worked properly since I received it.

This is stressful and extremely exhausting. I’m starting to wish I had purchased a different brand of machine because of the issues and lack of response each time there is an issue. If this machine keeps working, I will try to run the tests again and provide photos. The tension on the tracks on both machines seem comparable. No debris has been on the wheels or tracks. As noted above I have cleaned it over and over again. When #9 was giving the BUMPED warnings, it would still glide forward and back extremely smooth and the same when I would move the laser head to the left and right. It just wouldn’t work correctly on it’s own. Again, most of these issues have been happening since I received it. So it started with a clean Glowforge straight out of the box. When I get a free moment later, I will try to provide photo examples of new jobs run on each machine to show burning and charring. Hopefully I will get a response sooner this time.

@Jules That was short lived. During the first print, the only thing that resulted was a failed job for unknown reasons and a wasted thick maple board… Back to one working machine. Time 12:50pm on Dec 9.

@ivan1 @MarcM @pip Hi, I am tagging you guys because @Jules mentioned that he doesn’t get on here much. So I want to make sure I get help from someone. Please read the 2 previous posts. Thank you.

@ivan1 @MarcM @pip @Jules I restarted the machine #9 again (#9 is the name of the machine) and tried a simpler design, in case it wasted more wood. This time it sounded like it started. But the fans ran and the time counted down, but it never cut anything.
This was ran at 1:56pm on 12/9. Please send me a new machine soon. I have way too many orders to keep messing with a faulty machine. This has been nonstop issues. I’d be happy with just getting a full refund at this point and moving on instead of getting a 10th machine. This whole experience has been awful.

@ivan1 @MarcM @pip @Jules Thank you for not responding at all. It is much appreciated. I’ll just sit here and wish my machine back to working correctly or working at all.

This has been wonderful help as I sit here with a nonworking machine once again, that I cannot use as it now centers and then grinds over and over into the right side as if there is more room to go. The customer service at Glowforge has been amazing.

1 Like

Unfortunately, it looks like your unit is experiencing an issue that we can’t resolve remotely. I want you to have a reliable unit, so I’m recommending we replace this one. I’ll be in touch via email to sort out the details. I’m so sorry about the bad news.