Banding/resolution/lines not matching up?

Hey there, FINALLY got my GF up and running (held off on setup till I moved, then moved, then discovered the 'forge was leaking fluid was sent a replacement, then was under construction/reno so left it safe in the box till this week).

I’m running into a little weirdness.

My Gift of Good Measure doesn’t seem to be printing with the resolution I’m seeing in the photos from GF - it’s like the laser is hitting the spots its engraving twice, a little off kilter from one another. I realized the table I was working on wasn’t 100% stable and fixed that - it’s better now, but still a little weird.

On training project #2, the box, the ‘made on a’ line is showing the same weirdness, but the “Glowforge” line looks OK to my eye.

Then I ventured into my own project based a little bit on the third item, making a circular token/pendant thing. I set up a score line on the inside of the design - similar to the demo - but when the 'forge did the score it don’t quite return to the same spot at the end of the circle so it’s jagged…

What’s going on here? Do I need to clean something(s), or… ?

(Will add photos in comments)

2 Likes


(Gift of good measures, three attempts)


(made in a glowforge logo)


Circle score finishing in different location 2 times…

Yeah, something’s not right.

Definitely make sure the surface the GF sits on is level and solid. Also don’t let your material overlap the plastic sides of the honeycomb tray, as the gantry can hit it there and be thrown off. The material shouldn’t extend past the metal honeycomb on the sides.

Also check your rails and belts for any bits of wood or masking that might be interfering with movement. When you’re sure they’re all clear, with the machine off, move the gantry forward and back and the head back and forth through its entire range, and see if you feel any spots where it’s not moving smoothly.

If none of that turns anything up, think about where on the bed you’re placing things – there’s an issue that affects some machines where things go off-kilter if anything is being printed in the right-most few inches of the bed, but if nothing is in that area, they come out fine.

3 Likes

Some time back I had a similar problem. If the head came to a sudden stop or change in direction it threw off the head from where the head thought it was and when it came back it was a little off.

It has been a long time so I don’t see the image I had but making 3 passes each was about a half mm off from the pass before. In general Glowforge had a lot more issues like that then it does now due to the support team but you might want to score a 5 point star and run it fast and low power score for 3 passes and see if that is part of the problem.

Here is a quick star to try…
star

1 Like

Hello, thank you for letting us know about the trouble you’ve run into with your new Glowforge. To assist with troubleshooting, would you please check your X and Y axis belts for me to ensure they’re correctly tensioned?

For the X axis belt (Located under the Laser Arm)

  1. Turn off your Glowforge.
  2. Carefully remove the crumb tray.
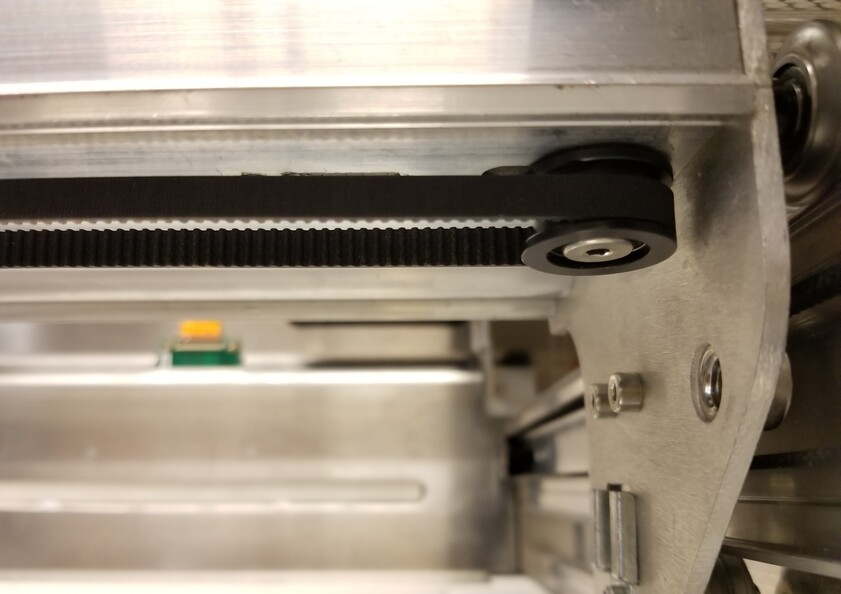
  3. Without removing the carriage plate and belt, locate the black pulley fastened by a metal screw on the right end of the laser arm.
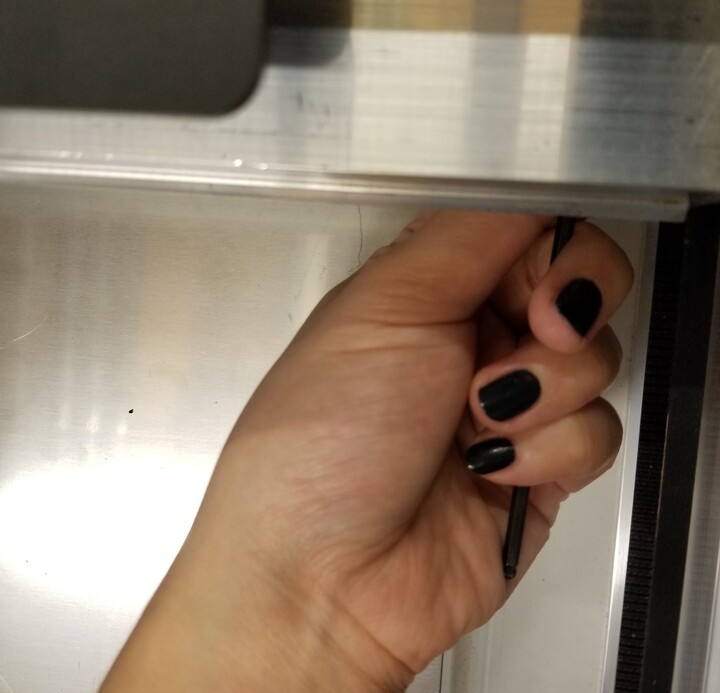
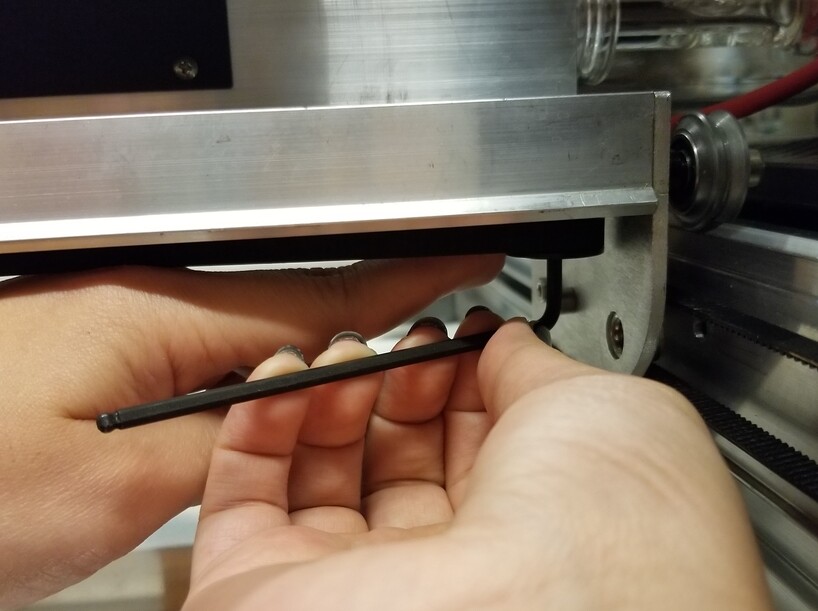
  4. Insert the short side of the 3mm hex L-key into the metal screw with the long handle pointing toward the front of the unit.

    ​​
  5. Turn the key clockwise to loosen the screw until the pulley can slide with some friction. Don’t remove the key from the screw.
  6. Holding the key with your right hand, use your left index finger to push the pulley to the right until the belt is taugh. Don’t stretch the belt or touch the belt with your fingers as this can affect the tension on the belt.
  7. Applying firm pressure with your left index finger, turn the key counterclockwise to tighten the screw. Make sure the pulley doesn’t move during this time.
    ​​​​​
  8. Continue tightening the screw until you can’t turn the key anymore.
  9. Gently slide the carriage plate from side to side to ensure it moves smoothly and the belt does not catch or sag.
  10. If you’re not satisfied with the tension on the belt (it should be taut, but the belt shouldn’t be stretched), go back to step 4 and try again.
  11. If you are satisfied with the tension on the belt, try a test print. Print the Gift of Good Measure on the Proofgrade Draftboard we included in your material shipment for troubleshooting, and let me know how it goes!

If you have any questions or run into trouble along the way, don’t hesitate to reach out! I’m happy to help.

For the Y axis belts:

The Y Axis belts are located on the left and right side of the interior of your Glowforge.

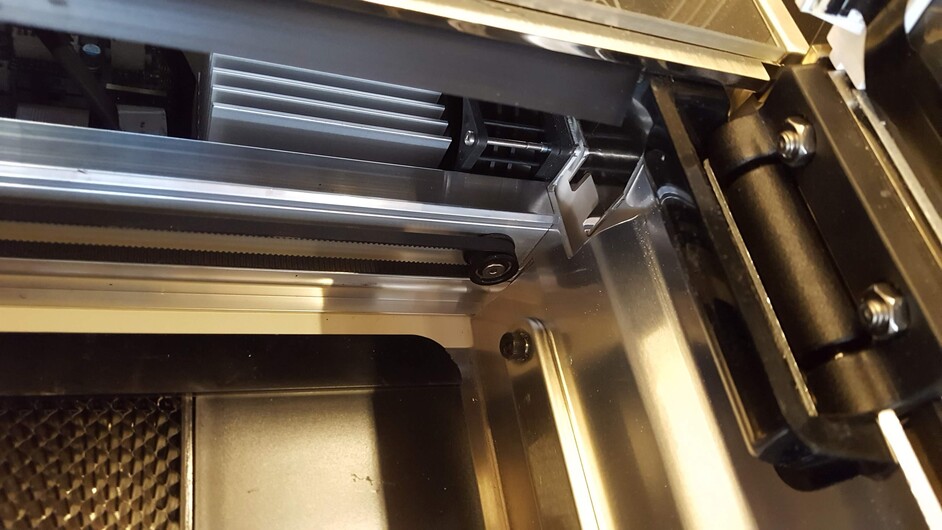
Turn off your unit and move the laser arm to the front of the bed. There should be a black pulley connected to each belt on the far end of the rail. Try to wiggle the pulley and let me know if it’s secure.

After you’ve tried the above, please let us know how a test print goes.

1 Like

Any pointers on where to find the 3mm L Hex key? I may have one, but I don’t believe there was one in the packages that came with the Glowforge unless I missed it somewhere…

No, one doesn’t come with the machine.

Definitely still an issue. On the left is where I was, the right is where I am now. The scores are looking weird too, now.

(Of note, I have been running some significant wood cuts off in the past few days and just dealing with the imperfections, so I may be due for cleaning.)

1 Like

Any advice?

Thank you for the update and photos for your results. I extracted the logs from your unit and the amount of print time you’ve had recently doesn’t appear to be enough for your optical surfaces to need cleaning (although it never hurts to check!) As a next step, would you please do the following to verify that your carriage plate assembly is properly seated?

1. Turn off your Glowforge

2. Open the front door and carefully remove the crumb tray

3. Remove the printer head

  • Holding only the finished black surfaces, grasp the printer head as shown. Pull gently up and back to disengage the magnets and remove the head.

  • Push down fully on the wire ribbon tab to unplug the wire ribbon from the printer head. Pull the wire ribbon gently away and tuck it into the laser arm.

4. Unhook the belt

  • Push the carriage plate to the center of the laser arm so it’s out of the way
  • Reach under the laser arm on the right side and feel for a black belt and pulley

  • Take the belt off of the laser arm
    • Placing your thumb between the belt and the laser arm near the pulley, push down on the belt while sliding the belt to the right towards the pulley. The belt will slide off of the pulley. Don’t be afraid to use pressure.
  • Unhook the belt from the motor on the left side

5. Remove the carriage plate

  • Place both index fingers on the rear corners of the plate and both thumbs on top of the front wheels. Use your other fingers to support the plate. While keeping the laser arm stable with your thumbs, use your index fingers to pull the plate towards you as far as it will go. Then push down with your thumbs to angle the plate down and towards the back of the Glowforge until the plate pops off of the laser arm.

6. Replace the carriage plate

  • Unwrap the belt and hold the carriage plate as shown

  • Placing your index fingers on the back corners of the carriage plate and your thumbs on top of the front wheels, hook the rear wheels on the groove under the laser arm. The front wheels should be mostly visible.

  • Pull the plate forward until the front wheels clear the laser arm then angle the plate up until the the wheels are in line with the rail. Release the plate – it should grasp the rail firmly.

  • Pick up the right side of the belt and make sure it is not twisted. The outside of the belt should be smooth and the inside should have ridges.

  • Hook the belt onto the pulley on the right side.
  • Make sure that the left side of the belt is not twisted and is smooth on the outside and ridged on the inside
  • Attach the belt on the left side
    • Using your left hand, set the belt on the front half of the motor (the silver piece on the left hand side below the laser arm) and support it with your fingers by placing them under the motor. The belt will not be fully on the motor. Use your left thumb and fingers to clamp the belt firmly in place and apply pressure.

  • Still holding the belt and motor firmly with your left hand, use the pressure from your left fingers to guide the belt clockwise around the pulley as your right hand slowly pushes the carriage plate to the left. The belt should roll onto the pulley until it is secure.
  • Once the belt is in place, be sure it is taut and does not sag. If it’s quite loose, please take a photo of the belt and send it to support@glowforge.com.

7. Prepare to Print

  • Gently slide the carriage plate back and forth on the laser arm to ensure that it travels smoothly. If it doesn’t, remove the plate and try again.
  • Set the old carriage plate and belt aside. Please keep it on hand in case this new one doesn’t work out the way we expect.
  • Replace the printer head according to these instructions

8. Turn your Glowforge back on, print the Gift of Good Measure, and let us know how it goes!

If you have any questions or concerns, please let us know.

1 Like

Hi @adigitalnative! It’s been a little while since we’ve heard back from you. Were you able to check your carriage plate and do the test print that ivan1 requested?

If you run into any troubles or have any questions please don’t hesitate to let us know!

1 Like

It’s been a little while since I’ve seen any replies on this thread so I’m going to close it. If you still need help with this please either start a new thread or email support@glowforge.com.