It’s funny… When it does that to me I’m always half-paying attention (setting something up in the GFUI or something) and I kinda go “Wait… Did that just happen? I swear it was Ready a few seconds ago.” And for a moment I get nervous there’s a problem, but then it just finishes and goes Ready and I’m good to go.
Probably did that a dozen times for me today. I figured it was because I was opening & closing it a lot today(MakerFaire). I noticed it because I was surrounded by people who were watching the GFUI on a large screen and they’d ask what it was doing all the time.
Your day go well?
Once I got connected to the cloud it was great. One thing I have to remember is the whole process is magic to most people. So I see the calibrating message and I’m impatient. The folks watching don’t know it’s an extra minute that doesn’t seem necessary to me ![]()
I think GF needs to enable full authentication to join & use wifi networks. The venue had done a good job providing wifi accounts & bandwidth (local university). But they required both an ID & password. I had a wifi hotspot (Sprint) but had no service. My ATT phone had no service either so no way to use it as a hotspot. I tried setting up my laptop as a hotspot (Win 10 allows you to creat a wifi hotspot sharing your network connection - wifi or wired) with a password set up but no requirement for a user ID. The GF would connect but some kind of handshake wasn’t happening.
Finally turned out a friend of mine who was there had a different cell carrier (T-Mobile?) that worked.
I had premade a lot of pencils (thanks @marmak3261) and earbud holders (although someone lifted my sample earbuds ![]() ) as well as round Tuits, commemorative coins and 30 or 40 various other projects. People we’re floored when I told them all of it had been done on the GF - wood, slate, acrylic; cutting boards, living hinge projects, mixed materials, etc.
) as well as round Tuits, commemorative coins and 30 or 40 various other projects. People we’re floored when I told them all of it had been done on the GF - wood, slate, acrylic; cutting boards, living hinge projects, mixed materials, etc.
I had printed out one of the pages that GF uses to let people draw a luggage tag and let people draw or write what they wanted and then did the bed trace & engrave on ore-cut PG Maple ply tags. Some of the kids wanted me to put the trace on their earbud holders they picked up so I started doing those. Then folks wanted to do that with the embroidery floss barnyard animals I made (had a couple dozen I brought along).
Watching the GF take their drawing and engrave it on something just grabbed everyone’s attention. I had a large monitor that I had my laptop screen duplicated on so they could see what I was doing and the progress the machine was making.
Lots of conversation about the GF, ease of getting started, using it at home (vs the big machines some had seen elsewhere), price, etc. Got as much interest from regular folks wanting one as from the schools & libraries looking to expand their maker spaces. More than one person (& their kids) made the “I want one” comments. The variety of materials was huge in making the wow factor. A few talked about 3D printers and how they felt limited by (mostly) only making plastic bits.
Another local MakerFaire asked me to demo there and this one asked me to sign up for next year and asked me to do a talk as well. It’s a great way to see this in real life. Lots of sample projects people can pick up & look at helps get the versatility across.
If we can get the connectivity thing licked, it would be a slam dunk to do these kind of events all year.
Another local GFer (@d.z.schneider) stopped by early to see it in person - he got his golden email but is waiting to get it - but he had to leave before I got the connectivity working so he didn’t get to see it operating.
Sounds like a rewarding experience, aside from the connection issues. Thanks for sharing that!
I had some of my stuff in our maker space’s booth too and they’d send people over who were interested in lasers where they could see one operating.
It helped that I had the only laser there  ️ GF’s portability makes it great for these things. The K40 types are much more complicated to haul around and the big ones are just too unwieldy.
Yes, it hadn’t occurred to me what an advantage the consolidated systems and portability would be in that situation.
Being the only laser exhibiting there would be a highlight! 
This is a silly question, but could what you are finding be due to a software correction? If software assumes one is using measurements plus kerf of cutting instrument so it is removing kerf before cutting? Ie a 2x4 isn’t actually a 2x4 inch board, you pay for the kerf that was removed when it was cut. Thus your 0.15 was better.
Second question, is there anyway to switch this setting to millimeters for better accuracy and to get away from 3 digit decimal values?
At the time of this writing there is not.
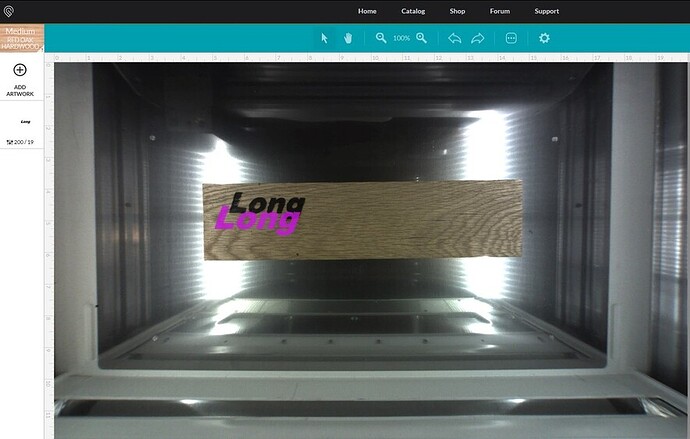
What are you using for material? I see you have no crumb tray in place and have selected medium red oak hardwood.
The camera system is very reliant upon accurate material measurements/height. The honeycomb of the crumb tray is 0.00”. If you are using the crumb tray and non-proofgrade material, you need to put a very accurate material height into the unknown materials box.
If you are removing the crumb tray to fit something larger than 0.5”, you have to put an accurate measurement taking into consideration the 0.00” height of the crumbtray.
A more detailed explanation (was typing from phone earlier):
The system uses measurement in the following way:
If non-proofgrade material and using the crumb tray, you’ll have to enter the material thickness by clicking unknown material on the top left, and then use uncertified material. This measurement species the dewarping amount based on the height of your material. It’s used for more accurate camera placement. It also sets the initial focal point of the laser beam.
If you’re using proofgrade material with the crumbtray (which I don’t know why one wouldn’t offhand), it inputs the thickness automatically.
If you’re using material thicker than .5", you’ll have to remove the crumbtray (which it seems you’ve done here). Since the honeycomb bed of the tray is considered 0.00" point, you’ll need to calculate the height above that level that the surface of your material is at for more accurate camera placement and accurate laser beam focus. In addition, that material has to be within .00" to .5" above where the honeycomb tray usually sits, as that’s the focus range for the laser. So, if you measure your crumbtray height at the honeycomb (a tutorial exists somewhere here for that) and for EXAMPLE ONLY it’s 1.35" and your material is .75" thick, you will need to shim it a minimum of .6" and a maximum of 1.1".
You’ll need to know the exact height of your shims and material and subtract the height of the crumbtray.
Shims+materialThickness-crumbtrayHeight= material thickness in the uncertified materials box
If that formula comes out to less than 0 or greater than .5", you need to figure out a different solution.
So my crumbtray is 1 1/4 inches high and I can only burn 1/2 on this . So I can’t burn a 2 inch board like I was told since it only allows for a 1/2 inch above the crumbtray.
I think you might be mis-measuring your crumbtray. You might be measuring through the crumbtray and hitting the actual crumb holder beneath it (which is a part of the tray component)
Here is the tutorial.
You can place something close to 2" inside without the crumb tray using the processes described and engrave on top of it. You could never cut through 2" of material. Not possible with any CO2 consumer laser. 1/4" to 1/2" cut depth is more reasonable.
Hi fndgunshop,
May I suggest the following test. Draw a 3" square in your favourite vector s/w, upload it, drag it into the central area of the bed image in the GFUI, and do a low power cut onto a piece of scrap cardboard.
Leave the cardboard in place until the screen refreshes, then take a screen shot of the file overlaying the ‘cut’ image, and post here.
If the cut image is a different size to the image of the original file, as well as being offset, ( like the ‘Long’ file you show in your post), I think you had best contact support with the information. Alternatively start a new thread in problems & support, but don’t do both.

Great idea!
It is in my experience REALLY REALLY important that you level the machine out.
I have my machine sitting on a 3" oak table, that is absolutely flat and rigid. This helps a lot.
The other machine is setup on a table that warps somewhat - it’s in a “rustic” toolshop in a basement - and I needed to place wedges under 3 of the feets of the machine, to make it even throughout.

