Oh… Those are all individually-placed. I was placing them in relation to the material, so I couldn’t really pre-place them on an artboard. I took the single object, and copy/pasted it within the GFUI and placed each one where I wanted it to drop onto the material.
A random thought: those pencils I did yesterday were after I shimmed up the front right corner of my machine, which made a significant difference to how flush the lid closes. It’s still bowed front-to-back, but it used to stick up a lot on the front right side (you can see how much here: https://youtu.be/D8C7JysnZmQ?t=1h22m14s).
It’s hard to imagine that much play in the lid not making a difference in alignment. I wonder how bad your lid is, and if pushing down on it changes anything.
1 Like
That’s crazybones.
I agree, it’s hard to imagine that. But everybody’s is bowed. I brought the bowing question up to Support with my G2. I took a video to show them and they said that that’s normal. G3 now appears to be bowed in a very similar way. My GF table is nice flat glass. G3 is sitting in the exact place G1 (perfect center-bed alignment) sat, and also where G2 (different alignment issues) sat. I should also note that this morning’s cardboard and Proofgrade runs were done with the room lights off. The only thing lighting the room was the 'forge itself. So that rules out any room light alignment suggestions from this and other threads.
2 Likes
Perhaps, while the Glowforge software is still in beta, use design software when placement is critical. There’s the 12x20 artboard trick, too, for placing stuff in the UI. I realize that doesn’t work for all situations, like using scrap.
You really can’t. I mean, you’re aligning the design to the material, not the bed. So I’d have to know the exact placement of the material to know where to place it on the artboard, ya know? But even if I know the exact placement of the material, once I place that artwork in the GFUI, it’s going to misalign it the exact same way it’s misaligning it otherwise. Does that make sense? If I drop a 4" disc roughly in the center of the bed, and I want to engrave a 3.5" circle within that disc, I need to align that visually.
1 Like
Agree that this shouldn’t be necessary, but there are work-arounds that people with less-computer-assisted lasers have been using to good affect. I’m pretty sure I’ve seen people set up the shape outline and pattern/engrave on two separate layers, put something sacrificial down on the crumb tray (masking tap, printer paper, etc.) and cut out the outline of the material they’re using (so a 4" circle in your example), then use that as a guide for where to place the item to engrave. This is, of course, assuming your offsets are repeatable. And obviously that’s easier with singular, easily drawn shapes like your example than scraps of material, but could be some help.
2 Likes
Thanks. Yeah, that’s what I’ve been forced to do with every single job on these 2 recent machines. Masking tape does the job just fine.
Just to be clear, I don’t mean bowed, I mean… cockeyed? The right side of my lid, where it closes against the front of the machine, stuck up above the top of the machine. I’m talking about the difference in the height of these two parts:
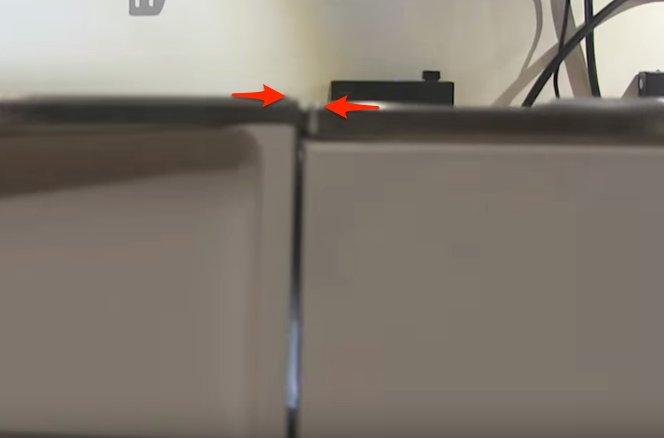
That was entirely “play”, in that I could push the lid down all the way, but when I let go it popped back up. It was clearly not sitting in a solid closed position. Lifting up the front right of the machine brought that part up even with the lid. So the body of the Glowforge has a certain lack of rigidity, such that it will flex with the surface it’s sitting on and affect the fit of the lid.
I’m not trying to convince you that this is the source of your problem, I’m just pointing it out as a possibility and something you may want to check. If your lid moves when you press down on it, I would be curious to see if running a scan while it’s pressed down changes the offset.
5 Likes
Looks like it should have had three feet or levelling screw feet because I expect it has big effect on camera accuracy in the corners.
2 Likes
Oh how 'bout that! Of the things I suffer, that’s not one. ![]()
At the front and back of the lid it’s almost perfectly flush with the rest of the case. It slopes upward to the middle, then back down again for me. Here’s the video I sent Support when I asked about it.
1 Like
I’m so sorry man, this really sucks for you.
I agree that it looks like the stepper are losing count, BIG time in the lower right but it seems that they are loosing a couple steps thru-out the print, I wounder if the head is moving too fast and breaking too fast??? Again all hardware issues, its crazy it has been more than one machine.
Like @chris1 pointed out, having the machine level is really important and not stressed in the manual, Even lathes that are 2000lbs of solid steel will warp over time if not properly leveled giving poor results. (but I don’t think this is your problem)
I hope they sort it out for you in a hurry and you get a good machine.
4 Likes
Try laying a flat edge on the lid. Remember when we were talking about this a couple/few weeks ago and I confirmed mine was just like yours with the bow in the middle? Turns out the lid is dead flat, but the side panels dip down thus giving the perspective that it’s the lid bowing upward.
3 Likes
I’ll just throw this out there… I’m not 100% sure, but that lower-right weirdness I swear I heard a little sound. Like the head hit an invisible wall on the right. Or got to the end of some invisible tether. To be clear, it did not hit the right rail or something. It didn’t hit anything. It just sounded like it did. At least I think I heard something. It’s not like the machine’s quiet as a kitten when it’s engraving. But I’m pretty sure I heard “something.” More than once in that corner. And then not again the rest of that job. For the record, the head is snapped in securely and the ribbon cable is unobstructed.
A visual inspection of the rails and casters may be beneficial. Maybe there is something still ON the rail (a drop of glue?) or some major crack/scratch in the rail.
3 Likes
You’re right. I do know that to be true. And now I can’t remember if I put a straight edge on mine or not. I think I didn’t. I think all I did was put a full sheet of material on top the glass to be sure the material layed flat. So, not as good as a straight edge, but still reasonable enough. Not sure why I didn’t do that though… I mean, the straight edge sits right next to the Glowforge. I’ll be home for a minute this evening so I’ll do that.
If I were @Tom_A I’m not sure if I would have the machine totally tore down(probably) or have it boxed up! I don’t think I would be putting a lot more time into testing, its not a PRU.
Thanks. Good point. Actually, I inspected the rails before I even turned the thing on. Smooth as could be.
I don’t disagree. But if there’s any testing that could result in a solution that doesn’t require me to box up yet another unit, I’d prefer it. My receiving department is starting to get… unhappy with me getting these big, heavy boxes. “Another one?! I’m just leaving this one on the loading dock. Get it whenever you want.” I’m happy to test (to a point). If something can be fixed in the field, that’s a benefit to all, including me.
1 Like
@Tom_A, what’s the power quality of the place you’re at? Where you have the Glowforge plugged in? Is there other heavy motors on or nearby the circuit? Have you tried moving the Glowforge to another power location and tried to see if it changes anything?
3 Likes