My camera has been blurry since the first day I got my machine. It’s never been able to read a proofgrade QR code, and I can’t use it to reliably align my designs on materials I’m engraving when I need precision.
I recently learned that there is a camera calibration procedure I can do to get the camera to work properly. I’ve tried the process 4 times now, ruined a couple pieces of MDF in the process, and it always ends with a message that says:
Not Completed
The process was interrupted, so no changes were made to your calibration.
as well as a little popup message that says:
Calibration Complete
After completing measurements, no improvements were found. The alignment of your system was not changed by the calibration process.
I’ve tried all of the following:
Connecting the machine to a different, higher bandwidth WiFi connection (I’ve tried directly to my comcast connection, to my nest mesh connection that has a spot in the same room, and directly to my FiOS connection which is about 14 feet from the Glowforge)
Repositioning the material to be right at the edge of the crumb tray (it was the first couple of times, I tried again to be sure)
Cleaning the camera lens each time with a Zeiss cleaning wipe
Making sure there was no movement at all in the room to prevent any vibrations from interfering
Each time the calibration process says it’s processing measurements and preparing to make changes, then it just says Not Completed. How do I get this to work?
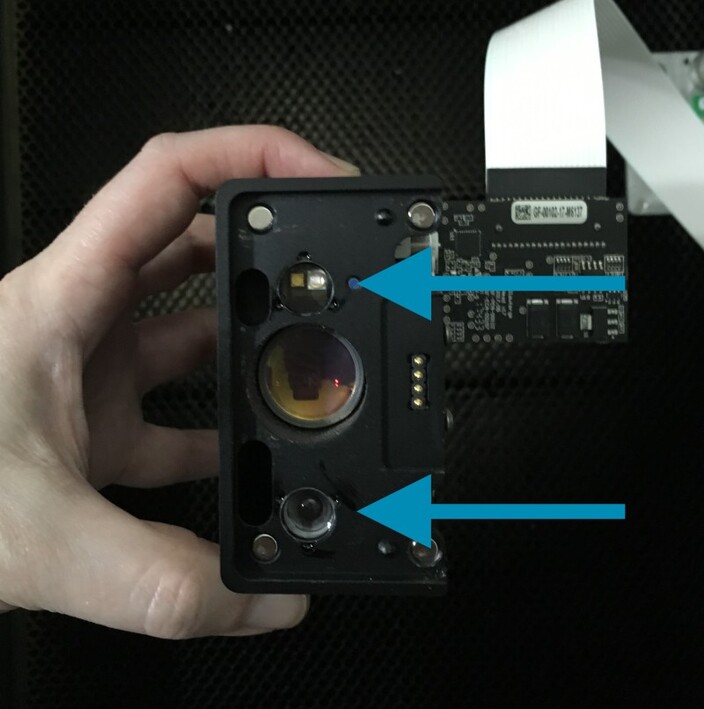
Make sure these two little windows are cleaned. You can also reuse the draftboard sheets used for calibration by adding a new layer of masking material. I have used the same sheet several times.
You could spraymount some clean paper over a previous calibration attempt or even use smooth cardboard. It’s just important that the calibration material is very flat.
As you’ve already tried two different networks, just for giggles - have you tried using your phone’s hotspot? I could never get the calibration to complete with my ATT fiber but it worked first time through my phone. It doesn’t need strong wifi, it wants very stable wifi.
I reviewed the logs from the calibration attempt. I’m concerned about the blurry, and about the bright light.
Regarding Blurry
The lens on the lid camera should be glued into place. Can you gently try to twist your lid camera lens to check to see if it’s fixed in place.
Regarding the Bright Light
You may have more luck running the process again, but blocking out any external light coming into the print bed. If you can try that once more, even if it doesn’t work, I’ll be happy to take another look and see if there is more than can be done.
use anything that is the same size and perfectly flat. Preferably white…ish. Cardboard is good. Or replace the masking on whatever it is you’ve already been using.
Edit: if it’s still too bright, could take some electrical tape and cover a couple of the LED on either side. Just spit ballin here.
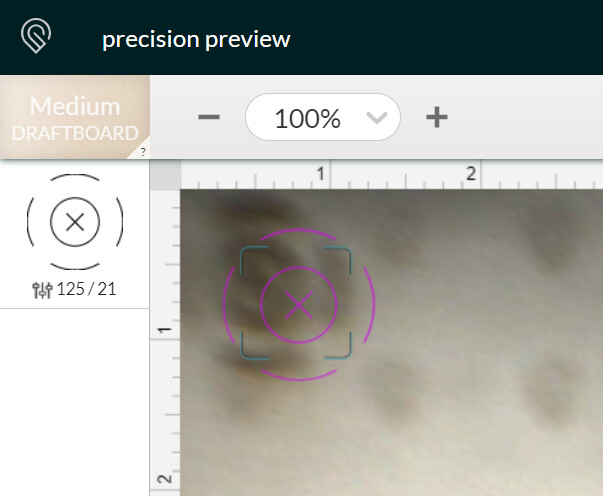
Edit Edit: If that top pic is with the Set Focus command, that is waaaay terrible. I don’t think the calibration will help. It might, but the calibration help the AI know how to de-warp/straighten images that should already be clear. If it’s always been this bad, kudos to you for struggle bussing through…
Thanks Pearl. I’m out of masking material and waiting for more to arrive. However when I did remask it previously the image of the glowforge logos was still somewhat visible through the material.
@wesleyjames Yeah that’s using the instructions to check alignment. My machine has been bad and blurry since I got it 2 years ago but most of what I’ve been doing has been cuts with engraves and not just engraves on existing materials so it hasn’t really been an issue. Now that I’m engraving on specific materials I need the alignment to actually be precise.
Thank you for letting us know. I’m terribly sorry, but after reviewing everything your printer is experiencing an issue we are not able to resolve remotely. I just sent you an email with the next steps.
We’ll continue to work on this with you there, so this post will be closed.