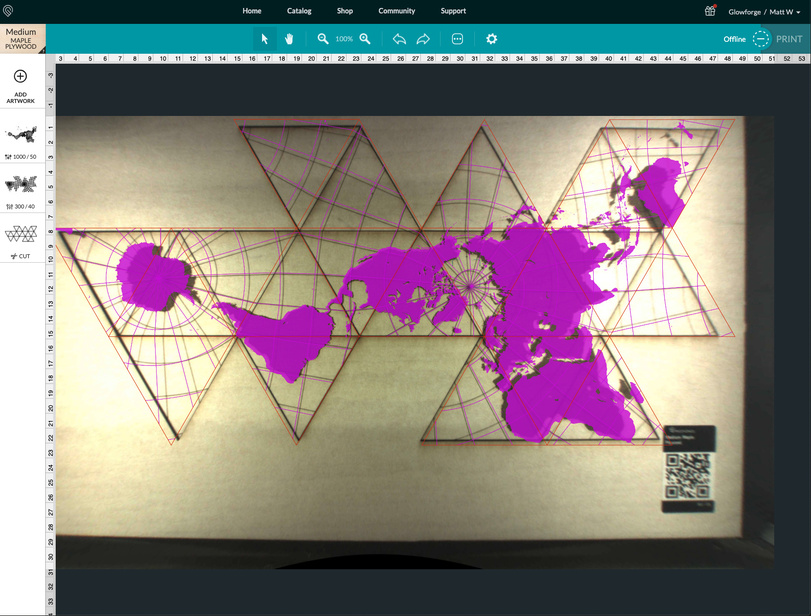
Loving my new GF Basic which I received a few weeks ago. I noticed that as soon as I set up the machine that the focus on the lid camera is very badly off. As you can see from the attached screenshot, the focus is bad enough that the QR code on proofgrade materials doesn’t work.
I have of course cleaned the lens using a Zeiss wipe and have run the camera calibration process (the new one which prints a bunch of Glowforge logos on the back of a draftboard). Neither of these steps have improved the camera image.
Fortunately the machine seems to cut and engrave just fine, so this doesn’t appear to be affecting focusing of the laser itself. However, it does mean that there’s poor registration between the image in the web UI and what actually gets cut.
Any ideas what I could do to correct this problem? Thanks!
Fuzzy in the corners is normal - it’s a fisheye lens that is only flat to our view through a program run on the GF end.
Cutting more than 1/4" off is out of spec and is a warranty issue.
Are you using Set Focus (under the gear icon) after selecting your material? Often material will vary in thickness and the Set Focus gets you a better camera image because it’s measuring what you’re actually using
When you did the camera calibration, did it say you settings were adjusted or that they didn’t improve? You should be able to get sub-mm offset after running that
Is your machine on a solid flat surface? The case is designed to flex, so if your surface is at all bendable that can significantly effect your focus
Let’s get your machine working perfectly sooner rather than later!
Thanks for the tips. If you enlarge the image, look at the QR code in the corner. It’s barely readable and the GF generally isn’t able to parse it – I always have to set the material settings by hand. Is this expected?
I will try the Set Focus option next time I load material in the GF.
Camera calibration did report that it adjusted settings, however, it is not noticeably better.
The GF is on a solid flat surface (a strong wooden workbench).
Not so much expected as “within tolerances”. Depending on how close the sticker is to the edge, whether you put it in the lower right or the upper left, all can effect whether or not it reads. I mostly pull the stickers off and use the drop down at this point, because engraving through them requires different power than not so they can get in the way.
This is what the image looks like before they do the math, so you can see what they’re working with!
Thank you everyone for providing that great advice! These are some of the things that can help improve the alignment for your prints. I do have a test I’d like you to do so we can further troubleshoot this.
We’d like to have you try a few troubleshooting steps for us:
Turn off your Glowforge.
Check for small pieces of debris or dust.
Check the lower door to make sure it closes all the way. It may require some force to open, but open it, wipe any dust off the edges, and close it all the way.
Remove the tray and clean any dust or debris from the surface underneath. Pay careful attention to remove all debris from the four dimples where the tray rests.
Check the lid to make sure it closes all the way. Small particles of material, such as dust or debris, can prevent it from closing completely.
Check the surface your Glowforge is on to make sure it’s flat. Ensure it is not twisted slightly and that there is no debris propping up one side of the machine.
Turn your Glowforge back on.
We included an extra piece of Proofgrade Draftboard with your materials shipment for troubleshooting. Place the Proofgrade Draftboard in the center of the bed and print the Gift of Good Measure in each of the corners, and one in the center, using the default settings and setting the focus.
When the print finishes, leave the lid closed and wait until the fans stop and the picture updates. Without moving your artwork or your material, take a screenshot of the Workspace to show us the difference between the artwork placement and the actual print placement. Make sure to include the rulers in your screenshot and show as much of the bed as possible.
Mac: Press Shift-Command-4 and click and drag a box around your image. You’ll find the screenshot file saved on your desktop.
Windows: Click on the Start Menu and type “snipping tool”. Open the Snipping Tool > New then click and drag a box around your image. Click the Save icon and name and save your file.
Send us the screenshot along with the date and time of the print, and we’ll investigate.
It’s been a little while since I’ve seen any replies on this thread so I’m going to close it. If you still need help with this please either start a new thread or email support@glowforge.com.