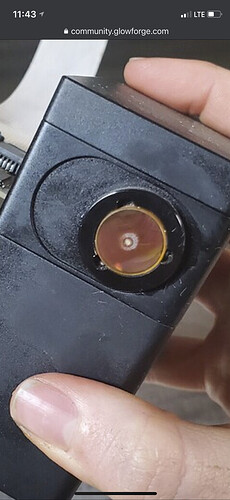
My GF came with a scratched side lens and I just got the replacement window without instructions on how to replace. Can’t find it on the site either- anyone have experience with doing this before I submit a request?
By posting here you have submitted a request and do not need to do another. There are two divots on the ring outside of that window and there should be a tool with corresponding points to place in the divots and twist. It might have come with it but you could make your own (maybe from a screwdriver?) or others who have done so can chime in.
You can grab the edge of the window with any pliers that will span the diameter. It just screws off. You could cushion the jaws of the tool with a piece of fabric to prevent tool marks on the aluminum if you wanted to.
The two holes on the periphery are made for a specific “spanner wrench”, a tool made for the task. All yo have to do to remove it is screw it out.
You should just be able to twist it by hand to loosen, remove and replace.
Maybe it’s changed? ![]() I was able to unscrew both head and side windows by hand. Maybe the person that put them in put them in by hand
I was able to unscrew both head and side windows by hand. Maybe the person that put them in put them in by hand ![]()
Must have been, the ones on mine were not that tight, but more than finger tight. I presumed a tool would be needed because of the spanner holes. 
Not the best picture, since it was a cracked lens picture that I found, but if too tight to remove by fingers, the pliers with some sort of cushion should work fine. It shouldn’t take much effort with pliers at all.
Those little holes aren’t meant for a spanner wrench so far as I know. I may be talking out of school here since I haven’t looked at it up close in a long time, but these optics mounted in this fashion are usually glued in and the divots are usually where the glue is applied.
When I replaced my side lens due to a scratch, I used a small pair of needle nose pliers…
You’re right, I stand corrected. Thanks! The glue looks like UV resin.
I’m so sorry that the instructions for installing the new window did not arrive via email. Just in case (as I see the community has been absolutely AMAZING in helping out) here are the instructions for installing the Printer Head Window:
To install your replacement printer head window:
- Turn off your Glowforge
- Remove the Printer Head
- Unscrew the Printer Head Window (For additional grip, try a rubber glove)
- Screw in the new Window
- Wipe the new window with a Zeiss Wipe
- Replace the Printer Head
I hope this information helps! Please let us know if you run into any trouble, and we’d be happy to help 
thanks. I was able to put her together. Now just at the wifi connecting part- thought that would be easy but…
thanks
Hey @allwashedover, I’m glad to hear that you were able to get the window replaced. I just took a look at the logs from your Glowforge and can see that you were able to get it connected to your WIFI and run a few prints as well. That is great news!
Is there anything else that we can help you out with now that you’re up and printing?
everything is working awesomely. thank you.
We’re glad to hear you’re back up and running smoothly, that’s great news! Please feel to reach out again if you ever need anything else.
Since you’re good to go now I’m going to go ahead and close this topic.
