As it happens, I wanted a cardboard laptop stand so I made the DIY one that was linked to. There was another design from Lifehacker that was very similar, and I saw several more online.
None of them were “exactly” what I wanted, so I designed my own. I wanted a larger front lip. lower profile, and wider separation between the sides. Oh, and it had to be made from a single sheet of material that would fit in the Glowforge.
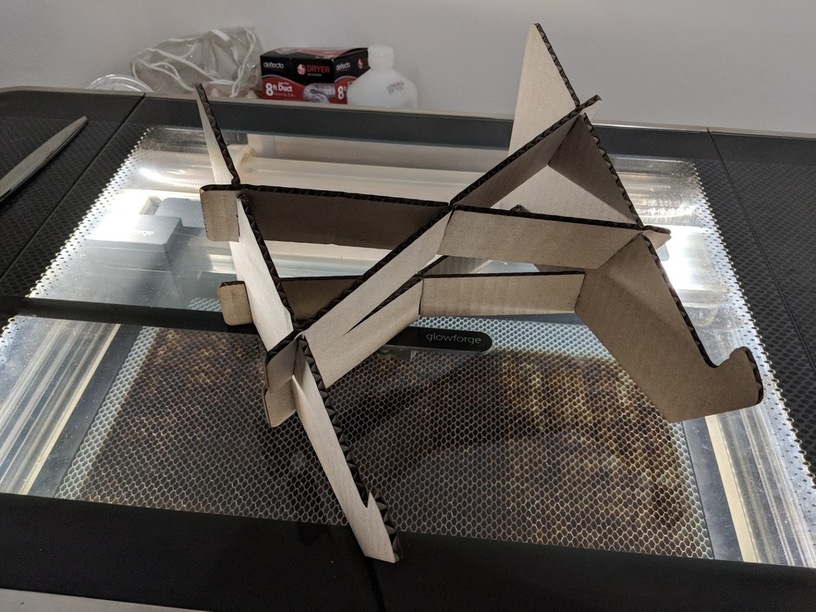
This will cut from a single sheet of 12x20 cardboard in the GFUI and it supports a 15 inch laptop easily.
The slots are .125 inches. I cut it from cardboard that is .170-ish thick cardboard and it worked just fine. I used this stuff Amazon sells (non-affiliated, just easier than cutting up my own boxes): so total material cost was about 40 cents. It is about 3:30 print time on a basic using 250/90 for a nice clean cut. Your mileage may vary.
The entire design depends on the cardboard being able to bend to make the cross braces connect to the sides so don’t try this design in any material other than cardboard. It won’t work without modifications
Warnings:
Don’t type on the laptop keyboard when its on this stand. It’s only cardboard.
Don’t blame me if anything happens to your laptop related to using this stand. It’s only cardboard.
Really, this is cardboard. Use at your own risk.
Now that we’ve determined that an external mouse and keyboard should be used with the laptop when its in this stand, here is the SVG file:
A very slight scale change and power setting adjustment and voila, it’s made of baltic birch and you can abuse it as such. Thanks for posting.
EDIT: Hmm correct me if I’m wrong, but it looks like maybe you didn’t compensate for the angles in your slot width (non-90 degree angles must have wider slots to accommodate “off-angle” cross pieces). Cardboard can be cajoled into fitting anyway, but baltic (or other woods) will be less inclined to humor you. It’s possible to figure out the appropriate slot width with the law of sines.
Yup, this won’t work for any material that won’t bend like cardboard.
You can open up the slots to accommodate other materials but best bet is to redesign the cross braces entirely. That is a different project that will no doubt also be done soon
One thing I discovered building a big drawer oven for slumping glass that making very nice 90° cross braces was not strong but laying them in “sloppy” at a range of different angles was quite strong even though the angle differences were not great.
Also playing with magic fingers has shown me how much a perpendicular plate in an I-beam or box beam is stronger than a simple vertical plate.
If you made all the pieces a bit over twice as wide and only scored so they made a U-channel when folded on the score the result could be a great deal stronger and put together with hot glue and I think you could be typing even on the cardboard.
Making large structural furniture within the capabilities of the Glowforge and excessive available cardboard has been the subject of a long thought experiment since I first put money down on the Glowforge just about a year ago.
Confronted with the fire issues has restrained putting thought to action, but if I can get past that I think there are many possible ways the final result could be quite impressive.
There are times when I really miss my old grey tray. I sometimes regret replacing it. Best part about it is the simple fact that it’s grey! YOU CAN SEE IT in the camera image! Makes it SO much easier to line things up sometimes.
Hi. Yup, it’s what I now refer to as the “limited edition” tray. I was lucky enough to get one of the first (couple hundred?) models before they changed to the black trays.
I think it was originally not as gray though and reflective enough to sometimes cause issues . You’ll note that I’ve done my best to not clean it though… That’s my story and I’m sticking to it, it’s dirty for performance reasons!
I love my limited edition gray tray. I’m a lucky one whose 1-year warranty has been up for more than a month.
You can easily see the margins on it, and inside those margins you can’t tell it’s gray; but outside the margins it’s a cool reminder that I’m one of the lucky ones that had it so early.
Now there’s no difference and I’m really glad that the more artistic and more creative folks have their machines.


 . You’ll note that I’ve done my best to not clean it though… That’s my story and I’m sticking to it, it’s dirty for performance reasons!