
now how do i wrap the continents around a sphere in fusion???
… Quite honestly I like just the sphere more than a globe. Ive seen people who slightly offset the rotation of each completed ring layer by a small amount while assembling to create interesting spiral patterns around the sphere.
10 Likes
I was thinking of a Death Star, myself, but I see what you did there.
1 Like
I believe that Fusion 360 sadly doesn’t have this ability to bend or wrap.
You’ll have to either do the modeling in another program first or find a globe model that’s been pre-continented to bring in to Fusion. There’s several on Thingiverse like this one.
(and I agree with you about offset plain spheres being more interesting)
3 Likes
After watching a tutorial on Autodesk Fusion 360, I downloaded a model of the Earth from the Thingiverse and imported it into Slicer for Autodesk 360 Fusion. To produce a PDF with cut instructions, I did the following:
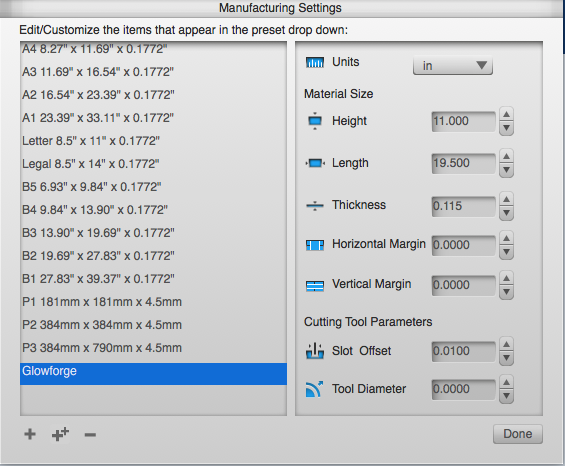
- Adjusted the manufacturing settings, creating a profile for my Glowforge. Note that the thickness is set to 0.115 (typical thickness of cardboard from Amazon boxes)
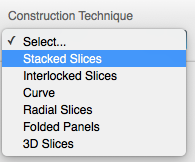
- Selected stacked slices for the construction technique.
-
Adjusted the Slice Direction to align with the North/South poles.
-
Clicked on Modify Form
-
Clicked on the “Hollow” button on the bottom of the screen and hollowed out the center of the globe in order to create rings instead of discs for each slice.
-
Clicked on “Get Plans,” chose PDF as my preferred format and then exported to a file on my computer which you can download here

Cardboard Globe.pdf (1.6 MB)
Note that this is a 22 page PDF with each page sized for the 11"x19.5" cutting area on a Glowforge. Before actually making this, I intend to clean up the PDF and merge a number of pieces onto fewer pages, reducing the unused space currently on many of the pages.
When I print, I intend to cut the blue lines and use the red lines to create score marks which will help align each layer of the complete globe.
Enjoy and please share if you find a better way to do this!
6 Likes
Wow, you did an awesome job on this! Why don’t you create a new post for this in the Free Laser Designs category? I’m afraid folks won’t find it otherwise.
Can’t wait to see it after you cut it!
2 Likes
That’s just about how I did it. I believe the unused space is a side effect of cut placement that allows for the grain of the corrugated cardboard to flow and line up.
Thanks for the suggestion! Posted at:
3 Likes