Since it looks like I’ll be watching while the tiles cut I’m going to post some comments and pictures of my project. I’ve ordered some of the types wood that Glowforge specified in the PDF from Ocooch Hardwoods. However as I’ve mentioned in the past my patience isn’t great and I’m cheap so I wanted to try some other options while I wait for the delivery. I popped into Home Depot here in Canada and picked up one of each of the only two woods they carry in 1/4", Poplar and Oak. The first experiment was the poplar unfinished, just masked and put in the Glowforge. It cost around $10 for the 4’ length. I cut it into thirds to fit in the machine and match the tiles sets, each piece will do the 4 tiles. The poplar cuts and engraves awesome. In fact I hope the picture captures it but the edges aren’t even black, they have a nice brown semi-gloss kind of finish on them straight out of the Glowforge. I put some wipe on polyurethane on one of them but didn’t love what it did. The board I picked quickly had two distinct color tones along it and when I put on the finish it really brought out the two distinct colors which I didn’t love. Next experiment will be to find some stains that will match the tile sets. I will also try the oak which was about $10 for 36". I plan on making a few of these this year, xmas presents and donations to a few fundraisers for auctions.

A big project for sure! Think everyone likes the idea of trying to save money, hard to not at least try!
This won’t be an early choice for a project here … but, still can’t help but have it on the list.
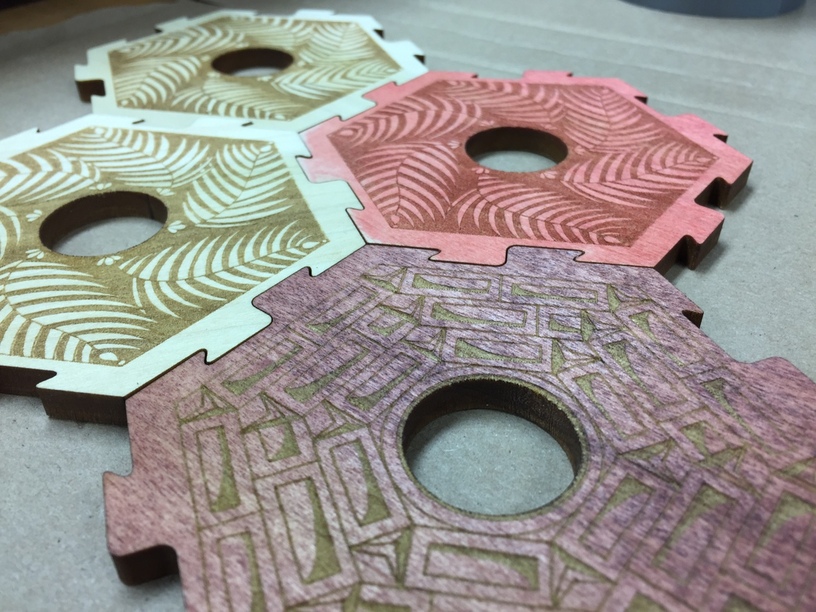
So I mentioned I’m cheap right? Turns out that Minwax water based stain, the type with all the colors, only comes in the large can size. A little more than I needed for this project. So I turned to the acrylic paint stash and watered it down. I can’t believe I haven’t used this technique for craft projects before! It doesn’t penetrate very well but it will definitely do the job and with a quick light sand using 220 grit the raised grain disappears. The pink tile was just proof of concept and applied after the laser. The brick tile I was trying for the right color, which you can see I haven’t quite hit yet, but getting there. It was applied before lasering. I need a darker brown/hint of red color, which I didn’t have in the stash. Ratio was about two parts water to one part paint, applied with a brush, then just wiped off with the grain using a paper towel.
Looks like an option, for sure!
Years ago I used oil based paints to tint their natural based stain. It was for a wooden frame that I made for an oil painting. It was a nice green while still allowing you to see the grain. It might do a better job of penetrating. I was quite happy with the results 25 years ago.
Progressing nicely… I hope to have the full set complete by the weekend. I’ll post my settings and everything once done.
I’m doing this very same project, but I’m using the different woods for the different tiles. How much processing have you had to do to the tiles? I’ve had to put in many many hours of processing of the various tiles.
OH, I should also note that I’m also adding several of the extensions of the game. I think a total of 72 tiles. Plus the border pieces. The only coloring I’m going to do is using blue dye on the water tiles.
What processing are you doing? All I’ve been doing is importing the PDF into Illustrator, cutting out each set of tiles and then re-saving as a separate PDF, all of 10 secs. I’m planning on adding the pips to the center numbers when I get to those which will take a bit of time. I’m also going to purchase the water tiles, but haven’t done that yet.
I assume that, like a lot of people’s projects, you are using the masking as a high contrast to the exposed wood.
Do you think there will be any problem with the masking eventually curling up at the edges, and/or getting dirty, especially with something that’s going to be handled ?
Have you tried a sealer layer over the masking, or would this detract from the contrast too much ?
John
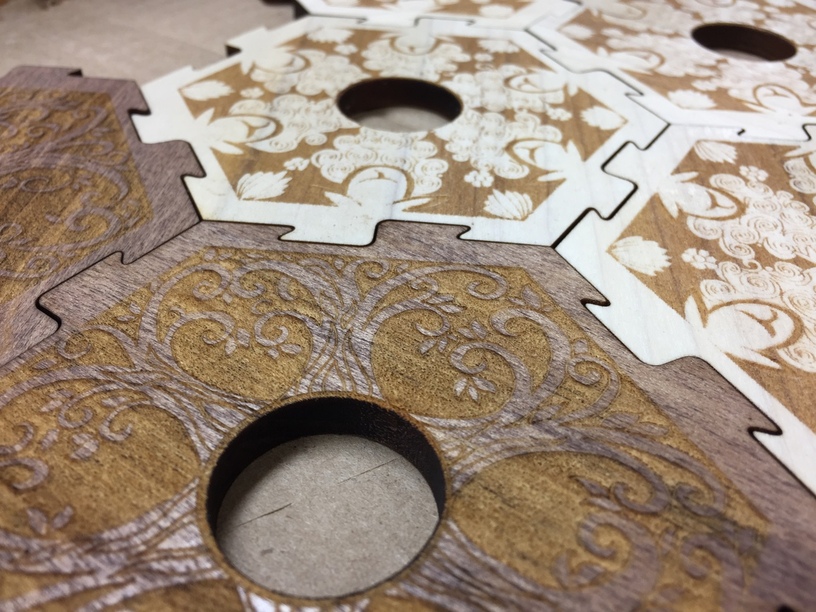
Actually I don’t have any masking left on any of the tiles. I’ve removed it all after engraving. I’m using the acrylic paint/stain technique on both these sets and it’s really quick. I have also hit both these sets with two coats of a clear finish.
My apologies. Is the white an acrylic paint layer then ?
Impressive.
John
Looking good, I did a couple tiles to test on some 5mm ply I picked up from home depot and they came out suprisingly good, but Iiked how they looked on the  ply so for my set at least I went that route because lazy. Maple for Sand/Grain, Cherry for Wood/Clay, and Walnut for Stone and Sheep(whitewashed for contrast).
Well, a number of hours were spent trying to develop my own artwork for the tiles (disclaimer, I am NOT an artist/graphic artist/ etc…) and I was not getting a consistent “feel” for all the tiles. I finally resorted to using the GF free designs. I developed my own style for the number tiles, but made them 1 in round so they were more easily visible from “normal playing distance. I had to “shrink” the GF Catan pieces so they were 3inches from flat side to flat side due to the 1/8” wood I had gotten from Amazon for this project. That meant that I had to enlarge the holes to fit the number pieces. I decided that I didn’t like “through holes” since that meant the number were completely in the hole and difficult to get out (bad for some of the seafarers scenarios that allow numbers to be switched mid-game. I’ve gone to a deep engrave for the holes so the numbers sit “proud” of the tile surface
I also had to “fix” some things on the tiles (each of the sides are not “joined” together at the corners, which means a little more burn at each of those corners. I’m also trying to “simplify” some of the lines so that I can cut more tiles at a time (too many of the “complex” designs at once will cause the GF to not print anything). Also, more simplified designs run a little bit faster, that means a LOT of hours tweaking the files trying to get them to look as similar as possible with as few nodes as possible. (I’ve gotten at least one of the tiles down from over 15,000 nodes to about 2-3,000 nodes which makes over 15 minutes of difference in execution time.) I’ve had to develop my own border pieces, gold pieces, desert pieces, and port pieces.
At what cost in design time? Are you net positive to the good yet? Sometimes I just let the machine brute Force its way. And I’m usually impatient as anything but I can be doing something else while the laser burns most times.
Sounds like it will be an awesome set once complete. Post some pictures!
Well, So far I’m not selling this set. So it’s not going to be net positive at all. However, I like to make things as best as I can and I’m giving this as a gift to my Catan-obsessed parents. I’m hoping that this is one of those things that gets passed along.
There is also a part of me that just really likes to make things efficiently. So the hours spent on this are satisfying as I get better and better at Inkscape, as well as being a labor of love for this gift.
I’ll start another thread, I really am liking the path you’ve been taking on this.
Here you go: My Catan Board So Far
I think the meaning was more, “Did you save more execution time than the extra design time?” Of course, if you are going to run more copies, then you can multiply the time saved.
Yep. I’m amazed sometimes about how deep into the rabbit hole I end up diddling with design optimizations and then look up and see it’s 4 hours later and I should have been in bed. ![]()
Of course there’s the occasional one where I catch that dumb thing I did that will take a design processing time from 40 minutes to 2 and I feel triumphant! And I remember that one the next time I head down the rabbit hole.
(It’s like golf when you remember that one flawless drive and the ting it made off the head of the club and not the seventeen other ones which were lucky to get to the fairway but that one convinces you to come back ![]() )
)