Every time I turn my Glowforge on in the morning it takes a very long time to center and gets stuck on centering. I have turned it off and and back on. unplugged it, made sure nothing was in the way of the laser head, still nothing works. I get it to work eventually but it does take me around an hour every morning, when repeating this process multiple times. The laser head moves around and says scanning and centering but then eventually gets stuck in the middle all the way to the left. Does anyone have any tips as to getting this process going faster?
1 Like
I’d start with the official troubleshooting steps to narrow down causes:
Don’t discount wifi as the issue – nobody ever thinks its wifi, but Glowforges are notoriously picky about their signal, so it’s worth checking to be sure. If it is wifi, some of us have a lot of experience finding ways to get it working better. 
2 Likes
Hi @meghan1 - sorry to hear you’re running into some centering trouble, thanks for letting us know.
I extracted the logs from your printer and see it appears you’ve been able to get some prints going since reaching out to us, that’s good news! I took a bit of a look to understand what might have been causing your trouble and there’s a couple things I’d like to check just to make sure the issue doesn’t creep back up.
For starters, if you do see the centering trouble return, please try these steps and let us know how it goes.
- Turn off your Glowforge
- Clean your lid camera with a Zeiss wipe
- Remove all material from the crumb tray
- Check that the carriage plate is installed correctly with the teeth on the belt pointing to the inside. You can follow these instructions to clean and check Carriage Plate.
I’d also like to double check the connections to your printer head, could you please do the following?
- Turn off your Glowforge.
- Holding only the finished black surfaces, grasp the printer head as shown. Pull gently up and back to disengage the magnets and remove the head.

- There is a small tab in the center of the wire ribbon. Push down fully on the tab to release it, and gently pull the wire ribbon plug from the printer head.
- Take a clear photo of the gold pins inside the printer head where you just unplugged the wire ribbon. It should look like this.
- Pick up the printer head and wire ribbon. Make sure the tab on the wire ribbon is facing up. Slide the ribbon back into the head until it clicks.
- As shown, lower the printer head over the metal plate so that it rests next to the two round posts. Then push it gently away from you – you’ll feel a “click” as magnets pull the printer head until it sits snugly atop the metal plate.
- Pull the laser arm all the way forward.
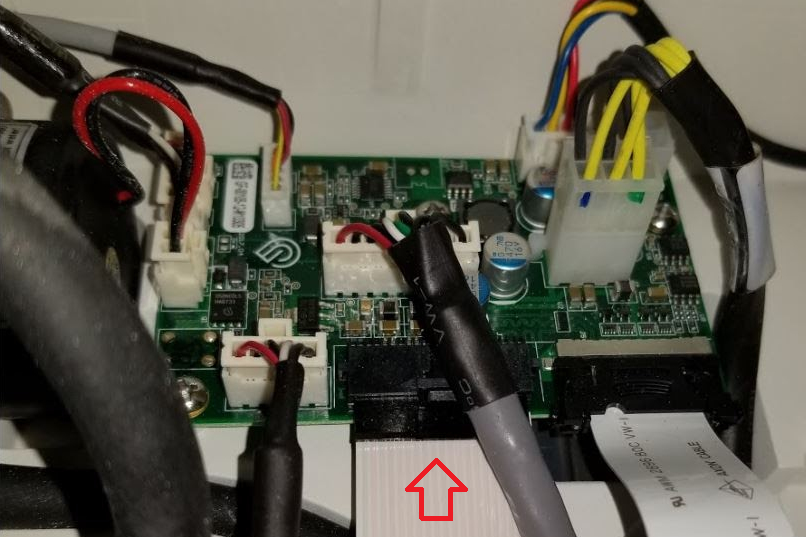
- Reach over the laser arm, and to the left of the inside of the unit and you’ll see this circuit board:
- Take a photo of the circuit board. If the cable I’ve indicated above with the red arrow appears to be loose, please reconnect it and try printing again. This cable should ‘click’ back into place.
- Turn your Glowforge back on.
- Send us the photos you took in step 4 and step 9.


Please let me know if you have any questions.
It’s been a while since we’ve heard back from you- I’m going to go ahead and close this topic. Please feel free to open another request here or via email if you are still having trouble.