Christmas Puzzles

I could do a ton of things with the laser (and otherwise) to really customize the space and make it more efficient. But getting organized is hard!

1 Like

as far as masking goes, i haven’t done it.

if you do a good job of sealing the top of your puzzle, you can easily clean it in place before removing from the crumb tray. heck, you can even take the crumb tray out and clean it somewhere else.

i leave the whole cut puzzle on the tray when it’s completed. then i take water and a paper towel. dampen the paper towel, wipe (ok, scrub, it takes some elbow juice) down the puzzle. rinse (not literally, i use a new piece of paper towel) and repeat until the char is removed from the puzzle.

now, i haven’t made chipboard puzzles, maybe that’s not as good of an idea for that. i’ve only made wooden puzzles (1/8 and 1/4). but it’s worked well for me.

You sent me down a rabbit hole with mentioning this printer. I don’t have the space, or the requirement of this model, but I’ve been looking at the Canon Pixma Pro-100, which has a $250 rebate on B&H with the included free photo paper. The only hurdle is that shipping it to me is like $165, so I’m trying to see if a friend on the mainland will ship it out to me. Looks like I can save about $60 going that route, as it’s free to anywhere in the contingent 48 states. I’d just have him ship it through FedEx or USPS. I’d love to also pickup the Daige Maxit, but I think my wife can only handle me buying big, new, expensive toys every few months. Going to love seeing her face when I roll this printer through the door :sweat_smile:

1 Like

That’s a Canon rebate, so should be applicable through any authorized retailer.

Here is the form:

1 Like

we have an earlier version of the Xyron. I really like it. for say player names/numbers for my field hockey team. so everybody knows who to cheer for :slight_smile:

Gonna need to keep digging then! Bestbuy has them for $500 :expressionless: It was attractive that it also came with the 50 sheets of 13x19 free, and with that addition it qualified for the additional $50 off in the rebate. Thanks for pointing that out, though!

Work the system :slight_smile: Best Buy will price match BH, Amazon, etc. Can’t believe they are asking $499, crazy. Even Canon is selling it on Amazon for like $280 (not prime). Amazon is selling one directly for 359, with Prime shipping.

1 Like

That Best Buy one looks like it’ll be the best bet, it also comes with a $70 gift card, plus I get 5% back in rewards on my CC. I literally just bought a chest freezer from Best Buy this morning, plus there are a couple of other things I’ve been wanting to get from there so the rewards and GC combo will go far. You’re the man for pointing that rebate info out, and I appreciate all the help you’re always willing to share!

Update: Literally checked out at Best Buy online for the $359, refreshed my amazon page, and the price dropped to $321! They price matched the new price, so I’m feeling pretty good about the order. Anybody interested in getting a good deal on one of these printers, now’s your chance!

4 Likes

I got a $300 rebate on my Canon as well. I bought from B&H. The 1000 is a beast. Heavy sucka!

1 Like

Yeah, I just got mine today, but my power went out right after it showed up so I haven’t had a chance to play with it. Plus, it showed up a lot faster than I thought it would, so I don’t really know where I’m going to put it; this thing is humongous!

Hi, my 93 yr old grandmother just surprised me with a GF. She loved puzzles and I want to make her one. I’ve been reading everything this community has to say and so grateful for everyone’s willingness to share and help. I have 3 questions about your puzzles.

  1. Did you spray the Mod Podge sealer onto the chipboard and photo or was that only after it was already adhered to the chipboard with the 3M Photo Mount adhesive?
  2. How did you smooth out air pockets or bubbles, if any?
  3. Do you have to cut down chipboard to size of photo first or did GF cut it?

So sorry for so many questions and I really appreciate you taking time to answer. My grandmother would be so excited and happy to see I made her a puzzle. I want my thank you to her be special. Especially since she is the one who bought it for me.

1 Like

No problem!

I taped the photo to a separate piece of cardboard to spray the sealer on before gluing it to the chipboard, but it might be better to do so after gluing it to the chipboard, because getting the air bubbles out requires you to use a roller like this one:

https://www.amazon.com/dp/B07YDNKSH6/ref=cm_sw_r_sms_apa_i_B86KEb0WHN1SR

The photos tend to be slightly bigger than the CB, so I take a razor knife and trim them down to the chipboard size, this is also after I’ve glued them down. If they’re not bigger, say because you got a smaller than an 8x10, then try and glue it as straight as possible on the CB.

The simplest way I’ve found to do puzzles now, is by using a jig. So I’ll go into Illustrator, set up my file to what my CB size is, and use a sacrificial sheet of wood that I’ve placed pushed all the way into a direction, in my case, I butt it up against the left side of the tray, then slide it towards the front door/to me as far as it will go, once again having it butt up against the door. I also always make sure that my tray is as far as it can go in the same SouthWest direction within its divots. This is so I know I’ll get the same placement again and again when using this jig. I use the Honeycomb Bed Pins, to hold the jog in place, then I cut out where the CB will go. The jig will now give me accurate, repeatable placement for future puzzles.

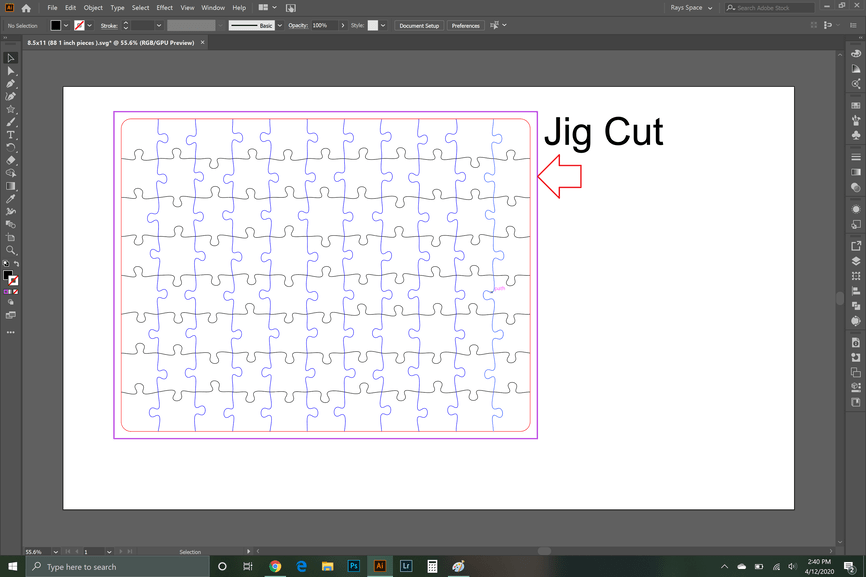
I go back into that same file and center the puzzle to where I created the cutout for the jig so when I upload it, it should match the where I cutout the CB hole in the jig. This step isn’t entirely necessary as long as you centered your original file to begin with, but if you had it offset at all, you’ll need to align your puzzle file to the jig file. If you take a look at this example, you can see that my puzzle isn’t aligned to the center of the overall file, but it is aligned to the center of the jig cut.

It’s also not as big a deal as it used to be since accuracy has been greatly increased since this post was originally made. So be sure to run the Camera Calibrator, because that should help your machine be pretty precise!If you setup your puzzle to be slightly smaller than your jig, similar to my example, it’s not that bad to place it manually without having to worry about it being too far off, just remember to use the Set Focus tool if you do place it manually, rather than using the premade file method.

Some additional notes, not all of the chipboard will be the exact same size, so it may be a good idea to make your jig cut slightly bigger than the CB’s actual size, not by much, we’re talking under an 1/8th bigger. @jbmanning5 has some of the best guides on puzzle making, one of which is explains a great way to mask the puzzles How To: Weed a Puzzle Like A Boss

Finally, when I mentioned making my jig by butting it against the southwest corner of the tray and GF machine, I should also mention that I used an oversized sheet that was taller than an average sheet of Proofgrade, I believe it was closer to 16x20, rather than the 11x20 of the PG material. This is how I was able to have space at the top of the jig. You’ll notice that if you slide a regular sheet of PG in the same way as I mentioned, you won’t have much space to work with towards the top.

Feel free to ask more questions if the need arises, I know that everyone I’ve made a puzzle for has loved them, and in fact, within the last few days I’ve had people bring them up because they’re stuck at home with nothing to do!

4 Likes

Ha thanks. @lindyg11 if you search my name and puzzles, you’ll probably find a lot of stuff re puzzles that I’ve posted scattered about.

The way to do it, like @raymondking32 said, is to basically use a jig and don’t worry about the camera view - no matter how close or how far off it is. I score a guidelines, glue to the guidelines and then off to the races. One of my first projects was making a set of crumbtray rulers for the edges of the crumbtray so that I could locate the board in the exact same place every time. A bleed around the edge makes life a lot easier. I set bleeds up on every puzzle I cut - which mostly negates any errors in placing the board back in the machine as well as not gluing it perfect.

I started my puzzle business with a Glowforge - so you can definitely make some quality stuff.

For example:

5 Likes

That’s a beautiful photo! I don’t intend to make puzzles as a business. I’m not a photographer. I just wanted to make a thank you gift for grandma since she bought the GF for me. She loves puzzles and I have a family photo I wanted to use for the puzzle. Thanks tons for your help. I really appreciate it😊

1 Like

Whew, that’s a lot of info. Thank you! I just thought I could make a puzzle for grandma from a family photo as a thank you gift. I really appreciate you taking time to reply. :blush:

1 Like

You can laminate a picture to chipboard or whatever by applying the adhesive, then letting it sit under a stack of heavy books or similar. I use my pile of 12x12 material for my GF, which probably weighs about 15lbs.

1 Like

Your grandmother rocks!

2 Likes

oh I hadn’t thought of that. I guess I was scared the laminated pouch would be wrong material for a laser. I was afraid it would catch fire or melt or something so I was too chicken to use it

By laminate, I mean the process of layering materials, i.e. apply the picture to the backing of chipboard or whatever with adhesive, not using a “laminating machine” with a plastic cover. Definitely don’t want to laser that.

oops, well I feel “not smart” Thanks for clarifying :rofl:

1 Like