Hey everyone! I’m relatively new to Glowforge but have been really enjoying it so far. I’m working on designing a game board that has a lid secured by 4 magnets. They are 1/8" thick and I’d like to sink them into 1/4" plywood. I’m assuming I’ll use the etching setting for this, but wanted to know if anyone had experience with controlling the depth of the etch that I might use as a jumping off point. I’m going to be using maple, if that helps.
Any experiences you can share, any tips and tricks for toying with etch settings, any anything is greatly appreciated. Thanks!
You will need to do a bit of experimentation to get your engrave the proper depth. I suggest making a simple square for the test. Engraving depth is variable depending on the material and the Glowforge settings. Experiment engraving your small test square on the 1/4" material until you have the depth you desire. You might start with one pass at high power/slow speed/high lpi, or with two passes at lower power and faster speed.
If no one has done any work like this before, I’ll definitely do a lot of testing. My hope here was that someone had done the work before and had a good place for me to start. Thanks though!
I’ve actually done this a lot for using magnets, but I must agree with @dklgood …testing for your particular design and material is pretty much the best way to go. It won’t take you long. I know because I had to do that myself. Your choice of materials is going to have the biggest impact on what settings you end up with.
Thanks everyone. It just occurred to me that instead of engraving 1/8" into a 1/4" piece, I could just do two layered 1/8" pieces and cut a hole in one and maybe a light engrave on the other just to help sink it. Rather than trying to engrave the entirety of the hole. A little extra work, but I think this might be the most precise way to go about things. Thoughts?
I would agree with you. Good work around. Testing is going to be key anyway, though…but, then you’ll have your own settings dialed in for the next time you need them.
I’ve done it for the ‘Save the Date’ announcements for my daughter’s wedding. About 3 tests got me there. I under-sized the round pocket by a hundredth or so and pushed the magnets in with vice-grips set for the finished thickness. Nice and solid, no glue needed. The magnets I used were rare-earth 3 mm.
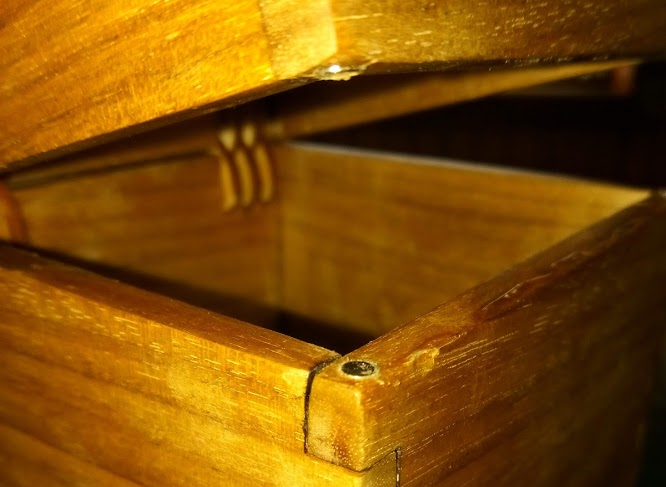
You don’t always need a laser. Sometimes you cannot even get where you need to go. I have a lot of 1/8" dia magnets but even in 1/4 diameter wood putting a shallow hole in the side of the wood with precision can get tricky. This is an example…
Even an electric drill can be hard to get right, so I have an antique one of these…
There is much better control for both place and depth.
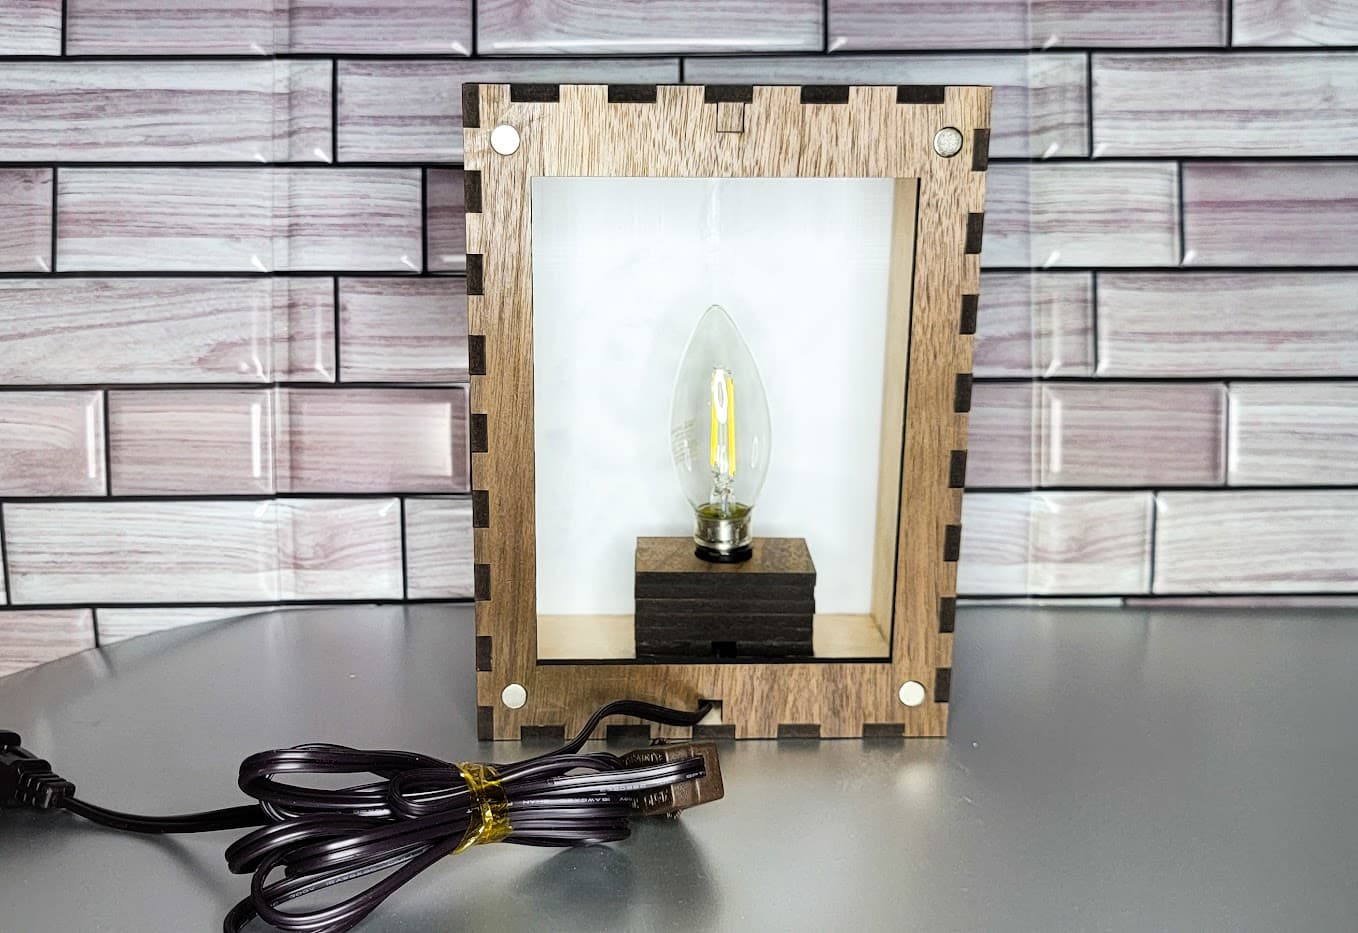
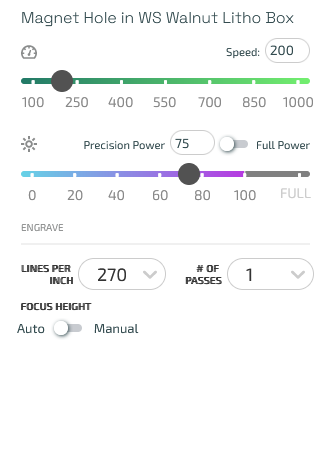
I make lightboxes for my Lithophanes. I used MDF core Walnut and magnets from Harbor Freight. Through testing I have found Speed 200, Power 75, LPI of 270 to work for my purposes. Next, Super Glue does not like to hold the magnet in, and 2 part epoxy works much better.
@3pm111 , It worked very well, with the right diameter you won’t have any doubt about the security after you push it in. Works well with MDF but thin section wood would tend to split easily.
I’ll just share my $0.02 worth… I use a drill to set magnets into wood. I use epoxy, which squeezes out and is easily wiped off the sides with a paper towel soaked in alcohol. You can use the laser to start a pilot hole for perfect alignment/positioning before drilling. I’ve had too many split or come loose, so I make the hole a little larger than the magnets.
I successfully engraved into Thick Maple Plywood on my basic at Full/300 for a 1/8 x 1/8 magnet using 0.119 as width. This make a tight friction fit. It seems to hold great but will likely add a drop of thick Starbond CA glue to be sure. My application is holding large flyfishing flies so there will be a lot of tugs adding and removing the flies.
I have not had good luck with starbond or other CA glues. It just does not hold the magnet in. Maybe it is the char in the bottom of the hole, or that the CA glue does not want to stick to the metal magnet? Epoxy have been great though.
On getting a good glue surface, I have a sharp dental type pick I use for weeding that I got from Harbor Freight.
Any suggestions on a flat one, say 1/8 or 1/16 wide to scrape the char out with?
Not directly. I use the same set maybe, the orange handled ones sold in a 4 pack.
I mostly use MDF core walnut. I get a black char in the bottom and have tried scratching it out, or putting some CA glue in the hole, waiting for it to soak in and setup, then using more to glue the magnet in. Of the 8 I am gluing in, at least 2 usually fall out. UV resin would work ok too, except you cant get the light under the magnet. So, I use 5 minute epoxy now and its working well.