I was replying to another thread but it got locked down before I hit the post button. Rather than Private Message the information, I figured I’d post here since it may be of value to people:
The original post I was replying to was:
So, @Bibliocat - here is a really quick and easy way to crop photos and other rasters into whatever shapes you want, without destructively editing the source file (in Illustrator, at least).
A quick and simple way to do this is to make your crop design, make it into a clipping mask (Object > Clipping Mask > Make) and then Object > Rasterize that clipping mask you just made. This will leave the source file completely alone. If you choose embed, it will write the image data into the file. If you choose “linked”, it will create a new raster image rather than modify the original image.
If you also wanted a cut line, you could just make your crop shape, make a copy of the shape and temporarily hide it, make your clipping mask and expand, and then unhide the copy before you save to SVG.
This has become my go-to workflow lately. I make duplicates of things (in the same file) before I destructively modify them, and then hide the original. So I end up with a lot of hidden layers, but if I discover that an hour ago, I misspelled a word, I can at least go back to the point where it was still a text object and fix it (and sadly, repeat all the following steps). I wish there were a 2D drawing tool like Illustrator with the amazing timeline replay features of Fusion 360.
I hate saying stuff about AI from memory without testing - but put your text behind the object you want to cut it out of. Select both the text and the object. And then in your pathfinder menu, do an Option-Click (or ALT-click, I guess for PC) on Exclude. That will drop the text via a compound shape but the text will still be editable and movable if you double-click into the compound shape (isolation mode).
For anything where I might want to go back to an earlier step and make a change. Rasterizing text was just an example, although not the best because most of the time that can be done last, or not at all if it’s rasterized on save. But, for example, it’s common to back-engrave acrylic, and we need to rasterize anything that’s flipped, so I make a copy before flipping in case I want to come back and change some aspect of the design.
I find it’s better to develop a habit of doing this automatically, more than necessary, so that I don’t forget when the time comes that I need it.
If so what I do is create my object non-destructively using the clipping path method, making sure the object is on its own layer. This allows me to tweak the look of the clipping object and its contents.
I then make a copy of the layer.
Then you can use the Pathfnder / XX functions to get the object to cut away all the normally hidden cropped items. “XX” can be your choice of different Pathfinder function options depending on your production needs.
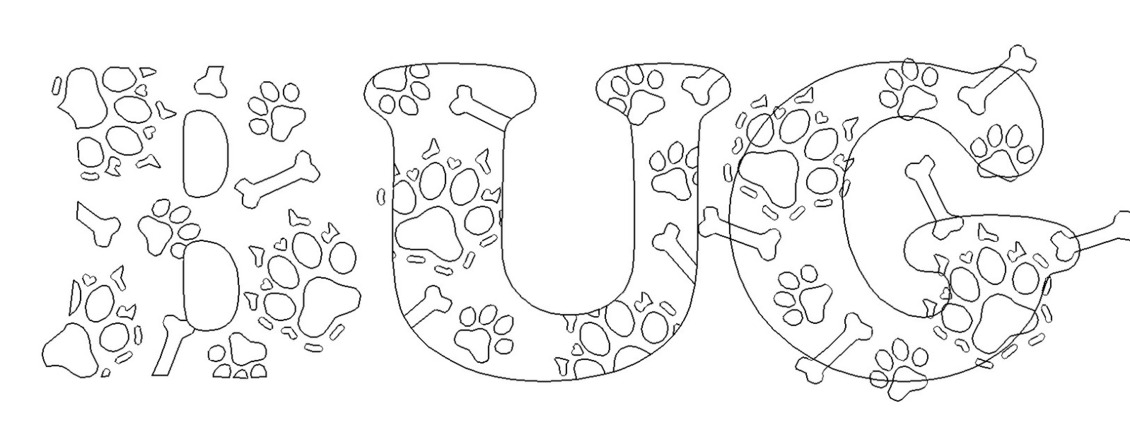
From a recent project of mine here is shown three approaches, looking at the Wireframe mode. The “G” at right is a Clipping Masked item. If you were to print this conventionally, all you would see is the paws-and-bones print showing through the “invisible” outer letter shape. However, as you’ve likely discovered, if you save this as an SVG and upload to GFUI that this item will not cut/engrave correctly—all the previously hidden masked content will be there.
However, if I select a Clipping Masked object— here the “U” — I can apply the Pathfinder / Divide function. This then trims away all the previously masked pattern content. However, I am also left with the outer letter “mask” as a vector object. This will have to be trimmed away manually if I don’t want that vector content in my production art.
However, you can also choose Pathfinder / Merge (e.g., the “B” in this example) so that I am only left with vector objects remaining of what was previously visible only through the Clipping Mask. This is the option I wanted because I was going to have this pattern cut out from my material, and the vectors of the letter shop are unneeded. However the counter areas of the “B” shape still have to be edited away…
So depending on how you are using the Clipping Mask function in the production environ, you can choose other Pathfinder options to obtain different “destructive” results. Any of them may need a little clean-up after. (In this case both “U” and “B” need it to get to my final intended result.)
Thank you! Yes, I was looking for a destructive method - sorry I wasn’t clear! All I could find was the method I used, which would not cut properly, since the hidden content was still present.
I will have to play with this a little more. I experimented with different things with Pathfinder, but had not been able to get that to do what I needed. I was afraid it wasn’t working because I was trying to use a path to cut a shape from a raster image, and that it would only work with two vector objects. But I shall try again.
Thank you for the responses! I’ve never worked with vectors before (or a laser cutter) so this is a whole new world. I was able to make a die, though, so I was very proud of that.
Rastering can work fine for a Clipping Mask destined for an engrave. In my example, I was cutting out the vector pattern of the masked content, so a destructive alternative was needed.
I’ve been using photoshop since version 2, and Im a fairly proficient illustrator user, but this tip changed my world. I’ve made quite good use of it in the last few months.
Thank you for this! I use Inkscape and I’ve been trying to accomplish this by creating a pattern that I can use to fill an object. The only problem is that I can’t find the patterns I create when I want to apply them. I put them in the Inkscape “Pattern” folder but they don’t appear in the menu when I need them. This is a helpful work-around.