Cuts drastically shift after ~8 cuts in a row

Twice now in two weeks I have run into a problem where my cuts suddenly shift by nearly 6 times the normal GFUI shift! I’m wondering if others have seen this or if support can comment on it.

Both times I was doing a series of repeated cuts of the same shapes using my Pros passthru slot. The first time it happened I was not expecting it so I did not know to look for a trigger or pattern. The second time I was prepared.

Based on my observations this time it looks like starting about the 8th cutting of the same shape there was a massive vertical shift in where the shape gets cut.

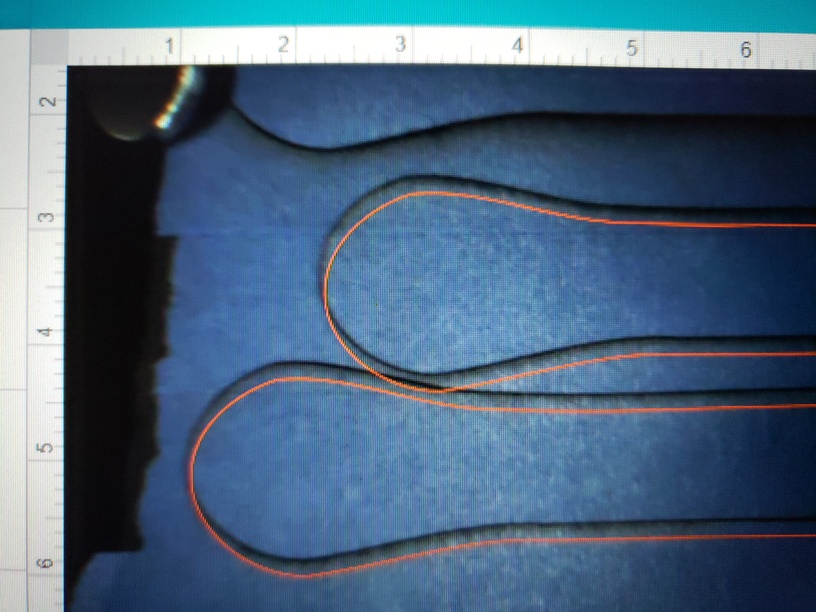
I know to “pre-shift” my shapes in order to compensate for the slight shift in where the cut actually happens vs the GFUI. This time I made the same “pre-shift” (16 down, 0 horizontal at 500% zoom) and I got the results I expected:

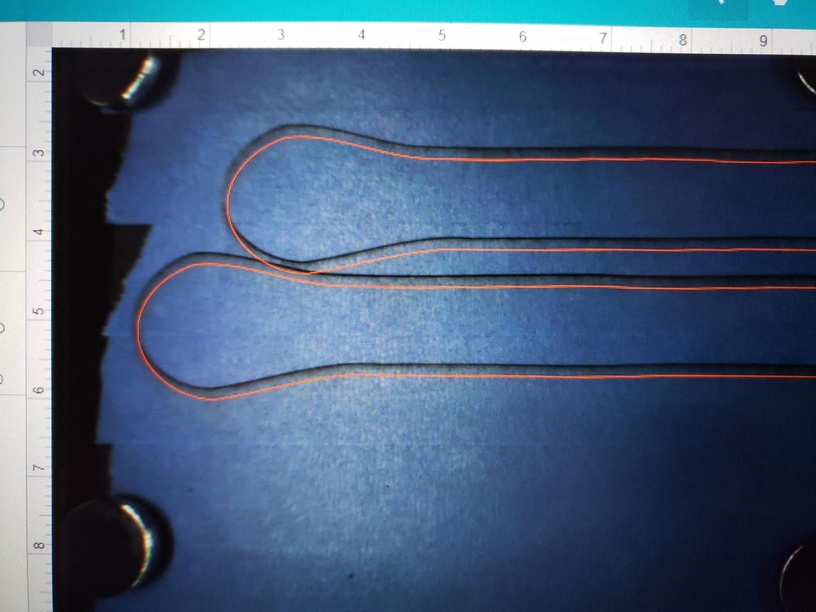
I cut the shapes twice for a total of 4 passes at 200 speed and 100%.

Since I was using my passthru and needed to make several more cuts without moving the artwork I used my laser level hack to tell how far up to move the material. I opened my GF and used my laser level to track where the cuts actually happened:

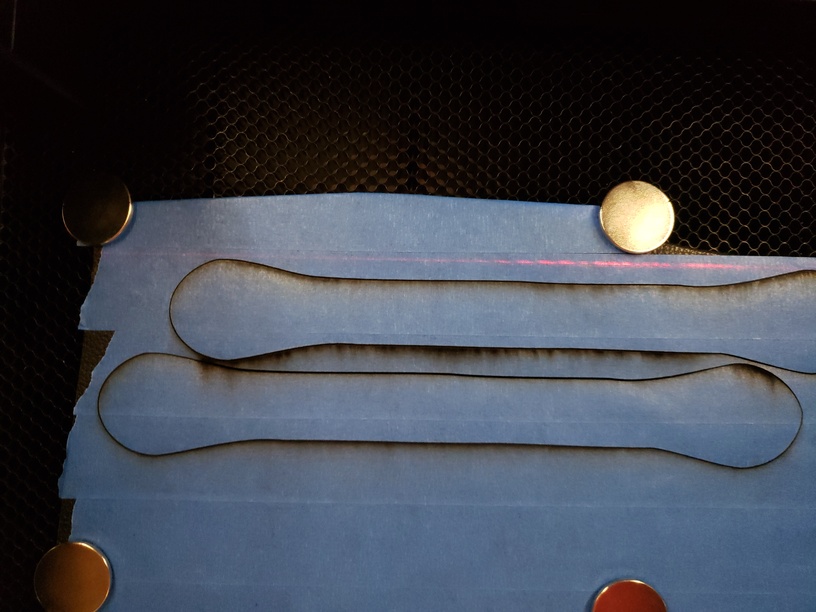
I then carefully pulled the material up and aligned it for my next pair of cuts:

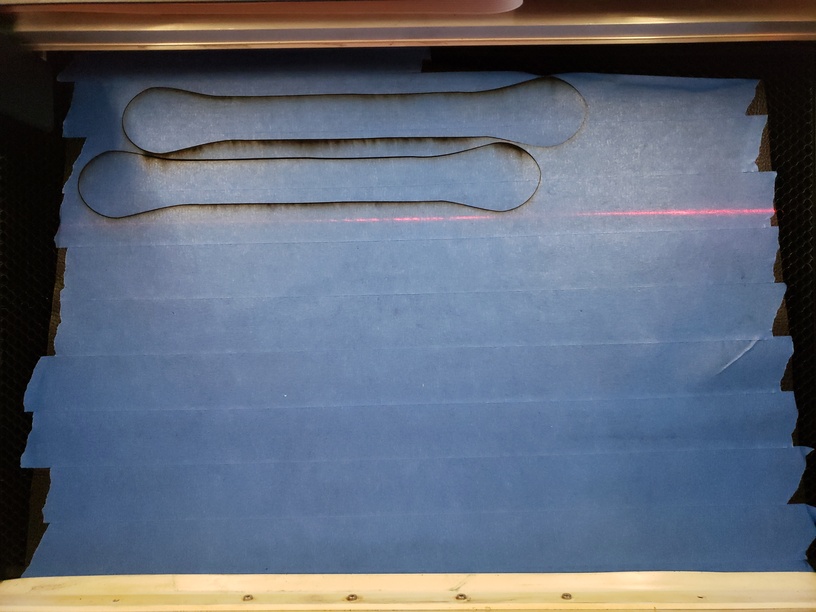
I then closed the GF and did two more cuts to get 4 passes with the same settings. Again I got the normal shift I expected:

I repeated this 2 more times taking care each time to double check everything. On my 5th set of cuts the actual cuts were WAAAY off vertically:

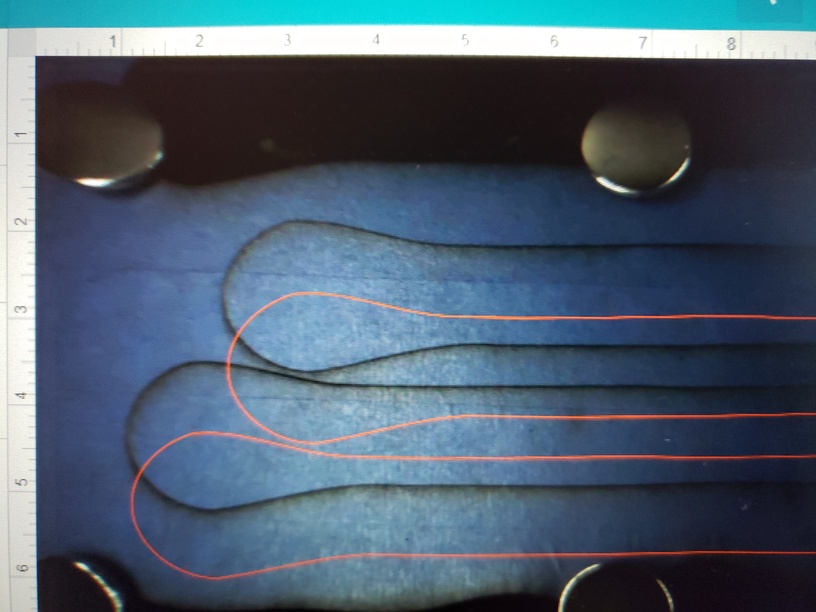
ALL of my subsequent cuts from that point on were all off by the same amount! Because I did not want to take the chance the shift could still be there if I restarted the GFUI (my material is limited), I did the only safe option and power cycleed my GF.

This is what my material looks like after I was all done:

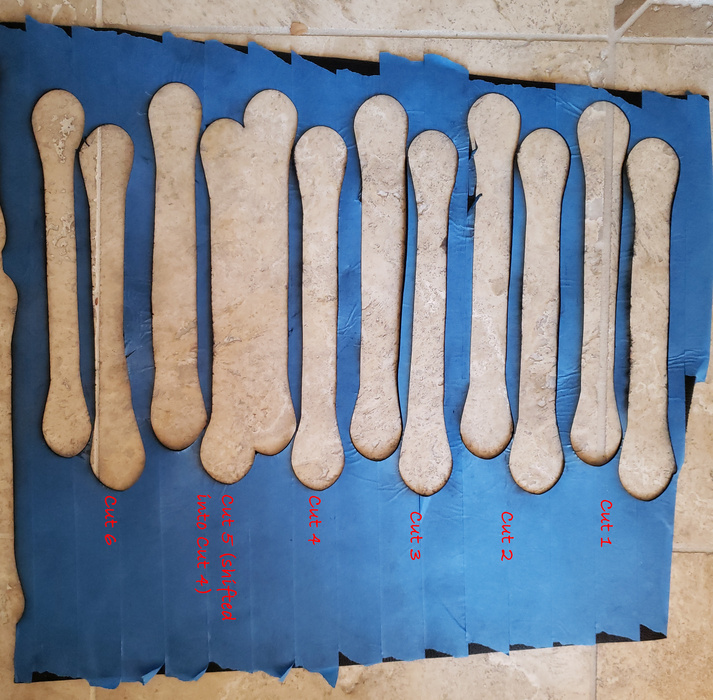
Since each “cut” was really 2 cuttings at 2 passes (to get a total of 4 passes) the shift happened on my 8th cut for that session. I did not close the GFUI between cuts, I simply dismissed the “Done” message and either redid the cut if I had only done 2 passes or sifted the material and then did more cuts.

Before I shut down the GFUI I did the shift counting that others taught me and I found the shift was 90 up and 0 horizontally at 500% zoom. That’s a 6 fold increase from I normally have.

Has anyone else had a similar experience? Does anyone have any ideas on how to avoid this short of reloading the GFUI (and then readjusting the shape positions) or power cycling my GF??

2 Likes

I did have this problem quite a while back and the cuts became increasingly odd. By turning off the machine and back on it would re-calibrate and suddenly become accurate, which was a problem as I had established the offset. eventually the locating became better and better till I got a replacement machine that is off again but not as bad as before.

I now have to run a test cut, so I set it where I want run the test and then move it from where it hit to where it was, but I had to guess some as when it moves it is no longer where it was.

The only time I’ve ever had this happen was when I accidentally bumped the head while the machine was on, throwing off the calibration. It didn’t take much of a bump either. Now I know if I get any taps to the head while removing material or whatever, I’m gonna have to do a power cycle or the following results will be off.

The taps can be virtual as well as I found with a design that had a lot of sudden changes in direction, I was making three passes and each was about a mm off of where the one before was. As the head changed direction quickly the inertia was messing with the calibration, Not much each time but cumulatively quite a lot.

4 Likes

The software on your Glowforge is responsible for ensuring that the print lands on the material in the same place as the preview. When you’re done with a print, let a new image load. If the print appears on screen far from where it was supposed to go, you may have an alignment problem.

Most alignment problems come from the material being closer or farther from the camera than expected. While the software is still improving, you can take these steps for the most accurate alignment results:

  • Use Proofgrade materials.
  • If you don’t use Proofgrade materials, use a precision set of calipers to measure your material, and enter the thickness in the “uncertified materials” dialog.
  • Use material that is not warped or tilted.
  • Place your design near the center of the bed.
  • Clean the area underneath your crumb tray, particularly the four indentations on the floor.
  • Reboot the machine. Alignment can drift over time, particularly if you bump the head of your Glowforge while removing material.

We’d like to have you try a few troubleshooting steps for us:

  1. Turn off your Glowforge.
  2. Check for small pieces of debris or dust.
  • Check the lower door to make sure it closes all the way. It may require some force to open, but open it, wipe any dust off the edges, and close it all the way.
  • Remove the tray and clean any dust or debris from the surface underneath. Pay careful attention to remove all debris from the four dimples where the tray rests.
  • Check the lid to make sure it closes all the way. Small particles of material, such as dust or debris, can prevent it from closing completely.
  1. Check the surface your Glowforge is on to make sure it’s flat. Ensure it is not twisted slightly and that there is no debris propping up one side of the machine.
  2. Turn your Glowforge back on.
  3. We included an extra piece of Proofgrade Draftboard with your materials shipment for troubleshooting. Place the Proofgrade Draftboard in the center of the bed and print the Gift of Good Measure using the default settings.
  4. When the print finishes, leave the lid closed and wait until the fans stop and the picture updates. Without moving your artwork or your material, take a screenshot of the Workspace to show us the difference between the artwork placement and the actual print placement. Make sure to include the rulers in your screenshot and show as much of the bed as possible.
  • Mac: Press Shift-Command-4 and click and drag a box around your image. You’ll find the screenshot file saved on your desktop.
  • Windows: Click on the Start Menu and type “snipping tool”. Open the Snipping Tool > New then click and drag a box around your image. Click the Save icon and name and save your file.
  1. Send us the screenshot along with the date and time of the print, and we’ll investigate.

Should you finish all of these steps, and find that you have an alignment error of more than 1/4", please contact us so we can investigate.

Additionally, as @cynd11 suggested, bumping the head with your hand can cause alignment issues like this. If you manually move the head, be sure to reboot so the machine can recalibrate.

It’s been a little while since I’ve seen any replies on this thread so I’m going to close it. If you still need help with this please either start a new thread or email support@glowforge.com.