I had that issue in the past and found that little checkbox from somewhere else in these forums, so it isn’t that one. Before I found that though, I was going crazy!
1 Like
Maybe check it again just in case. Sometimes it does not like to stay put, I have to reset it often.
1 Like
As far as I could see the material didn’t move, and the final product didn’t have any bare spots in the lines or overlaps that would happen if it shifted. Also, there is no resistance in the gantry movement.
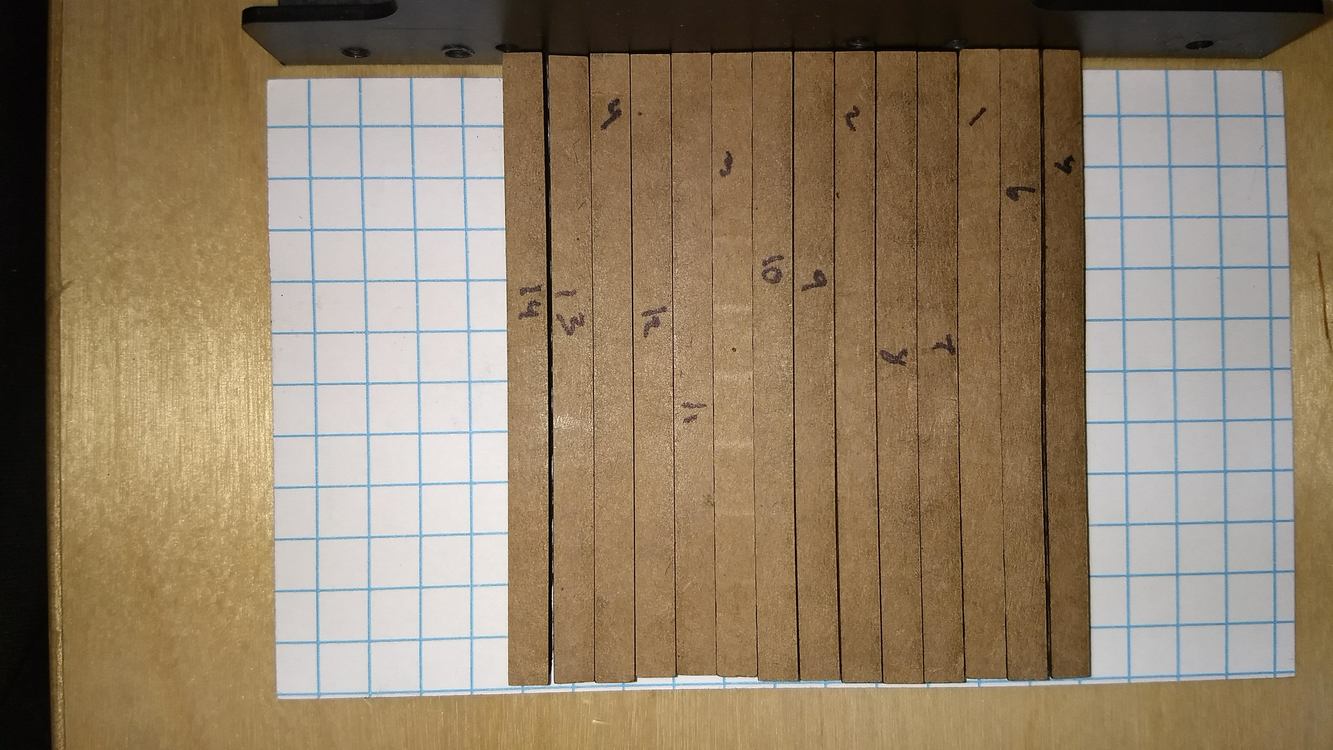
I’m trying out the rectangles again but in a grid across the x-axis and being smart and labeling them as I take them out to see the variations in size! Doing that I find something interesting… The pictures below show the cardboard piece with a bunch of the same rectangle cut out. First row is 5, 7, 9, 11, 13 left to right. Second is 6, 8, 10, 12, 14 left to right. The bottom 4 horizontal rectangles are 1, 2, 3, 4 from left to right. When I take them all out and put them against a straight edge, 1, 3, 11, and 12 are all noticeably shorter than the rest. Also, if I pair them up so that all the same cuts in the x region are next to each other ( 3, 11, and 12; 1, 5, and 6; etc.) I can see little groups of 3 rectangles that are the same width.
So, if i use the same shape (copied pasted) and I’m getting different widths still, AND the differing widths line up to general areas of the x-axis, I’m feeling like its less to do with the file and more to do with the carriage.

1 Like
Checked and it was still on. Good to know that I should check it often though!
Is that cardboard? You might need to run it on Draftboard if you haven’t tried it already…(Support can’t look into it from a mechanical standpoint unless you test it on Proofgrade materials.)
I’m not discounting the problem, but I have also had issues with cutting cardboard evenly…it’s partially the nature of the beast. You might want to run a couple of rectangles on the sheet of DB that they send along for troubleshooting purposes. I’d be interested in seeing if the rectangles come out significantly different when you cut in that. (When you run the test, if you still get a large variance, record the date, time and time zone so you can tell support…they’ll need to pull your data.)
Good point/good to know about cardboard. It makes sense when its flimsy in parts between the corrugations/can bend enough to create enough of a difference.
If I can wait until tomorrow (hopefully that is when support will get to me!) is it a better idea to not use my draftboard unless they tell me to? I would hate to get partway through the troubleshooting process and run out of draft board to have them say I need to buy more and wait a week.
You can wait to hear from them…testing shouldn’t take up a whole sheet, but they might prefer to have you print the Gift of Good Measure…it’s what they usually request. 
Roger. I think that I will give up for tonight, or if not I’ll do it on the BB that I have. It may not be up to their standards, but it has worked out for really precise cuts on my past GF.
Thanks again for taking so much time out of your night @Jules! If this were Reddit I’d give you gold, Facebook I’d give you thumbs ups, service of choice I’d give you kudos of choice!
2 Likes
Chuckle! My pleasure. Hope it winds up being nothing.
1 Like
Thanks for all your help, @Jules.
@lordoftrumpets Thanks for reaching out and for providing all the information about what you tried. I’m so sorry your prints aren’t turning out quite right.
Would you please do another test for me?
- Turn off your Glowforge, then turn it back on
- We included an extra piece of Proofgrade Draftboard with your materials shipment for troubleshooting. Place Proofgrade Draftboard in the bed and load the Gift of Good Measure design.
- Set the score and engrave steps to ‘ignore.’
- Create a few copies of the Gift of Good Measure design and line them up along the top of the material (similar to your rectangle test).
- Print the Gift of Good measure using the default settings. Allow the print to finish.
- When the print finishes, leave the lid closed and wait until the fans stop and the picture of the bed updates.
- Check the completed print.
If the issue still occurs please let me know the date and time of the finished print and post a photo that shows the different lengths of the Gift of Good Measure prints.
Thanks in advance!
1 Like
Don’t think it’s pinned, but it’s findable. It was sort of understood for a while, but then it was officially announced in an Announcement a few months ago from Dan. Basically sums up as, either post here or e-mail support, don’t do both because then support has to de-dup the cases before acting on one of them.
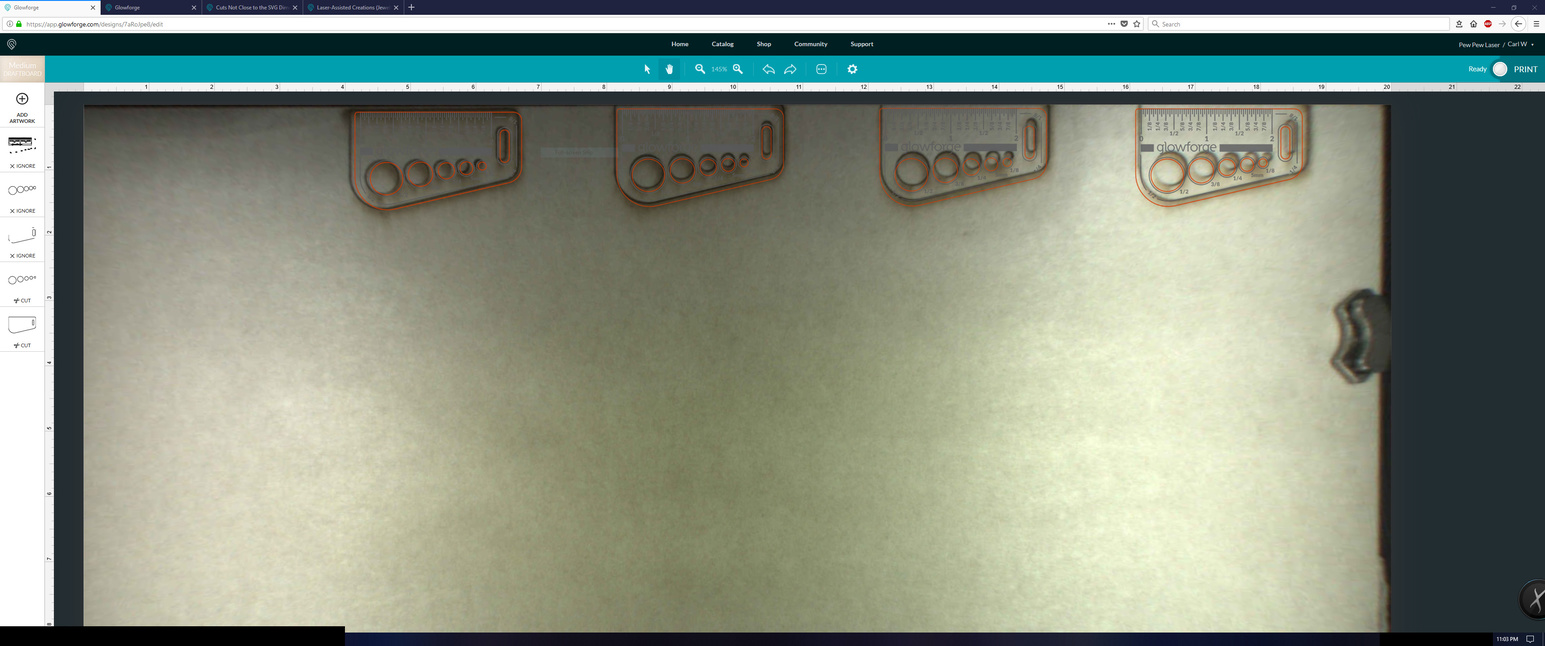
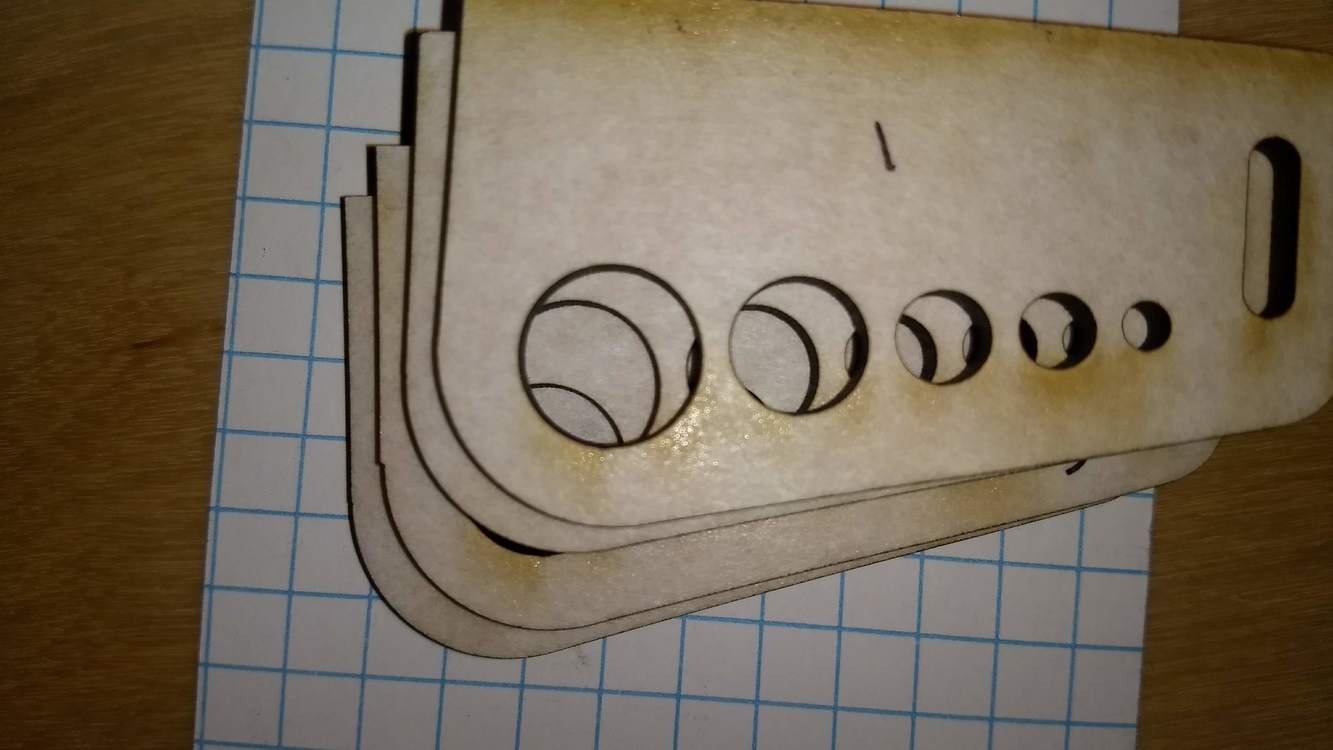
Well, it still didn’t work out. The tops of 3 went just off the edge of the draftboard (my bad trying to save material), but the widths were the problem we were looking at anyways. None of the cut operations were rotated after the copy pasting, so the width issues should still be preserved. Let me know if I need to re-cut them out, but that isn’t going to solve the problem in my opinion.
I lined up the 4 cuts with areas I was cutting out in my rectangle test, and turned on the machine to get the cuts started. When it was scanning it made “crunchy” noises when the x-axis carriage was traveling alone that I hadn’t heard before tonight. Best way I can describe it in nontechnical terms, but it didn’t sound like a belt slipping, but more something with the stepper motor. Proceeded with the cut and the results are below.
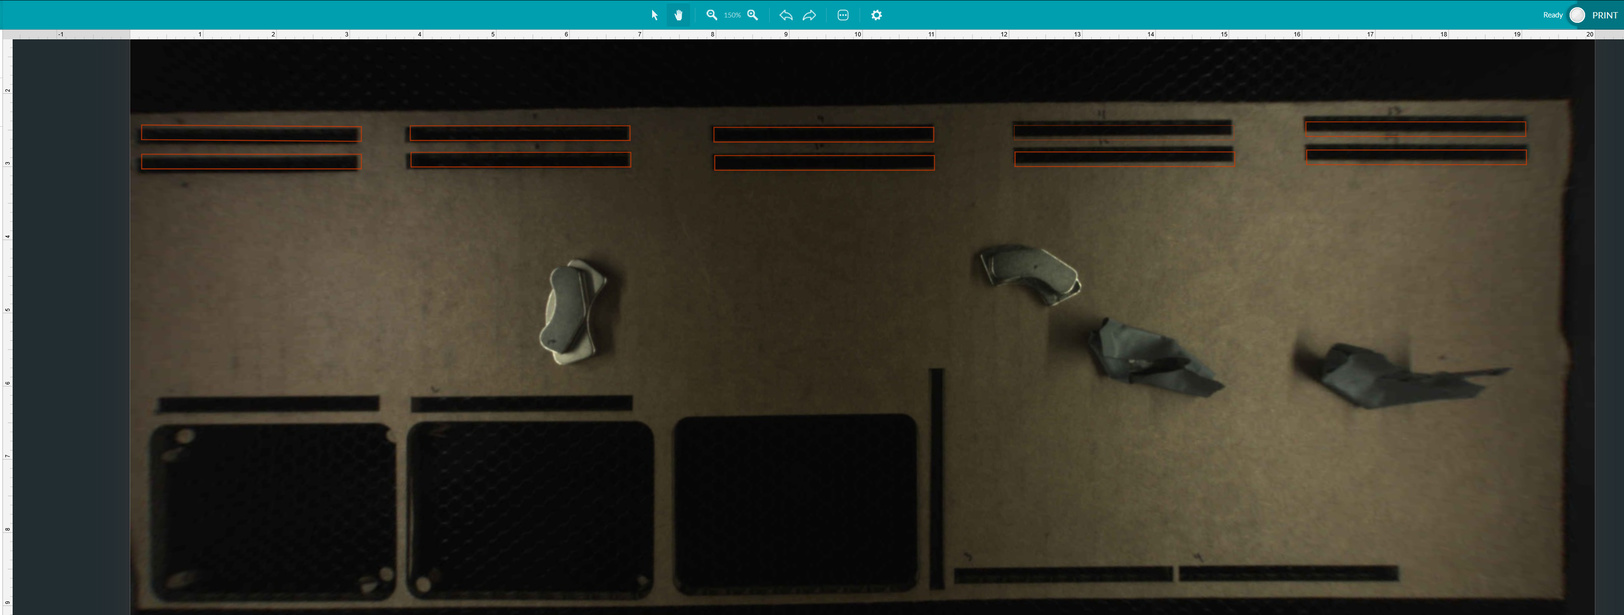
First image is of the finished cut, and the overlaid project.
Second and third images are of the pieces cut out with the edges lined up. You can see that they don’t line up with the naked eye. The dimensions measured with a quality caliper are: 1) 2.545in, 2) 2.546in, 3) 2.551in, 4) 2.518in. What is extra concerning is that between today and yesterday, the short piece is not in the same x region.
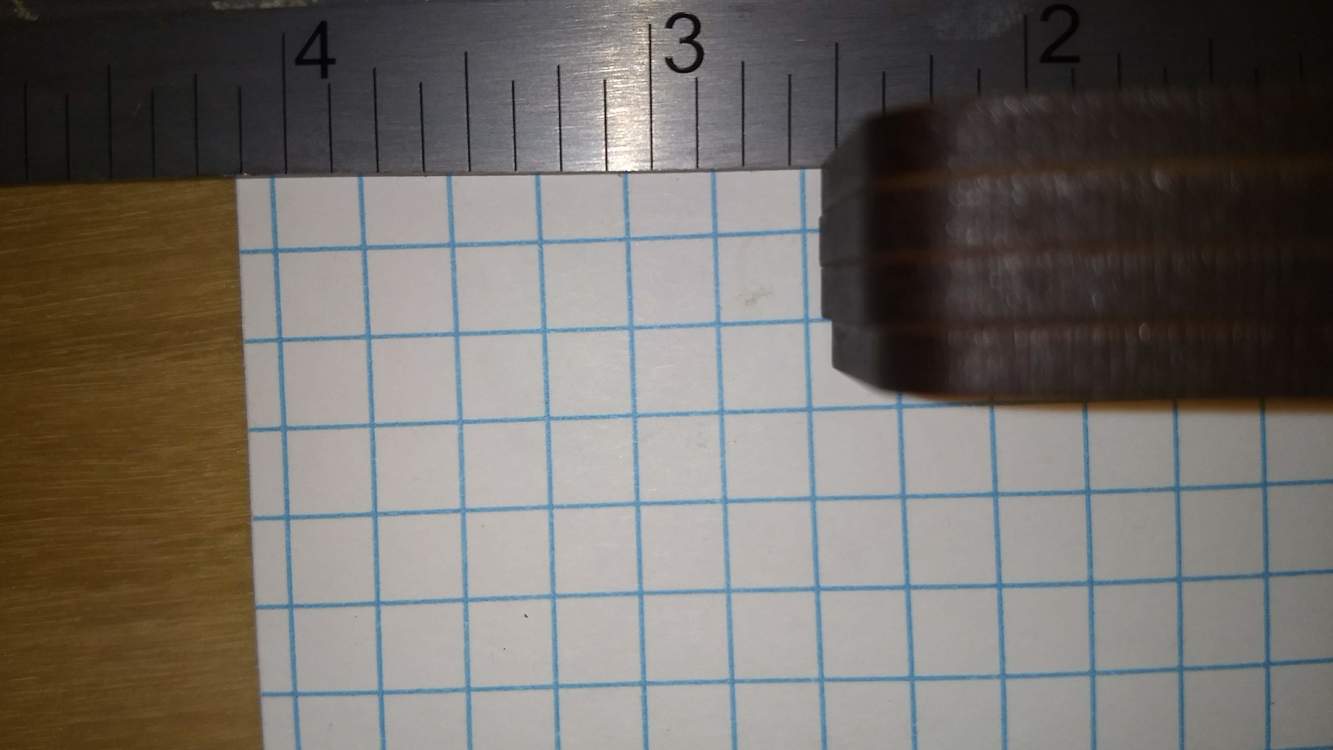

Last image is a comparison of where the larger radius meets up with the straight left edge. All of them are a little different at that location, which could maybe be attributed to the laser double cutting at that location, but 3 has an obvious jog in it which is not attributable to the laser starting and stopping at that spot.
Last things are that I checked to make sure nothing was on the rail before and after the cut, and its still all clear. Close inspection of my refurbished warranty replacement unit’s rails have a few scuffs above the x rail, but nothing that should affect its movement. On the y rail there are 2 spots that have scuffs/nicks on the v that you can feel with your finger, but they aren’t on the section that is being used during these cuts. Now that I’ve actually taken time to really inspect the rails and visible components, whoever had this unit before me used it pretty hard; lots of sticky smoke residue all over the lights and internals and scuffs galore on sections that I wouldn’t expect scuffing on.
I vaguely remembered something about posting in this forum opening a ticket (which is why i went looking in the pinned posts), but I couldn’t find it in the rules and how to’s of this specific forum. I definitely didn’t go searching on the forum via the search box for it, because i figured it would be pinned as a rule for the forum. Sorry again for the mistake, and I’ll be sure to not make the mistake again now that multiple people have told me!
1 Like
i noticed that too. Had to set my stroke to 1pt, with everything else in MM. By happy accident the file worked out but it surprised me. As an aside, how does one update the default settings in inkscape?
They need to step up their game. Refurbs should generally look and work like new. Minor scuffs can be expected but residue from use ought to have been cleaned. The whole point of refurbishing is to make it as close to new as possible. It’s disappointing to hear how these are coming through considering the number we’re seeing.
1 Like
If you are exporting out of fusion 360, I would suggest using the shaper origin export tool. Goes directly to .svg file that cuts correctly in Glowforge (no inkscape required). (doesn’t account for Kerf)
2 Likes
Yeah… Unfortunately I’m pretty unsatisfied in that regard. I used my first GF for less than 30 minutes of run time and was extremely careful with it only to get a replacement that was taken far worse care of and used much more than my failed unit. Essentially, I’ve paid full price for a used unit that is also not behaving appropriately, while only completing 1 project in 6 months. Definitely not the ideal ownership story, and I’ll need to talk to support about it all. The state of this unit makes me wonder how much life this tube even has left in it!
So I’ve looked at that, and the lack of kerf adjustment is actually why I’ve not used it. Additionally, I’ve not had any problems using the cam outputs in f360 and laying them out as needed in inkscape, so it’s doubly not something I’ve messed with. If there is an easier workflow that is better I am more than willing to try it, but initially when I was researching everything it seemed like half a dozen of one, six of the other.
Any updates to what next steps are @jaz?
1 Like
Thank you so much for running the tests to help verify the issue.
I’m going to send you a part that will likely fix this. I’ll reach out to you via email to sort out the details.
I’m so sorry to hear your refurbished replacement wasn’t up to standard. I’ll follow up on that in the email as well.