FWIW, I’ve found that this type of “caliper” is also very helpful. It’s normally used to set the height of a table saw blade, for example.
In Glowforge use, It’s good for measuring something that is not proofgrade that is going to sit on the crumb tray, even if that something is not perfectly flat. It can also measure further from the edge than a typical 6" set of calipers.
Edit - just realised I’m a tad stupid, the crumb tray isn’t open bottomed of course so what I had said here about just using the depth gauge part was wrong.
Nothing stupid about it. I use calipers for lots of things and as “I’m a professional” (ha!) grabbed the nearest set to measure thru the tray using the built-in depth gauge (other end of the slide) - I got a consistent 1.2" (near enough) and was quite frustrated until I glanced thru this entire thread and saw Nathan’s image. That when I remembered the tray was enclosed - DUH also…
I am a dope - I couldn’t puzzle out the step measurement so I had to resort to a video.
Interestingly, the video shows another way to use calipers, which is to zero the calipers (fully closed), stick them so the butt end of the slide is flat on the honeycomb bed, and then extend the inner rail down through until it hits bottom.
Edit: ignore this - it’s interesting trivia about calipers but not a good measure for the GF deck height.
I’ve tried something that seems to be much simpler. I measure from the bottom of the printer head to the top of the crumb tray with a ruler. Which in my case is 1-3/8"
Then measure (again with a ruler) from the bottom of the printer head to the bottom of the GF with the crumb tray removed. My measurement was 2-3/4"
Subtracting 1-3/8" (11/8) from 2-3/4" (22/8) = 11/8 (1-3/8").
No calipers were hurt using this method.
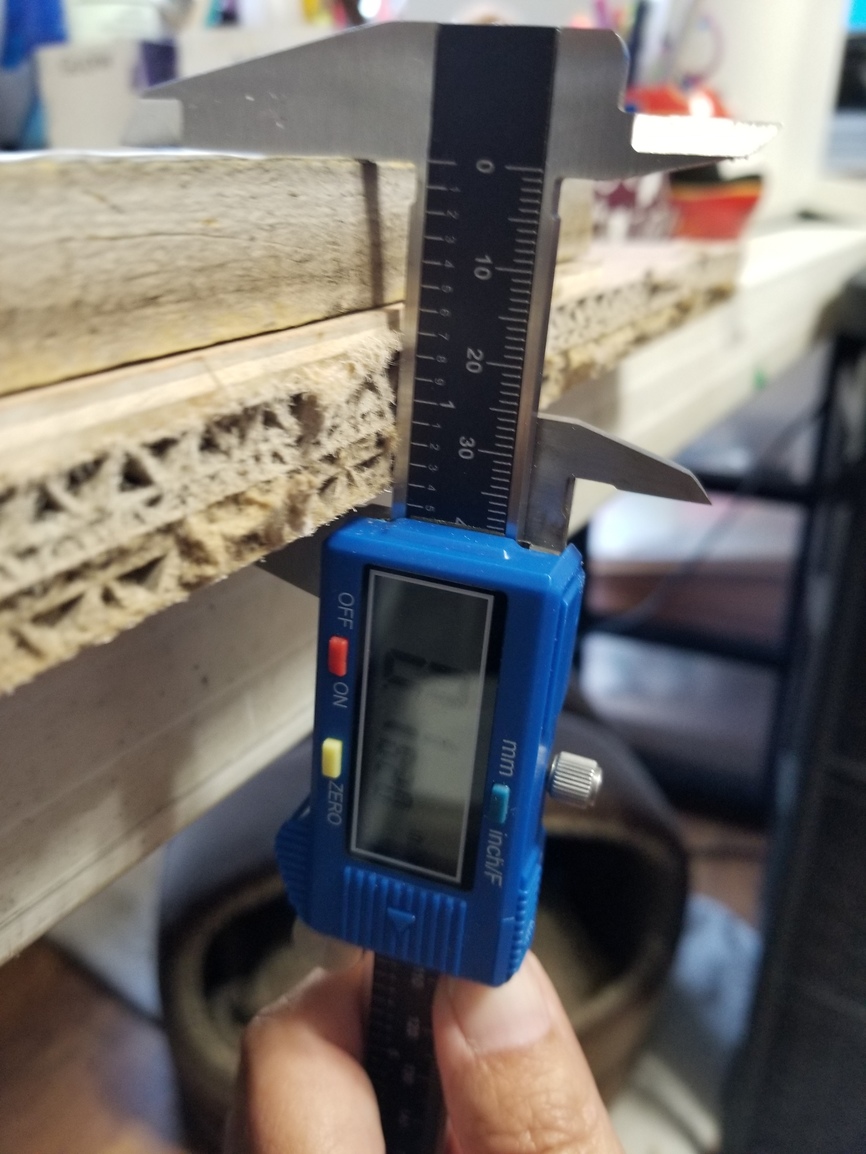
Correct. You need to measure with the caliper depth gauge sliding down the outside of the honeycomb which is the back edge - the sides have the black plastic lip that will make your measurement high.
I have a probably stupid question… What is the point of the “Scanning your material” part of the operation if you have to manually enter the height? I thought the glowforge comes in and scans the distance to the material to set the autofocus? So as long as your material falls within the range of the top of the crumbtray to 0.5 inches above that, why do we have to enter in a thickness at all?
I assume that the manual entry is needed to de-warp the camera image so that you can place your artwork. Then, it verifies height at the point of the cut. (But you’ve already entered a number, and we recently learned that the focus mechanism has limited steps and a lot of allowable slop… so I wonder why the second measurement step is needed at all.)
Thanks for this! It made me feel better about taking the crumb tray out.
I did this with a 4/4 board that was surfaced to about .840 and when I was adding material to push it up into the correct range I stumbled upon a height of .130 which is where I find a lot of the medium PG hardwood coming in. Then I just used the PG settings and didn’t have to worry about settings for the engraving I was doing. I suspect this would work if you got material into the range of the thick PG materials too.
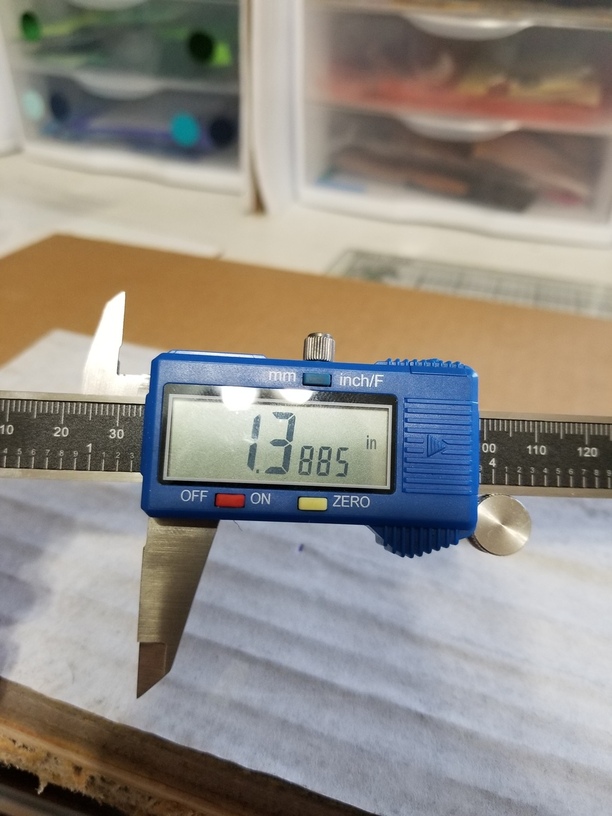
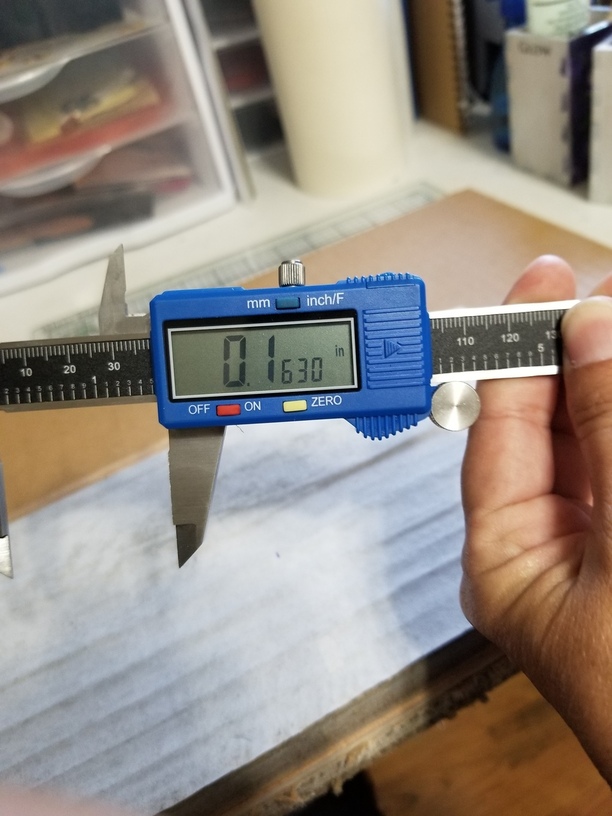
I wonder if you can tell me if I made a mistake on this method? I did the no math method, zeroing the calipers at 1.3885 (approx GF tray, etc measurement) and then I measured my material to engrave with the added risers and came up with a measurement of 0.1630, so put 0.17 as the focus height. The actual material thickness is .6", but when I try and input that number, the GF software automatically changes it to .5" The end result is that when I go to print, the laser is not reaching the material. I have rebooted computer and GF, in case it was a calibration issue, but that did not help. I have actually already previously engraved this same material a couple of weeks ago without any issues, so I’m not sure what I need to change. I would appreciate any suggestions you might have.
No. The crumbtray height is always the zero point for the GF. When you remove it the zero point would be, in your case, 1.3885" above the bare floor of the GF because that is how tall the crumbtray was. So, since you have stacked a total height of 1.630" off of the bare floor you just need to determine how much higher that is above the original crumbtray height. Pretty simple. 1.630" minus 1.3885" which equals 0.241". That is 0.241" above where the top of the crumbtray would have been. So, 0.241" is what should be entered in the material height selection. Don’t enter anything in the focus height. Adjusting focus height is an advanced technique that you will discover much later.
Also, keep in mind that no material height entry may be higher than 0.5" above the original crumbtray top, or lower than 0.01" So if you end up with a number that is lower than 0.01" or larger than 0.5" you will need to adjust your risers to fall within that range.
I can see that this has helped a lot of people and I tried my hardest to follow along, but somehow ended up more confused than when I started. It’s strange to not understand something that is listed out in steps.