Demo: Working with Bezier Curves in Illustrator

This isn’t meant to be a complete or technically accurate description of Bezier Curves and how they work. (Plenty of video tutorials on YouTube that can explain that for you if you are interested.)

This is just a handful of quick demos showing how to use them in AI to do a simple manual trace.

The images used below would generally not need to be manually traced, because there are clearly defined color breaks in them. (The Illustrator AutoTrace function will give you very good results on this kind of image, but you need to be able to see the demos, so that’s why I’m using them.)

Where you would need to use this manual trace technique is where you have muddy delineations between the areas that you are trying to trace, similar colors that butt up against each other, photographs, or gradients.

Some very basic things to know going in:

Vector drawing means you’re creating a drawing by laying down Anchor Points and defining the Line Segments between them mathematically. (Fortunately, Illustrator does the math.)

The vector path lines are called a Stroke in Illustrator, and you can set the color and thickness that those display. The vector line runs down the center of the stroke unless you change it, so if you have a thick line showing, the vector line is right down the center.


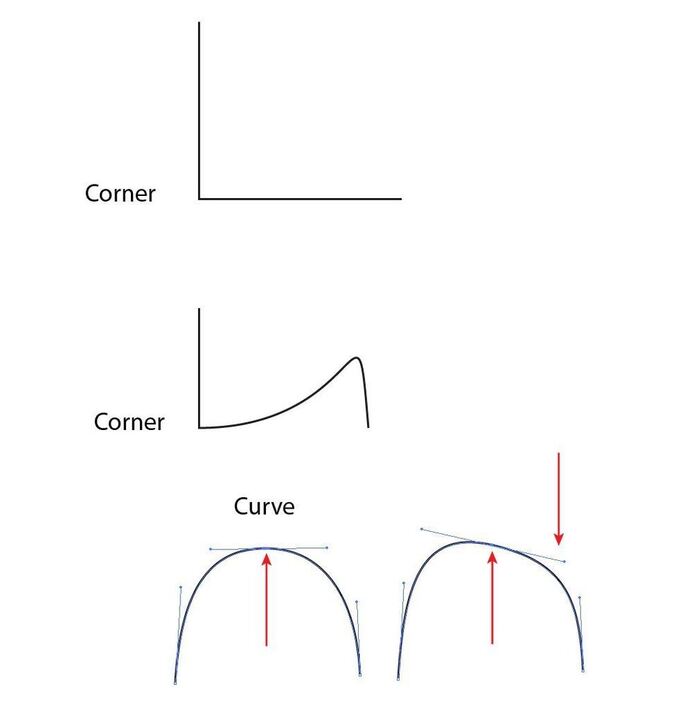
Illustrator has two kinds of Anchor Points that it uses:

Corner Points: The lines that connect to these anchor points are locked at that point. (They only have one handle if they are curved, and none if they are straight lines.) Basically, it’s a point where an instant direction change occurs.

Curve (Smooth) Points: The lines that attach to these points interact with each other, through the magic of Bezier.

They rotate around the point. Pull on one of the two handles attached to the point in order to shift a line, and the line on the other side is going to compensate. (Imagine a teeter-totter.) Pull on a handle using the little blue dot at the end.


Straight Line Trace

This one is the easiest to implement by far. Basically you just:

  1. Drag your image file onto the artboard.
  2. Lock it. (Because otherwise it will “flash” diagonals at you as you click, which is distracting).
  3. Select the Pen Tool.
  4. Choose Zero (Null) Fill and a Contrasting Color for the Stroke (so you can see what you are tracing.)
  5. Click and release on the points that you want the path to follow.
  6. Basic editing for straight lines is as simple as selecting the Direct Selection Tool (White Arrow), clicking on a point and dragging it where you want it to go.
    .
    .


Converting Points using the Edit Tools

There are many times when converting between one type of point and another is extremely helpful during editing – the short demo below expands a little on the edit options before we move on to Tracing Curved Lines.
.
.


Curved Line Trace

Little bit trickier…few rules:

  1. Click on a point, but don’t let go immediately.

  2. Hold down the left mouse button and drag it for a short distance along the edge you want to follow to create the “handles” that you will use later to edit the curve. The closer you follow the edge going forward while you are dragging, the less editing you will have to do. The dragging motion before release tells Illustrator that you want to put a Curve (Smooth) Point there.

  3. Release the mouse.

  4. Place as many points as you think you will need, but try to place a point wherever the curve changes direction (slope). (The center point of an S shaped curve.)

  5. If you want to set a Corner Point, do not drag, just Click, Release and then click on the next point.

  6. When you get a little bit more comfortable with the motion, you can keep dragging until the curved line behind the new point conforms to the shape you are trying to hit before letting go.

In the demo below, I’ll show what you should (and shouldn’t) do when tracing, so we can reinforce some tricks in Editing.
.
.

25 Likes

To continue…


Editing Using the Direct Selection Tool

  1. You can edit the trace using the White Edit Arrow (Direct Selection Tool).

  2. Click directly on a point or a segment to display the handles for it.

  3. Drag on the handle endpoints (dots), or on the points themselves to shift the curves.

  4. Do not drag directly on the line segments between the points. Remember that if you are working on a Curve Point, dragging on one handle or segment is going to have an effect on the line on the other side of the point as well. Sometimes that result is to twist the handles 180° at the other end of the segment, and you might not notice unless you are zoomed in. But that knot is in the path that the laser will follow – it’s going to burn a divot as the laser loops.

  5. If you drag a handle dot directly towards the center point (node) and release it on top of the node, you will convert that point into a Corner Point.

  6. Alternatively, to quickly convert a smooth Curve Point into a fixed Corner Point, you can click it while holding down the ALT key, then you can reshape the two lines that contact the point using the handles on the other end of the segments.

  7. And I don’t show them until the second demo below, but you can add or subtract a point if you need to.

.
.


Editing Using the Pen Tools

Yes, Illustrator has a half dozen ways to do everything. You can use the Pen Tools in conjunction with the Direct Selection (Edit) Tool as an alternative to using the buttons that appear across the top when you select a point.

They are the same tools that appear at the top, the advantage to using them is that you can break off a copy of the palette and move it closer to your artwork to cut down on hand fatigue.
(Do this for a few years and carpal tunnel will be a problem.)

Short demo below:
.
.


Last demo:

I mentioned above that I have trouble with not dragging on line segments. Reason for that is the plugin that I normally use to do a manual trace – it’s called Xtream Path, and it really makes the whole trace thing simple. It’s expensive for a plugin, but it is worth its weight in gold. I’ll put the link at the bottom, and throw in one more quick demo so you can see why I like it. No explanations needed.
.
.

http://www.cvalley.com/products/xtreampath/

25 Likes

Wowza…I have no patience to do tutorials like that…lmao
Thank you so much for your time.
I learned Corel the old fashioned way…do it or don’t get paid…lol

13 Likes

I remember how long it took to figure all of that out myself, before the advent of Lynda.com and YouTube tutorials…Hate to see my buddies here spend that long on it. (It really did take the better part of a year.)

(Folks will want to play when the machines come, not waste time trying to figure out why they’ve got paths full of knots. And I’m not doing anything at the moment. Chuckle!) :wink:

11 Likes

It’s kinda fun to think back to the time when I was trying to teach myself the pen tool. It was such a nightmare at the time but seems so natural now that I can hardly remember what was so tricky about it.

6 Likes

I’m not a fan of graphic tablets - never could get used to them, so I don’t know the pen process there very well… but, for using the pen tool in Illustrator (and just overall) the biggest thing I can think of is to learn keyboard shortcuts. Ones speed in designing will increase exponentially.

3 Likes

I’m faster with the mouse than the shortcuts because thats how I learned…lol
I lost my drawing tablet, but I used it alot for tracing on screen…maybe I should find another one…although Im pretty accurate with a mouse…lol

3 Likes

I have one hand on the mouse and one hand on the keyboard. When zoomed in tracing something, it’s so useful to use the alt/command/whatever keys, or A for direct selection… and then just hold the spacebar and drag to pan.

2 Likes

I’ve got one of the big Cintiqs (a gift)…it’s been out of the box once (for about a week), then I had to disconnect it to plug in another cutter. (Probably need to go find that and do something with it one of these days.)

I’m so used to mouse gestures (and the navigator with the other hand) I’ll probably never switch.

But i do agree that the keyboard shortcuts are a must!

2 Likes

I absolutely agree on shortcuts. The only time they become a hindrance is teaching someone else because they’ve become so reflexive that I don’t realize I’m doing it until the other person gets lost.

As for the drawing tablet, it’s just like everything else: it’s all about practice.

“Sucking at something is the first step to being sorta good at something.”

10 Likes

I have been eyeballing those for a while now, if you ever decide you don’t need it, I would be interested.

But if you are like me, if it were a gift from a family member I would keep it even if I didn’t use it.

4 Likes

Yes, it was a gift from hubs years ago, and he does get his feelings hurt if I dispose of anything he’s given me, so i try to avoid doing it. :slight_smile:

On the other hand, he has by now completely forgotten that he gave it to me, and it’s really too large for me to use comfortably, and i don’t do enough hand drawing to justify it. Seems a waste to leave it sitting in the box in the craft room.

I don’t know…it was the top of the line model at the time but that was several years ago - it might not even work with today’s computers, then I’d feel bad for selling it.

Shoot! Now I’m all conflicted. PM me if you’re seriously interested and i’ll give you the specs on the model, you can look it up and shoot an offer.

4 Likes

Thanks very much for taking the time to do this, I’m going to consume it all as soon as I have time.

You’ve already exceeded any of the other material I have seen in one important way–you said to place anchors where the slope changes. That was a real light bulb moment, and I have never seen any other Bezier tutorial explain that fundamental concept.

5 Likes

Wonderful, thank you for doing this for everyone!

3 Likes

@Jules refers to slope as the criterion, but I suspect it is more important to pay attention to curvature. One reference I found suggests putting control points at points of inflection, i.e., points where curvature changes.

2 Likes

You’re right, that’s probably a better word…How about:

“The center point of an S curve?”

It’s one of those things that you pick up instinctively with a little practice.

5 Likes

My pleasure! :slight_smile:

3 Likes

Yes, that makes sense. I like to imagine I’m driving a little car along the curve. The inflection point is where my steering wheel goes from turning left to turning right, or vice-versa.

3 Likes

Now that I think more about it, I don’t think we should make a hard and fast rule that inflection points are better places for control points. A Bezier segment is fully capable of creating an inflection within two adjacent control points. And, of course, many shapes, such as a circle, don’t have inflection points. Maybe there’s a better rule of thumb?

3 Likes

It’s not a rule, it’s just a minimum where you want to try to hit it with a point when you’re tracing. You can put a point every quarter inch along the entire design - it’s overkill, but it will get you a nice trace if you have enough time to do it.

When we are placing the points, the line that goes behind impacts the line that is going to come next. If you place the point at the inflection, you have placed it where you can get by with the fewest points, so it is the most efficient way to trace. But you can also place them at the top of curves and at the bottom and it doesn’t hurt a thing. It’s just a lot more clicks.

More info than most people would have been interested in though, so i didn’t bring it up initially.
(I have done a lot of manual tracing.)

5 Likes