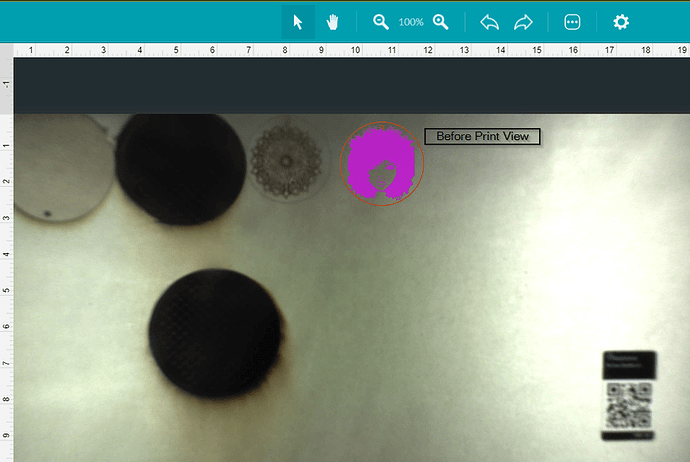
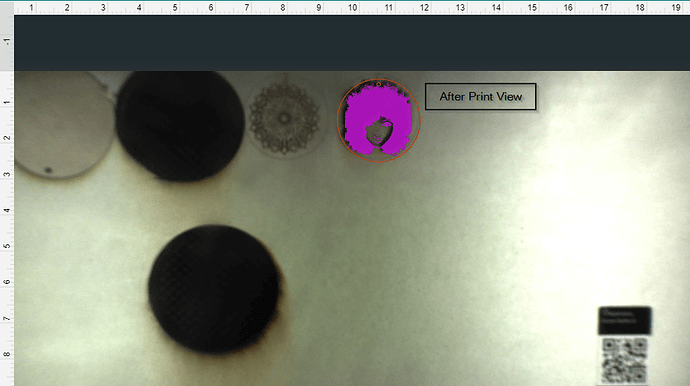
Good Day,
I’ve tried engraving on different materials in the Glowforge and it’s not lining up. When you put ur material in the Glowforge and try to line up ur design on the computer everything looks perfect on the computer screen, but when it starts to engrave it’s engraving in total different spot than what’s on the screen. So much wasted material with the design not centering correctly.
I Noticed the same thing recently, you’re right its a big waste of material
How does the GF Ruler behave on Proof Grade material?
Also make sure your material is flat, and the tray is properly seated.
A small variance will produce significant misalignment as the correction of the fisheye on the camera is significant.
Hi Houdini7,
Everything is in place properly within the Glowforge. My issue is if there is a camera taking a picture of the material in the Glowforge and showing it on the computer screen and the design is then placed on the material based on the feedback from the Glowforge camera why when it’s time to print it’s printing in a totally different location than what is on the screen. This offset is causing my material to be wasted. Is there a software fix that is needed?
If it’s more than 1/4" off it’s either because the material height was entered wrong or there’s something wrong with your unit. That’s where Support will come in. They ask for the Proof of good measure on PG (draftboard is good) with screenshots of both before & after cutting (screenshots should show the rulers in the GFUI). If you mark the material where you place the corner or edge on the material and then run the test it’s easier to see whether the design you lined up with the mark is off by that 1/4" or more.
On the computer screen the purple design is sitting where we manually placed it, but if you look at the dark design you will see where it decided to print.
- Set of photos shows two circles in which the purple is where the photo is placed, but once it is engrave is off center outside of the circle.
The thickness of the material has to be set accurately in order for the design to be placed correctly. In the photo of the spoon it looks like you’ve got a PG material selected, and I’m pretty sure the spoon is probably thicker than any of the PG available. That’s going to throw off the placement.
I can’t tell for sure what’s going on in the other photos. It could be you’ve got a mechanical problem, but definitely give it a try with the material height correctly entered and see if things aren’t closer.
(BTW, placement will be more accurate the closer you are to the camera. Around the edges it can be up to 1/4" off and still be within specs.)
does your camera view align with the print if it doesn’t recognize proofgrade? like if you cover the code? My camera view / actual view has lately been wrong when it autodetects proofgrade, but accurate when “material unknown” view is active.
I’m sorry your prints didn’t come out as you expected.
The software on your Glowforge is responsible for ensuring that the print lands on the material in the same place as the preview. When you’re done with a print, let a new image load. If the print appears on screen far from where it was supposed to go, you may have an alignment problem.
Most alignment problems come from the material being closer or farther from the camera than expected. While the software is still improving, you can take these steps for the most accurate alignment results:
- Use Proofgrade™ materials.
- If you don’t use Proofgrade materials, use a precision set of calipers to measure your material, and enter the thickness in the “uncertified materials” dialog.
- Use material that is not warped or tilted.
- Place your design near the center of the bed.
- Clean the area underneath your crumb tray, particularly the four indentations on the floor.
- Reboot the machine. Alignment can drift over time, particularly if you bump the head of your Glowforge while removing material.
Should you finish all of these steps, and find that you have an alignment error of more than 1/4", We’d like to have you try a few troubleshooting steps for us:
-
Turn off your Glowforge.
-
Check for small pieces of debris or dust.
-
Check the lower door to make sure it closes all the way. It may require some force to open, but open it, wipe any dust off the edges, and close it all the way.
-
Remove the tray and clean any dust or debris from the surface underneath. Pay careful attention to remove all debris from the four dimples where the tray rests.
-
Check the lid to make sure it closes all the way. Small particles of material, such as dust or debris, can prevent it from closing completely.
-
-
Check the surface your Glowforge is on to make sure it’s flat. Ensure it is not twisted slightly and that there is no debris propping up one side of the machine.
-
Turn your Glowforge back on.
-
We included an extra piece of Proofgrade Draftboard with your materials shipment for troubleshooting. Place the Proofgrade Draftboard in the center of the bed and print the Gift of Good Measure using the default settings.
-
When the print finishes, leave the lid closed and wait until the fans stop and the picture updates. Without moving your artwork or your material, take a screenshot of the Workspace to show us the difference between the artwork placement and the actual print placement. Make sure to include the rulers in your screenshot and show as much of the bed as possible.
- Mac: Press Shift-Command-4 and click and drag a box around your image. You’ll find the screenshot file saved on your desktop.
- Windows: Click on the Start Menu and type “snipping tool”. Open the Snipping Tool > New then click and drag a box around your image. Click the Save icon and name and save your file.
-
Send us the screenshot along with the date and time of the print, and we’ll investigate.
There are many tutorials in our Tips and Tricks section of our community forum: Glowforge Tips and Tricks - Glowforge Owners Forum . You may find these threads a good place to start:
Thank you for the response. I will try the methods presented and get back to you with my findings.
Good Evening Pip,
Your recommendation provide has improved the placement of my design tremendously. Thank you
I’m glad you resolved it! I’m going to close this thread - if the problem reoccurs, go ahead and post a new topic.

