Hello,
Is there a specific way to do a double sided print easily?
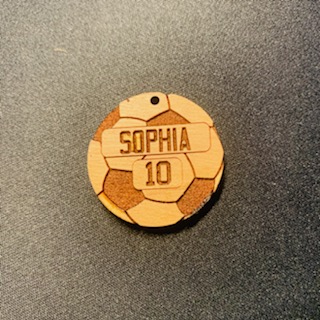
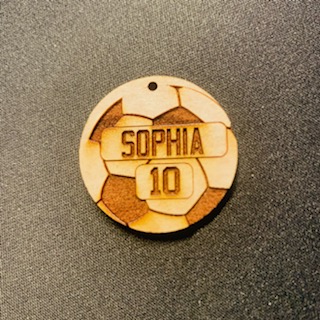
I cut a circle with a design on it and without taking the cut peace out, i turned the wood around and lined up the artwork exactly, and it ended up printing is off center. I’m new to this. Thanks in advance.
1 Like
Hi, welcome! The trick is to NOT visually align your second side artwork.
Put the artwork for both sides and the cut aligned correctly in the same file - make different colors so they’re different steps. On the first side - set the 2nd side artwork to ignore and run the cut and 1st side artwork. Flip the piece over and then set the set the cut and 1st side artwork to ignore, turn on the 2nd side artwork. It may look off in the camera but, as long as you haven’t moved anything, the GF will run the job in the right place.
7 Likes
When you say “haven’t moved anything” do you mean the print material?
1 Like
1 Like
Print the design. Cut the circle. Don’t move the board from which the circle was cut. Flip the circle. Ignore the cut for the circle (and little circle in this case) and print the design again (assuming both sides are to be the same).
7 Likes
Yep, don’t move anything and use your cut circle ‘graphic’ (don’t move it eithr) to center your 2nd artwork. As stated, don’t use the camera image to center. It will be off as it has a fisheye view and distorts the image…
5 Likes
When you first set up your top cut, and have everything highlighted, you will notice in the lower left corner a small object that when picked on brings up the precision placement widget, the upper set of which is the exact placement of what you have highlighted. That number is the most accurate for cutting, and as long as the location of the material is the same the precision placement will cut the same.
3 Likes
I do all of the alignment in the design software. Superimpose the design of both sides on top of each other in different colors, with a third color for the cut.
Put the material in the machine and immobilize it so it can’t move. Engrave the first color and run the cut while the other color is ignored. Flip the item in the hole it was cut from, ignore the first color and the cut and engrave the other color. The registration will be perfect.
1 Like
This turned out to be an interesting experiment…
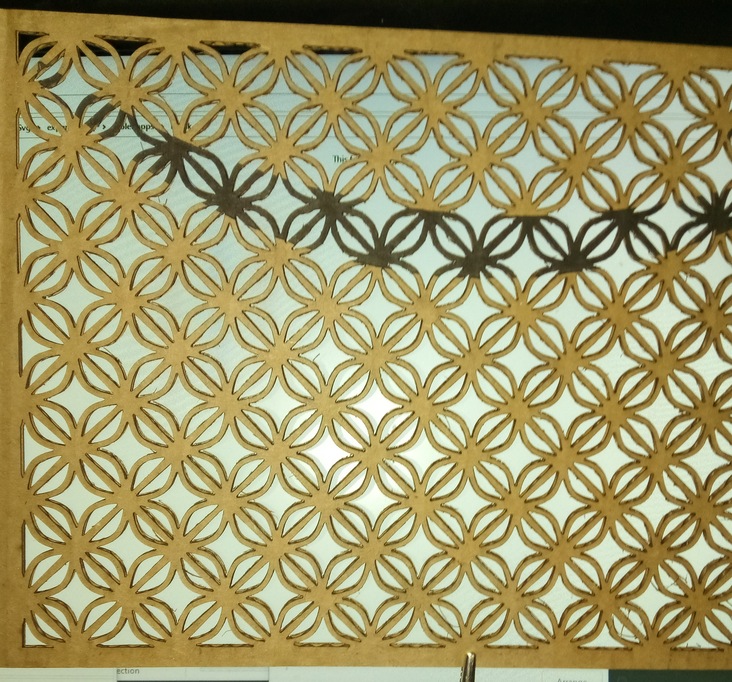
Trying out the speeds claimed for Amazon box cardboard I set out to cut this screen. Unfortunately, it did not cut all the way through on most of it and I had already moved it plus I was thinking the since most of the thickness was air I could just score the other side, and even if a bit off I could still remove the other bits. So I flipped the cardboard and quickly realized that the design was just a tiny bit less than perfectly symmetrical, so I had to flip that as well.
So after using the Set Focus I saw that I had not placed the cardboard back precisely, so I redid the SetFocus in the center and moved the screen image as close as I could manage. Not wanting to mess up the original cut I went too lite, so I redid the cut without set focus or anything even though the image showed way off.
While getting ready it did its own set focus and the image jumped to be on the ball, and I cut the design a third time. If you look very closely you can see some threads where the cut was a fraction of a millimeter off. It is a large and intricate design and in quite weak material so there was no way to bully the scrap to come loose, but only a vacuum hose that sucked akk the bits down as it passed over them.
2 Likes
does anyone use the clips you can cut with GF to keep board in place? If not, what do you recommend using the board in place when removing the cut peaces.
1 Like
Many (most) of us use the honeycomb hold down pins.
1 Like
Does anyone not use those clips?!? ![]()
Definitely cut yourself a bunch of these:
They’re super useful, and do wear out a bit.
Sometimes using masking tape and other things can be helpful too, but my primary is thoes hold down pins.
2 Likes
Is the size of the honeycomb pin in the file attached accurate?
Yes, they can be tight, they need !/8"material. I have some from just over that that are hard to use. There is also a piece in the middle that will not allow the rest flex enough unless they are poked out.
so 0.636 in by 0.755 in is the size correct
I had to get one to measure ![]()
mine is 0.99 x 0.83 x 0.31 which is too thick and I had to sand down all the corners of the “pin” part
Looking at another the cut size is the same but the material is 0.12 thick.
Okay so i cut the pins, i locked my material (Medium cherry) locked in place so i can do the double sided print in shop. it was impossible to take my circle cut out yo put it upside down to do identical print in the back. After so much struggle the material finally moved , and i saw that GF didn’t even cut the circle. I double checked the design and made sure it said cut. and it did. So I think the material they send is not 1/8 in thickness all around because i saw able to cut the same design in other areas of the material. Now my question is if there is a way to up the power of cut to make sure GF will cut through the material?
1 Like
Yes, you can easily increase the power or slow the speed to insure that your material cuts. Proofgrade materials, however, are guaranteed to cut if they are held flat to the honeycomb tray and your optics are clean.
Here is information regarding changing the speed/power settings: Working With Manual Mode – Glowforge
2 Likes
I slowed down the speed and i get a fire warning. Should I ignore and observe the cutting process?
Nope. How much did you slow it down?