Before. They are incredibly fragile after lasering. I’m thinking of experimenting with filling them with a little dilute glue (and draining) to strengthen them after lasering.
4 Likes
Jules, I bow to your genius.
Thanks so much for sharing your creativity.
4 Likes
I dunno. I recall @dan has said a couple of times that it’s both mesmerising and safe to watch.
1 Like
Feel free. It’s very bright. Some materials more than others. When you see spots after staring, let me know how you feel.
It is safe from a “am I going to get a laser beam in my eyeball and have it explode” standpoint - the window in the lid takes care of that. Is it safe for prolonged exposure staring at the bright light? That’s your call - try staring into a flashlight for awhile & report back whether you think something many times brighter will be okay. Remember it’s not invisible laser light that you’re staring at - it’s been converted to visible spectrum light by the burning/ablation.
Chronic exposure to bright lights over days or weeks has been demonstrated to cause damage in mice from something called photo-oxidative effects. Fishermen exposed to brightly reflected light have higher incidence of macular degenerative disease. Now the fishermen are also being exposed to UV light which should be filtered by the laser’s window but it’s not just UV but also intensity that causes strain and damage to eye tissue. Blue eyed people are more susceptible to light induced eye damage. Dark eyes people have lower rates of macular degeneration in the overall population.
Since we’re not supposed to discuss GF safety, I’ll just limit my recommendation to other CO2 lasers you may use while waiting for your GF. Take it how you will.
3 Likes
Pre-dyed eggs turn out pretty cool! They have a visible white rim next to the dark colored line from the burning of the membrane…check it out.
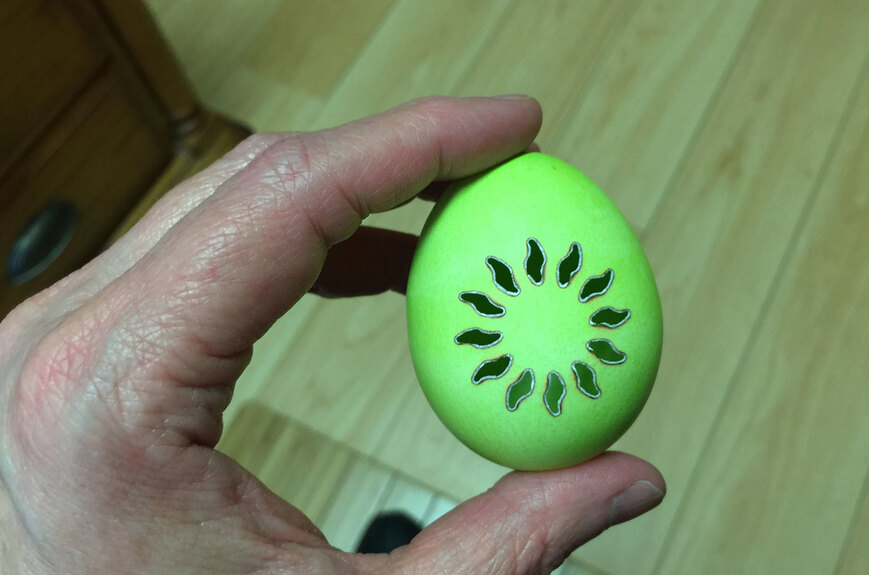
This is what they look like coming off the laser - you have to pick a bit at the white parts to crumble them off, but there was no burn through on this one, or the dye inside the egg hides it.
43 Likes
I salute your ingenuity. Obviously enjoying the exploration of materials! 
Thanks Jules!
3 Likes
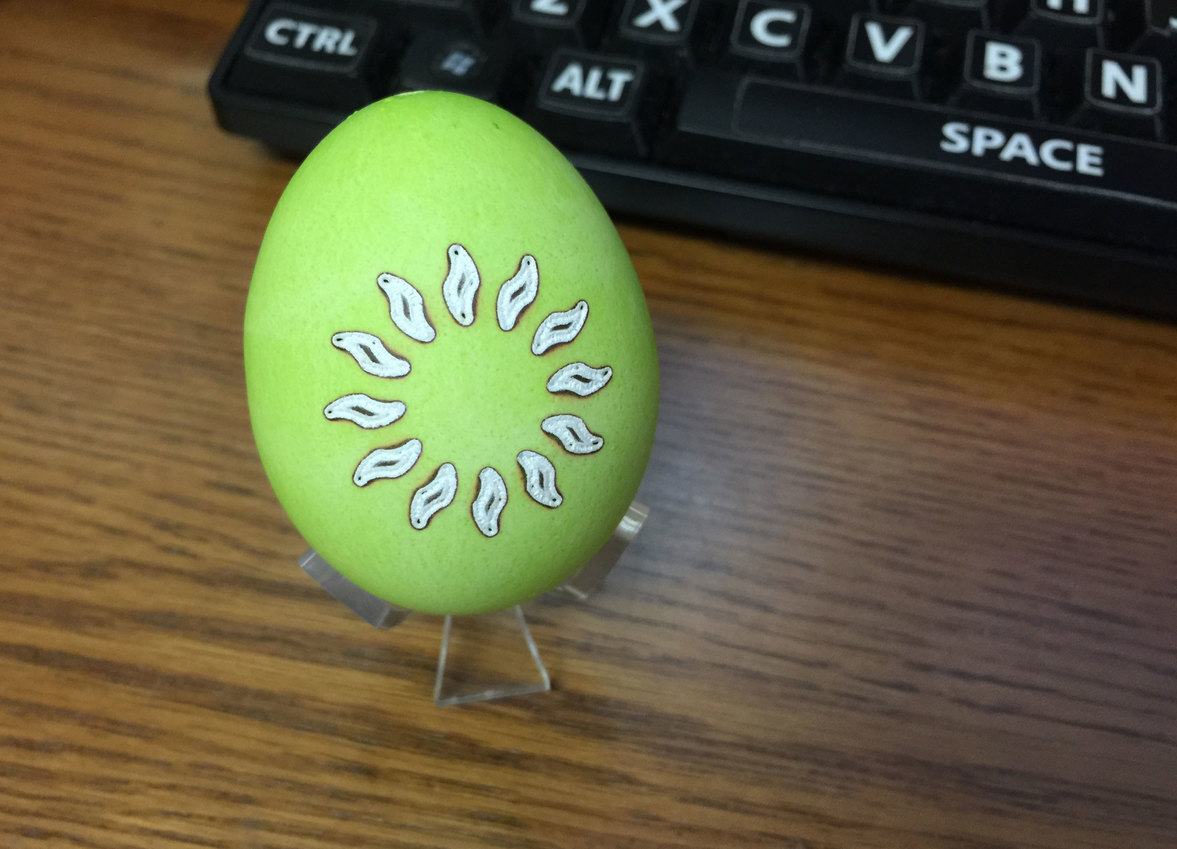
Are these all raster engraves? What causes the dark line in the middle and the two dots at the ends?
No they are cut throughs. The dark line in the center is just a little edge discoloration from the smoke of the membrane - you see it on the other side as well.
The white looking part is the actual egg shell damaged by the laser beam - it almost seems to melt into a thin cement-like substance at the edges of the beam - the egg shell itself is not being burned, as far as I can tell. It crumbles into a superfine powder when poked, but it is stiff.
(Kind of reminds me of what happens to Royal Icing when you let it sit out …for those of you who decorate. It gets rock hard and stiff, but with no side strength, and crumbles at a touch.)
8 Likes
I think if you add water to bunt shell then you do get cement.
3 Likes
FYI: The effect you are seeing is similar to what I have been getting trying to cut Mother of Pearl. Both the eggshell and Mother of Pearl are primarily calcium carbonate.
To report a failure: I can get through the MOP with high power or even many low power passes but I’ve determined that cutting thick MOP (0.06") is pretty much impossible to get a clean usable cut. It shatters, burns or turns into a cement that clogs the cut. No power level, speed or number of passes has given anything worthy of using for an inlay. That’s not to say that much thinner material or Mother of Pearl laminates might not work. But not the thickness that is typically used on fretboards. Will try the very thin laminates after I can get some in. I suspect those will work but they are mostly just decorative vs. decorative and durable.
8 Likes
good to know - I’m planning on doing a lot of inlays w/MOP and/or other shells. thx.
2 Likes
I don’t know how you could get through this if it were any thicker. It really does just kind of melt into cement.
I’m switching around the focal point to try to get something that creates a thin line, which is tough because the eggshells have a lot of curve to them - more than the devices that people want to engrave on later will have. It’s spreading the beam.
(That might get better once they implement the true 3D engrave function later, for now, I’m having to take a SWAG at the midpoint of the curvature. Not terribly successfully yet.)
6 Likes
Of interest, I have no idea, but here it is anyways:
6 Likes
“When an axicon/lens combination is used with a CO2 laser, the cutting time was further reduced to 0.2 seconds per egg and the mechanism of material removal is changed from vaporization to decomposition of the eggshell into fine powders.”
Very much of interest! THIS is what it does. (You have to clean the powder up after…its a much dustier process than burning wood.)
Good find. 
5 Likes
Was wondering how long it would take you to do eggs…how about a marriage between the GF and Eggbot
11 Likes
It is the continuously variable focus feature that can engrave on curved surfaces that is missing here. 3d engrave has been shown in proof of concept but not rolled out yet but I think that is quite different. In the first case the surface has to be scanned for depth. In the latter the artwork specifies the intended depth.
1 Like
Seems like it would need a powerful air assist jet to blow the ash away.
How is MOP cut traditionally?
That’s actually a great idea - the first thing I tested on the eggs with the Glowforge interface was the Trace function, and it worked like a dream!
You can draw on the eggshells and then cut out parts of the drawing.
So if you have an eggbot, or a ("oh hell, what do they call those things?") pysanky rotator thingy, you can draw on the eggs, use the Glowforge trace function, and just cut parts of the egg out.
I’ll probably take a shot at that once I get the settings down…but I only have one egg-bot drawn egg that would work without pulling that whole thing out again. (So later).
9 Likes
Yeah, that’s what it’s called…thanks.
Small CNC bits or by hand with a jeweler’s saw. I’ve only used the jeweler’s saw myself to do instrument work. This was my very first attempt at cutting MOP about 15 years ago. Didn’t really know what I was doing at the time so it’s not very fancy or even satisfactory. One piece. I easily recreated it on my CNC in laminate as a test but never bothered to use the MOP.
30 Likes