Thanks for the suggestion @Jules, that’s right.
@jcbergapparel, when you give these suggestions a try, could you please let us know how it goes?
Thanks for the suggestion @Jules, that’s right.
@jcbergapparel, when you give these suggestions a try, could you please let us know how it goes?
Of course. Will be working on the art a little later when I get back home!
@jules okay so I did all this, when I go to save as the new svg where do I ‘select the embed images on the radio dial’ I don’t see this option.
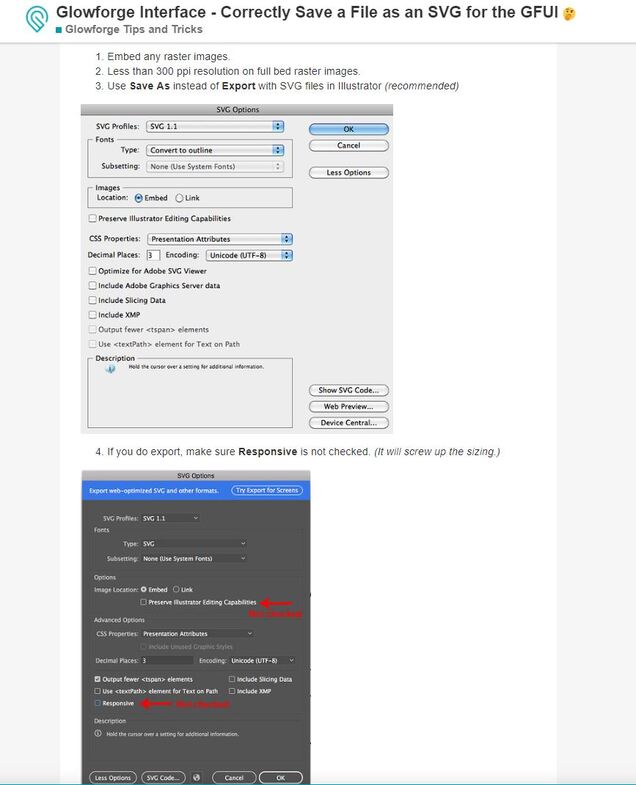
Here’s what it should look like when you save the SVG:
That’s from a tutorial here that might be easier to read:
argh I am in inkscape I don’t have illustrator yet and it does not have that options box. I did embed the png though so if I save as svg in inkscape will this still work even though it does not five me that options box? @Jules
No, Inkscape should automatically Embed it. (That tutorial tells you how to save one from Inkscape too. ) 
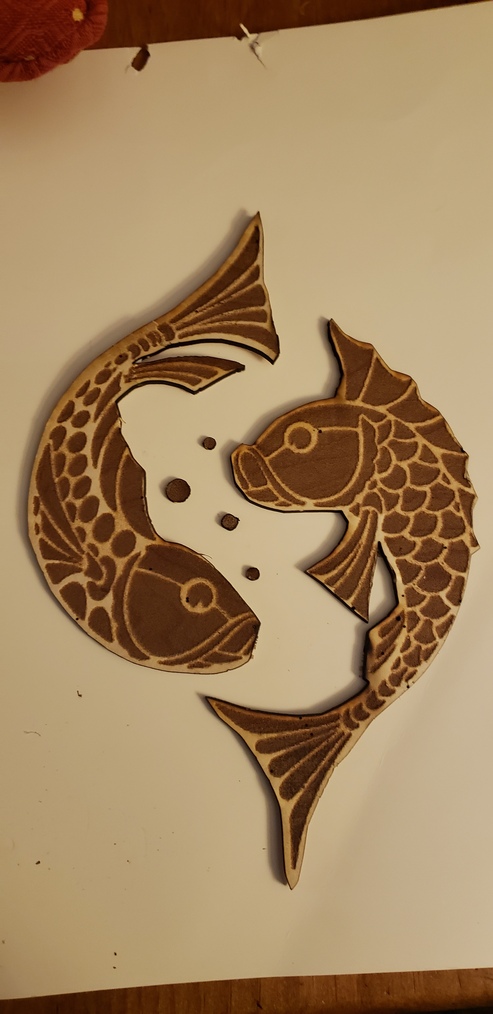
so it definitely worked for the engrave! thank you. I kind of like the scoring on the prior version so I think I will just figure out how to solve the small areas it engraved. The cutting issue is still a problem. It won’t cut all the way through at proofgrade settings and the speed down to 150
@jules @jeremy5
P.S. I had to take a dremel to get the cut the rest of the way done and it broke the tail
One step at a time.
If you want to score the lines, do an Auto-trace of the PNG file in Inkscape, and then set the various shapes to have a stroke color but no fill color. (You will first want to make sure to correct the connected sections in Photoshop by painting over the connected areas with white, so that the black is not connected.)
thank you!!! will post that next
is there anything else I can do about the cut problem? do you k now why it isn’t working?
Oh yeah, the cutting problem is common…everyone expects the materials to be completely uniform, but they’re not. Things like humidity can swell them, the slightest amount of warp will affect it adversely (as little as 1 mm), so what most of us do, especially if we live in a humid area, is to use pins to flatten out the boards on the bed, and sometimes, we send a second pass, or slow down the cutting speed by about 5 to 10 points. Any of those will work to give you better results.
Cut yourself a few of these honeycomb pins…they are a lifesaver. And if the cut doesn’t make it all the way through, you can just send the cut again as long as you do not move the material on the bed or the image on the screen between cuts. (Just use a piece of tape to pull up on the cutout to see if it is clear before taking the material off of the bed.)
you are a wealth of help!! thanks, printing these pins now and then trying the auto trace.
It’s been a little while since I’ve seen any replies on this thread so I’m going to close it. If you still need help with this please either start a new thread or email support@glowforge.com.