Hi there, I have an engrave issue. I am admittedly still learning vector graphics and appreciate all of you and your support as some things I learn on here in hindsight are obvious but not until I see or get the advice from all of you!
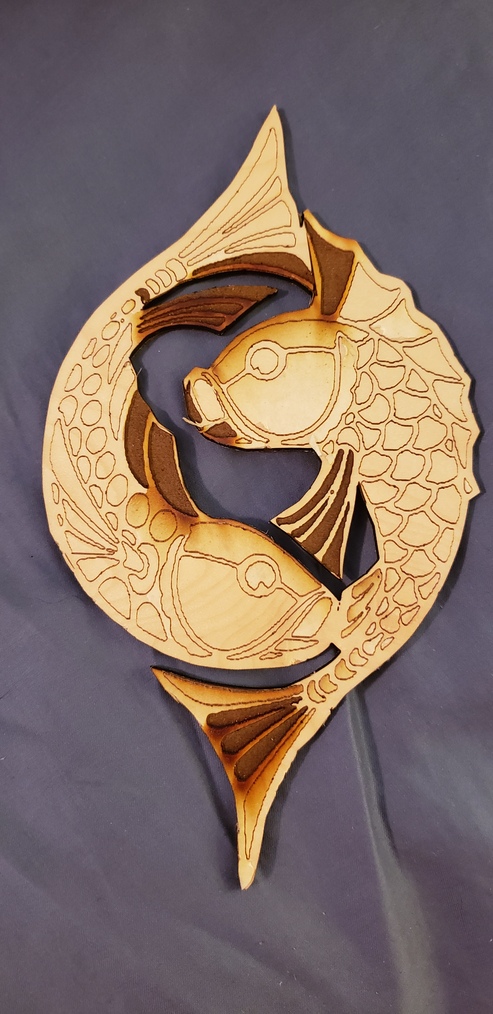
Okay so I was trying to cut out and engrave these fish on medium grade maple.
First of all the cut settings for the proofgrade maple won’t cut all the way through and I don’t know why?
Why are some parts of the engrave, like certain fins heavy engraved and then some of the scales are just scored, when the art work is all the same? Does the machine decide this randomly? How can I make this so I can decide?
Warping can cause cuts not to go all the way through. I deal with this proactively but setting a slow speed than the PG set amount. For example, if the typical cut speed for a given material is 165, I might drop it down to 150.
With respect to engraves cuts and scores, the GF UI will attempt to discern what different elements are supposed to be. If you look at the left panel, it will show you how all of the elements of a given file have been broken apart, and what the machine plans to do with them. If it’s not to your liking, click on it and change it.
@gmckayca thank you. the wood isn’t warped though, and when I slow down the speed it chars bad and still doesn’t cut some parts all the way through. As for the engrave part, yes I know how it breaks it apart. It isn’t that, let me try to drag the picture
Can you upload the SVG rather than a screenshot? That’s really the only way to tell how the file is structured. Probably best to zip it and upload the zip file.
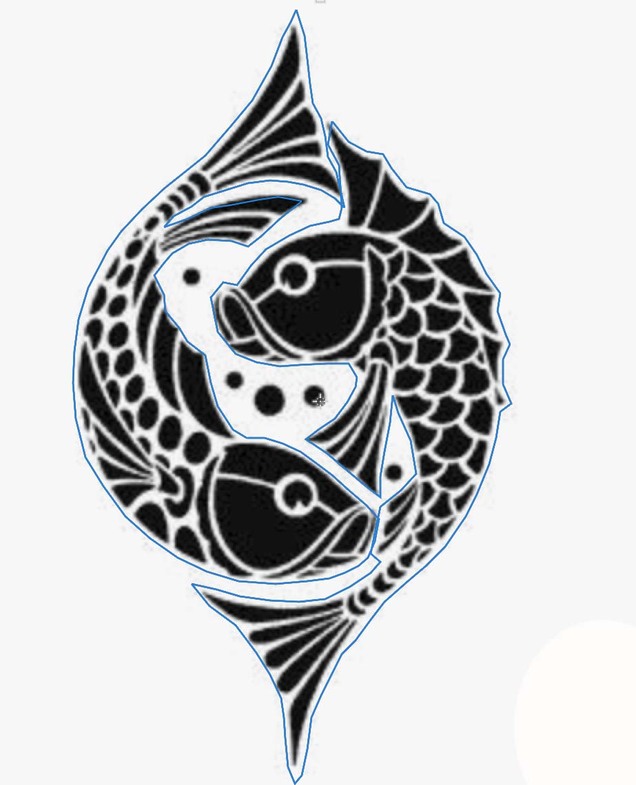
so to be clear there are two cuts the blue center outline and the outer blue outline. ignore the bubbles in the middle. The rest is all one engrave set on proofgrade settings sd
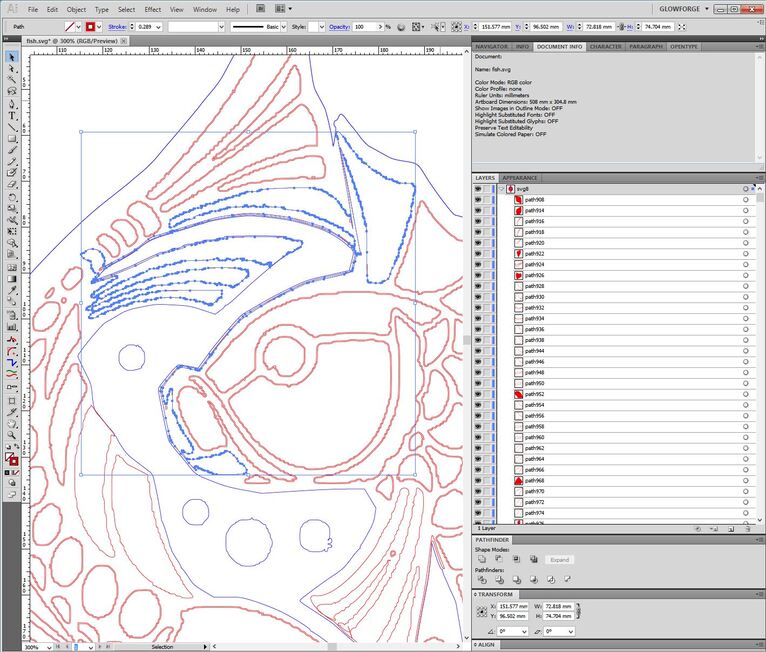
I don’t know what program you are using, but in Inkscape this file has open paths, double lines and areas that you want engraved are unfilled (therefore they aren’t going to engrave). I am not skilled enough at Inkscape to fix the file, but perhaps others on the forum can. In short, the file is the problem.
@dklgood okay I understand maybe the unfilled part of what you are saying, but how come some of the scales like on the tale did a deep engrave, I didn’t fill any of it
If you open that up in a vector program (I used Illustrator) you can see…there are a couple of places where your parts are connected to each other…basically everything that actually engraved on the results are connected into a couple of shapes that wander all over the place.
The blue highlighted part in the image below for instance is one shape, and it will be engraved as solid when you tell it to engrave.
I’ve never tried to do vector work in Photoshop except for creating selection areas, it’s possible that the Glowforge interface is interpreting it that way, so i don’t know what to suggest if you are using Photoshop to create the vectors.
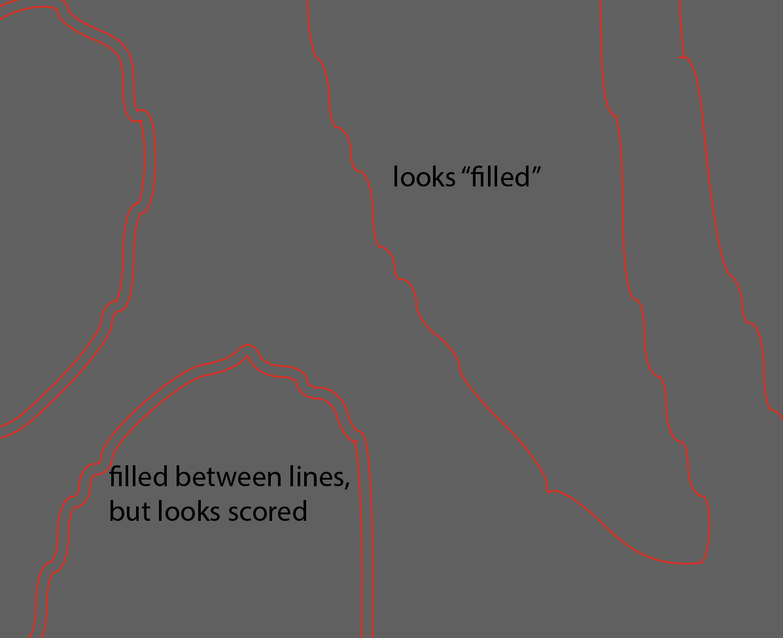
not sure how you got to this point, but when you zoom way in you can see this: the double-line ones are the ones that look scored, but are actually a very thin engrave.
your cut line from using the pen in photoshop looks like it worked out fine. If you were gonna stay in photoshop, I would put those cut lines around the original jpg, and engrave it as a raster.
edit-
here is the tutorial I wrote for doing that
in your case, you would use the pen tool for the outline instead of a “shape” tool.
ugh thank you guys. I have so much to learn. I am taking an illustrator class next month. I know I am making this much harder than it needs to be. appreciate the advice. I understand most of what you all are saying. They only part I am fuzzy on is @Jules when you say that is one shape, I see that now and am not sure how that happened but do you have a suggestion for how I fix it? I am actually okay with way the thin engrave or score as you said on the scales. I don’t want any of that deep engrave
What I would do is take the original image of the fish, select and remove the background entirely by deleting it. (In Photoshop.) Then I would save that as a PNG file, which is a raster image, and will be treated as an engrave automatically.
Then you would drag and drop a copy of the PNG file onto your SVG file open in Illustrator. Delete all of the lines except the blue outside cutting lines in your SVG. Then align the PNG file in Illustrator with the cut lines that you have left over.
Embed the PNG file into the SVG file (there’s a button on the top row when the PNG file is selected) and then Save the SVG again, making sure to select Embed Images on the radio dial in the SVG dialog.