I want to engrave a hammer. Do I need special settings? Help! This is for a last minute request.
4 Likes
Are you engraving a wood handle? Any idea what wood it is?  That would be a good starting point. You can’t engrave the metal. You’ll need something like Ceramark to “mark” the metal.
I am not 100 percent sure the wood. Probably pine. and yes, engraving the wood handle.
1 Like
Ash is the most common wood for tools, if it is a “real hammer”. Hickory was common in older tools. Ash is almost as strong but usually lighter so is more popular now.
Google ash handle tools and compare yours with the photos!
Good luck!
1 Like
So one thing I’d recommend is that you mask the hammer. Regular beige masking tape will work great. As for settings, I’d bet 1000/100 will yield nice results. ENSURE you’ve measured the exact thickness of the handle.
1 Like
Other thing to keep in mind is you’ll probably be doing this with out the honeycomb bed in there, so you’ll want to prop up the object so the surface is the same height as the honeycomb (+ .125 ish) when you’re done so the laser can properly focus. I did this with my pocket knife as I wanted to know which one was my 15 degree sharpened knife (I have 2 identical pocket knives, one at the normal sharpening angle which is anywhere between 22 and 30). I propped up the knife and then engraved a big 15d on it so I knew. I can’t remember the settings I used for the engrave right now, but yes, it’s either hickory or ash, which are a lot harder than other woods, so keep that in mind - either reduce the speed or increase the power and always mask.
3 Likes
Do I take the tray out? The thickness of the handle is 1.125 inches.
1 Like
Yes, the tray must come out. Best to look over instructions for engraving without the tray as it helps you understand how much you must elevate the handle from the floor of the Glowforge to get it into proper focus range.
Just pull in the default settings for Glowforge hardwood. There is maple and walnut and oak. Some handles are ash and some handles are hickory. I’d use the hard maple settings. Just make a cardboard jig and take out the crumb tray.
Tweak the blue outlines to fit your hammer. Cut two sets of the black design and blue designs for the full crumb tray jig out of cardboard. box. Score the red target for later alignment.
Assemble the box. Remove crumb tray and place box in center. Measure how high the handle of the wood is above the surface of this cardboard which is standard crumb tray height of 1.361 by my measurements. Using the score, align the hammer outline to the image on the screen. Get it close and do a light score and then adjust as needed. Make sure you select the hammer, text and target when you nudge the image into alignment.
Do your engrave of the text with the height of the hammer above the cardboard jig box surface.
I’m not at my Glowforge, or I’d post pictures. I have done this for kitchen utensils and it works great. Right click and save the image. It’s an SVG.

The simplest way would be to just put tape on the handle and stick it in the bed without tray. Do the calculation of the handle height above the crumb tray (just subtract 1.361 from the thickness of the handle). That’s your material height. Then lightly score or engrave the tape to do alignment. No need for a jig for a one off. Use a low lpi and light power, just enough to mark the tape.
When it is aligned, then adjust engrave settings to burn through tape and the wood. If the hammer handle is not as thick as the tray, put it on some cardboard as a riser and add until the engravable surface goes above 1.361".
24 Likes
Wow, this is a great process! Bookmarking…
1 Like
Wow! Impressive. I am stuck going without a tray for now. My height is 1.375-1.361? So .014?
1 Like
The height of the top of the tray is considered zero height. That occurs at 1.37" for most folks. Since your hammer handle is 1.125 inches thick, you will need to set the hammer on something on the floor of the unit to bring the hammer up into the correct engraving zone.
So…if you set it on a piece of wood that is 1/2 inch thick, the total height will be 0.50" + 1.125" = 1.625" That is in the correct zone because it is higher than 1.37". And the height that you would enter into the Unknown thickness slot would be 1.625" - 1.37" = 0.255". That is how far the top of the hammer sticks up above the zero point at 1.37".
Does that explain it? You basically have to park the top of the hammer into the zone from 1.37" to 1.87" from the bottom of the machine. That’s the laser focal range. Then subtract out 1.37" to see how “thick” it is for the machine to focus.
9 Likes
Maple is my default to use for almost any unidentified wood and hasn’t failed me yet. ![]()
4 Likes
The “weird” part of all of this is that handles / tools aren’t typically flat nor level (the hammer might be) at where you want to engrave them. I wonder if something like playdoh would work to get the hammer to the right height, and then leveled by adding / subtracting around the other side to get it level. Then you could score tape / etc to follow a process. But height would be difficult as you’re not really putting a specific amount consistently creating a flat surface.
Although, does it matter? Do you just need to be in the ball park with height for the focus?
2 Likes
Yeah, ideally you’d want to level things. 0.05-0.1" doesn’t seem to make that much difference to beam focus, but more than that you can definitely see the spread. By 0.3 out you’re drawing with a broad brush. (Which is also a nice effect, but maybe not what you want.
I would find a random piece of wood and prop it up to the same height the handle will be at, just to test things. First and only try can be daunting.
2 Likes
Some playdough or some other moldable medium would be good to use. Good idea.
1 Like
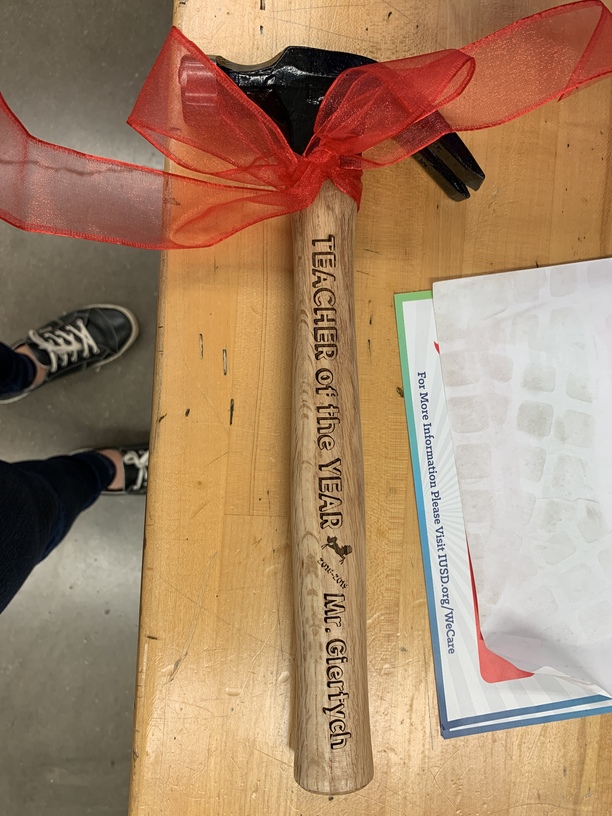
Nice result
1 Like
That’s awesome!
And holy s#!& I just remembered I’m a woodworker with a TON of engravable tools. Oh man, this will be fun…
7 Likes
Helps to have a lot of kids to think of wacky uses for that stuff.
Actually thought about building something with Lego’s seeing as we have 1,000,000+ pieces in 4 giant bins…
Yes, we like to build in my house.
2 Likes