Has anyone tried to engrave on a wooden board that is longer than the GF bed and has to go through the passthrough slot? I’ve found multiple tutorials and videos on people cutting large script words through the passthrough but nothing on engraving… is it possible?
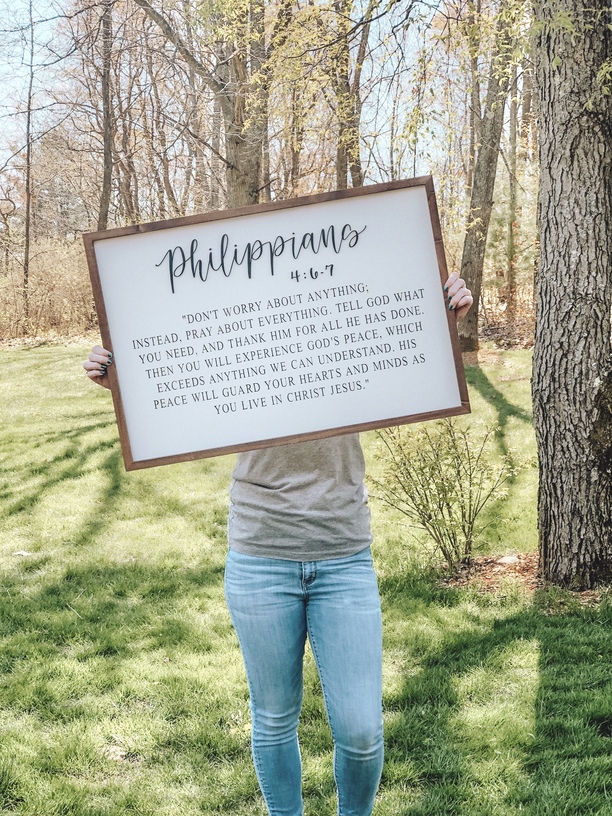
The project i’m trying to do is a 20hx30w sign with a cut out script word “Philippians 4:6-7” which I was able to cut 20" wide normally in the GF bed, but the verse below it needs to be 9hx25w and engraved because it’s a lengthy verse and cutting each individual print letter and gluing on one by one is not very ideal… so i planned on engraving it.
The problems and questions i have are how to set up the design in Inkscape, where do i break apart my quote into (probably 3) sections for it to go through the passthrough to make sure the engraving will line up? I can’t seem to find anything on engraving a large sign in the passthrough so thats leads me to question if anyone has ever even tried it or if it’s even possible?
I’ve attached a photo below of my project design that i created. I hand lettered the script in Procreate on my iPad, and used Times New Roman for the verse. Does anyone have any suggestions on how to break apart the quote to individual sections (25" wide) specifically in Inkscape that will be engraved through the passthrough slot and will line up correctly? I’ve spent the last 3 days messing with this… Please help
Did you sign up for the Passthrough beta test? If so, it would be very easy…if you are trying to do it manually, it’s going to be a little bit more challenging.
There is a tutorial for using Inkscape to do it here.
Study the instructions, make sure you follow all of them, especially the notes at the end, and when you break it up into segments …you can break it up into two segments of eight inches and one of nine inches. But when you are assigning the text to one section or another, do not split the text. Move the entire letter into one section or the other, so that when the file is processed, you will not have splits across the letters. You should have just about enough leeway to pull that off. When you feed it through, it’s going to go in vertically, so you’re going to rotate the whole design 90°.
And do yourself a big favor and test it a couple of times on cheap plywood or cardboard, using the correct settings for the material. You can use a very low LPI value (75 or less) to get a very rapid engrave to check the placement, and it won’t take forever to process. But you’ll need to practice that a couple of times, so best not on your expensive material.
Thank you for all this information! That example was really helpful!
You mentioned to not split a section in the middle of a letter but to move the entire letter onto one section, since i have 7 lines of text i don’t know how i would avoid having no letters split, since if i move a word over there will be big random gaps. Or do i need to do 1 line at a time? Pretending as if 1 line is like 1 “Ferguson” ( like in the example) ?
Oh, I forgot to ask…is that a raster file or a vector file? If it is vector, and the text is ungrouped, you can assign a whole letter to a section, even if it crosses one of the split lines. If it is a raster file, you are going to want to use Auto-Trace on it first, to turn the letters into filled vector shapes. (Or just create the text in Inkscape so that it is vector text and convert it to filled shapes that can be Ungrouped.)
Normally the best way to deal with engraves is to rasterize them, but not in this case, since you are wanting to split the file up.
Since it’s not too late yet…I’ll show you an example…,…give me a few minutes to put it together.
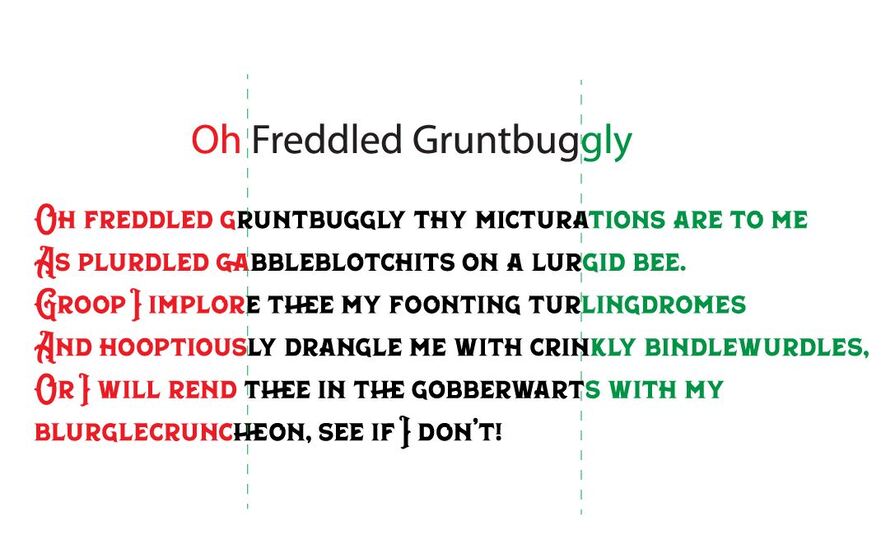
Okay, this demonstrates the concept…the green dashed lines are where you are going to break the text, the different colors are the different sections for each file.
Notice that when a letter crosses the break line, you either choose to include it in one section or the other…you don’t actually split the letters themselves. You can get away with that because it is text, and it will eliminate gaps in the engraving. You can’t do that with a solid shape that crosses the breaks, and that will not give as good a result.
As long as you are matching the indexing marks correctly, you will be able to engrave outside of the boundaries for a section, and it will pick up any letters that were not included in the first section when you do the second section.
After you have split the file up, you rotate everything 90° because that is how you feed it in.
Yes it’s a vector file, I did the text on my iPad and then uploaded to Inkscape and traced bitmap, your example above helped me out with that more too! But that is SO helpful! That’s exactly what i couldn’t understand before and that example is just what I needed! I will give that a try now and hopefully i don’t run into anything. THANK YOU!
I’m still a little confused as to how to break the sections apart. I have my quote set up just like yours in the example with 2 vertical green lines in the areas i would break the 3 sections apart, but I’m still unsure of how you were able to select just the one section at a time to change into a new color.
The photo example definitely helped me understand the concept of what the end result is supposed to look like, but I’m stuck on how to break the text apart to get to the 3 separate colors.
For text, in Inkscape, you have to convert it to Paths or Outlines first. (Can’t remember how exactly, I use Illustrator mainly)Path> Object to Path. Then Select, right click and Ungroup.
Then you would Ungroup so that each letter is an individual filled path. Then just select all of the letters in one section and set the Fill color to red or blue. Choose a different Fill color for the center section, and last section would also be a different color. Three colors for three files. You will copy all of the letters with one fill color into a new file, along with the indexing marks, which you will give a stroke color but no fill. You eventually will delete or hide the green lines so they don’t show up in the file.
When i follow those exact steps after importing my file and trace bitmap, it still selects everything as a whole instead of being able to select one part. should i just type the quote in inkscape instead?
When i do path - object to path - ungroup , it’s as if nothing happens, the text is still all together. I’m not sure what i’m doing wrong
Update- I just typed the quote out on inkscape in a text box, and then did object to path, ungroup, and it worked. Hmm… so i suppose from now on if i need to use a font i’ll just type it in inkscape instead of trying to upload it from my iPad and tracing bitmap.
Do you know by any chance if there are different steps to take if i did want/need to upload my text from my iPad and trace bitmap vs. just typing the text on inkscape? Since the fonts i typically use are on my iPad.
Thank you for all your help Jules!
That’s okay! 1 last question, i have everything split up into 3, in different colors, you mention indexing marks and giving it a stroke color, where do i find the indexing marks/what do they do?
You’ll want to review that tutorial really closely…they are little marks that you will place out to the side where the breaks are. You’re going to print them and use them to align the sections. (Diagrams and explanations are in the tutorial.)
Hey Jules!
I got it figured out, i did struggle most with having all 3 of my sections perfectly lined up on my screen in the glowforge app but then when it engraved the next sections instead of being perfectly lined up the way i had arranged it, it engraved just slighlty higher. (you can really only notice the most on the word “worry” at the top the W was the cut off on the first section and then ORRY is what engraved on the next and its a little higher than it’s supposed to but definitely not TOO bad for first try! I’m actually really proud of how it turned out overall and thanks to your quick responses and tutorial I am now currently making 2 more! Thank you! xx

 But that is SO helpful! That’s exactly what i couldn’t understand before and that example is just what I needed! I will give that a try now and hopefully i don’t run into anything. THANK YOU!
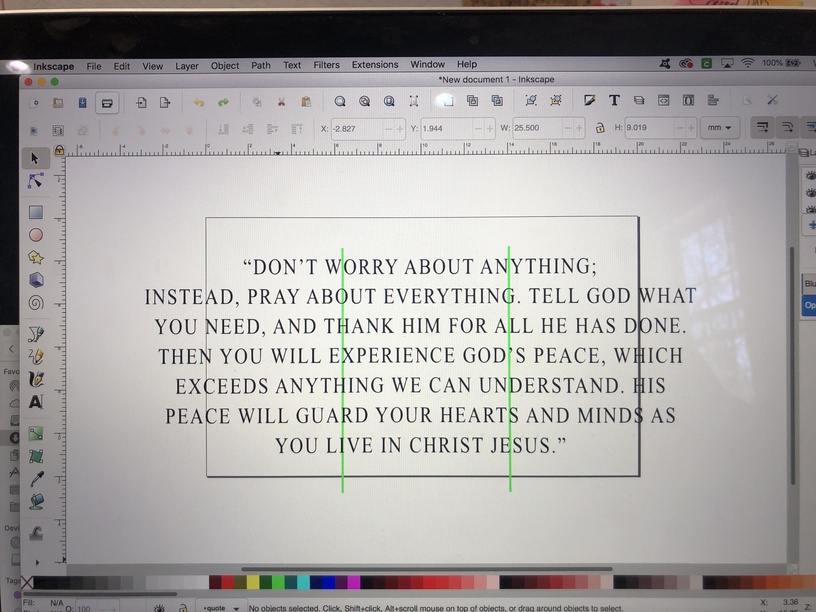
 should i just type the quote in inkscape instead?