Hi ![]()
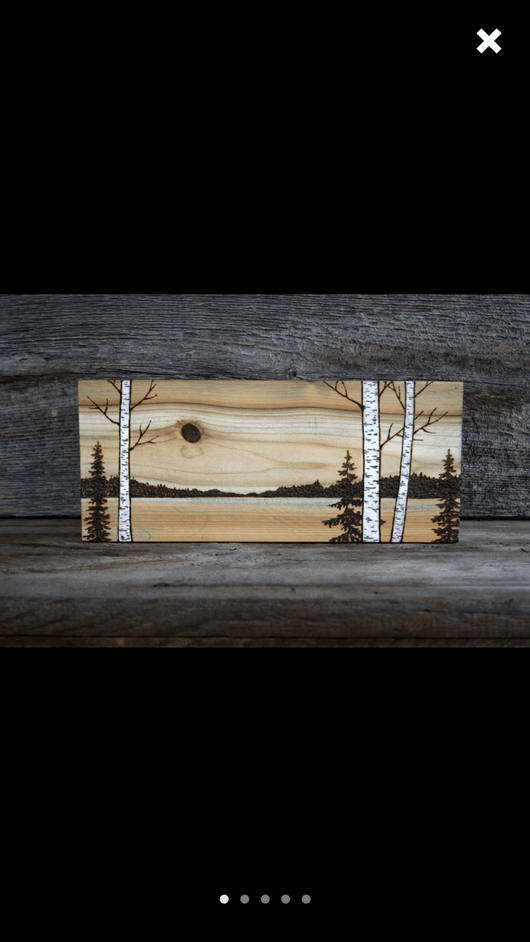
Does anyone know if it’s possible to engrave on painted wood , let’s say for example acrylic , like in this picture
4 Likes
As long as the paint doesn’t have bad fumes, there should be no issues. I suppose combustion concerns ought to be considered, but I see it as no worse than paper or sap (completely uneducated assumption though).
That piece I would assume had a small strip of white paint at each tree, then the rest done. If the whole thing was painted white, then they had to blaze off all the paint on the rest, which would be borderline insane.
You could also cut a mask of your final image from cardboard, lay that over the wood, then paint through the mask to only hit a restricted area.
1 Like
I knew an artist who always lasered painted wood. I always thought it’d be fun to try painting multiple layers in multiple colors and varying power/speed to expose different colors. Now that I think about it…
5 Likes
That’s what I thought I should do… Just paint the areas I needed color in but I was wondering if the gf could engrave the small details on top of the paint… If you understand what I mean? 
1 Like
You might be able to do the engraving first, and then paint on top of that. The lines might get a little obscured, but if you use dry-brushing techniques, you should be able to just hit the un-engraved high parts with paint. That could also give you a very interesting result.
As for cutting wood that is already painted, I know the GF can cut acrylic plastic sheets. I assume acrylic paint, when dry has a similar chemical composition, and it should not give off worse fumes. Although they do use different chemicals in the paint pigments, and those may give toxic fumes. I would worry more about the color pigments than the acrylic part of the paint.
2 Likes
I would need to have hands on with the piece you pictured to be certain, but my impression looking at it was that the black lines on the white tree were the same (depth-wise) as the horizon and other black outside of the confines of the trees.
You certainly can find a setting which will etch the paint instead of removing it. Not sure what exactly it will look like, nor how long it will last. But absolutely possible (if you can mark and not cut on paper, you can do pretty much anything. And a laser can mark paper)
1 Like
I have had some of acrylic ink on paper paintings cut with a laser.
1 Like
There are quite a few color fill products on the market. They work great on wood and acrylic. You engrave as deep as possible into your material and then fill the gap with color, and white the excess. Looks really cool.
1 Like
I would imagine that you would want to make certain that the painting is completely dry. If the acrylic paint is applied too thick then it may still be wet underneath after the surface seems dry. I was wondering about oil paints myself, which take way longer to dry. I have a cutting plotter, so my method may well be to send the same design that had been sent to the GF over to my plotter, and cut a stencil film for masking. The stencil film is vinyl, so sadly it can’t go into the GF.
Although now that I think on it some more, if you use masking tape (or application tape) than you can peel it away in sections for painting. So in the example image (i think the only painted bits are the trees, right?) you would peel away the masking from the trees and use a hard roller or dry-brushing or carefully use a sponge the way you would for stencil techniques. once that has dried you would peel away the rest of the mask.
using a hard roller (like one for screenprinting or woodblocks) lets you paint the top surface without dipping down into the cut/engraved areas. Practice will be required to get it right, as it is easy to apply too much paint and have it run down into the cuts.
1 Like
I had not thought of using tape to mask off areas, and using the laser-cutter to cut the tape to exact locations. That is brilliant!
1 Like
I am trying to get tech data from the companies that make application/transfer tape, to find which one may be best for laser use. Heat will affect the adhesive on some tapes more than others. It would not do to have an intricate cut through a mask, only to leave residue behind. I will update when I get more info.
3 Likes
Please let me know what you find out. This may be a technique I will use for other things!
1 Like
Will do. If you have access to a laser already, most of these companies (3M and RTape for sure) are happy to send out free samples.
1 Like
I am waiting on a written reply from RTape, but they pretty much told me that I was on my own and they would send samples. Application tape does not require an MSDS, and so MSDS’ are not offered. They were only willing to tell me that the adhesive is “rubber-based”.
I spoke with 3M Graphics customer support about the application tape they make for the sign and wrap industry, and they said:
“3M Graphics does not recommend using a laser to cut its films or tapes - and the process would be done on a test and approve basis.”
Then they sent me over to 3M Industrial Adhesives and Tapes. I asked specifically about the cut-than-paint process that we were discussing here, and after some back and forth with the lab they have recommended using their 201+ Masking Tape or 401+ Masking Tape
Unfortunately these masking tapes don’t come in the same standard variety of widths as the premasking tape does. It comes in widths of 0.47", 0.7", 0.94", 1.41", 1.88", 2.83", 3.77", and then jumps up to 58.66" ! So for what we (or at least for what I) are wanting our choices would be to buy a huge roll and cut it down into smaller sections (4.66", 24" and 30" ?) or to do what the cust. service rep suggested and contact a distributer who is willing to sell custom sizes.
I’m wondering if I can find a resource to test material composition down the road at UC Davis, where my girlfriend is doing her PhD…
3 Likes
It is tape. Cut a small section and set it on fire. The “look for a green flame” aspect of the copper test still applies, it is just far easier to get a sample to burn.
Yeah… not an in depth analysis, but sufficient to know you are at least in moderately safe territory.
1 Like
@jacobturner I believe the copper wire is an essential part of the test. The green flame is from the interaction of the chlorine and the copper. Just burning the tape wouldn’t do it.
1 Like
Thanks for calling me on that one @fan-of-glowforge. Did my homework this time, and it is copper sulfate which makes a green flame, not chlorine. I should have suspected the need for copper since the guides insist on using copper, rather than just grabbing a coat hanger or other metal anything.
1 Like
Also a note to anyone reading this:
Be careful of using lasers on old paint. A lot of older paints contained lead, and you don’t want to do ANYTHING to that that might get it airborne. I don’t know if cutting or stripping lead based paint with a laser is hazardous, and I have no personal intention to experiment.
2 Likes
update: TransferRite lists an MSDS for their application tape products. Looks to me like it is safe for lasers, but you are encouraged to check for yourself… I am NOT an expert!
This link was found on the Fellers website:
Still don’t know how the adhesive will react to the heat, but I am glad that they at least offered an MSDS, unlike 3M and RTape.
1 Like
I use standard transfer tape that is used for vinyl signs… it comes in various widths
2 Likes