Today I went to check one out and I was very impressed with the speed and the amount of details shown even in the thinnest lines of my design. The only problem I am having is the “texture” of the engraved area.
Since I am no expert using an Epilog I just had to believe whatever the salesman was telling me but I am sure if anybody here that actually has a GF AND an Epilog can probably show me some light.
All my designs are always vector files (usually PDF) that I engrave using the GF. I know when you try to engrave something using the GF and is not vector (picture, image, etc) it shows a different style of engraving menu where you get to choose dots, pattern, vary power etc. This does NOT happen when the artwork is a vector file and I think that is what happened today at the Epilog show room. I kept seeing that similar menu every time the guy was sending my sample file to print, it had the dots/ texture settings. It wasn’t a straight forward menu where he would just choose power, speed and dpi and GO.
The outcome was a texture that looks like very thin lines together that If I run my nail across them it will leave a mark. When I do it with my GF the texture is more like a burnt plastic or more like a sand paper that is durable and less easy to scratch but it is just because the way it is engraving my design (not using that dot, texture power menu)
Why the GFUI shows that menu for images and it doesn’t for vector files? What is the laser machine doing differently when it engraves either one? Is there a way for the Epilog to engrave like the GF when is NOT using the dots/texture? - If anybody here has an epilog, do you know what I am talking about?
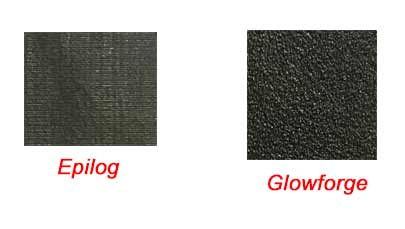
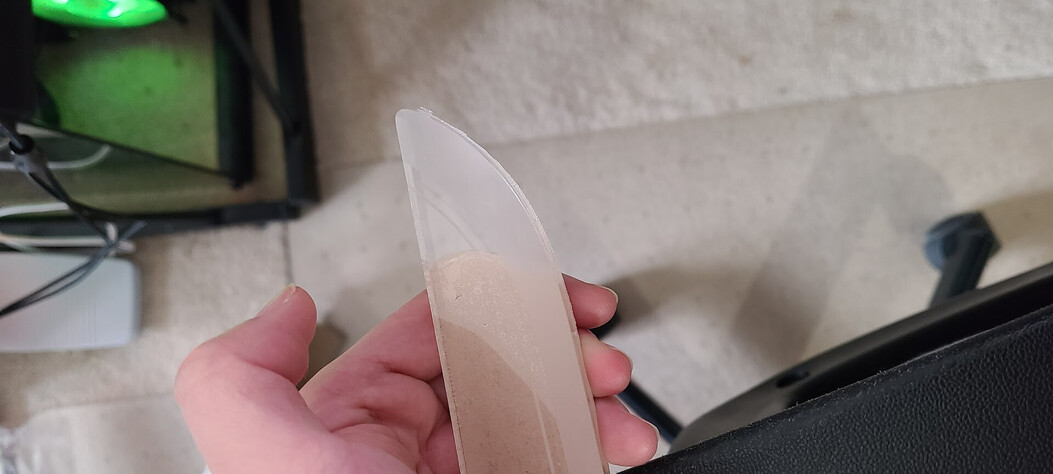
This is a picture of the engraved texture I get with the GF (that I like because it makes my product more “Scratch proof” ) and the one I am got today with the Epilog that scratches super easy
Is there any way to replicate the right side texture using the Epilog? or it always looks like the left side image?
I don’t have an Epilog but it looks like an LPI issue to me, That a higher LPI will have smaller and more of those lines to the point where they literally melt together.
Just looking at other lasers it would appear that the distance from lens to work is greater which would have a big effect on the width of the beam if slightly off focus. When engraving acrylic with a Glowforge it is normal to set the distance a bit off so the surface melts more, smoothing out those lines rather than having them at maximum focus.
When engraving vectors vs rasters the needs are very different. A vector is one surface at one power, while a raster contains much more information between white and black which can be applied like a newspaper as an array of dots tightly packed to show dark or further apart to appear different levels of gray, or as real depth that black is deepest and white is no laser and grays are different levels between.
Interesting. I am sure there has to be a way to replicate that GF texture using the Epilog, but since I have never used one I was just relying on what the salesman was telling me but he was just too closed minded and didn’t really was messing with the height, focus or any other settings other than speed and power
I only use vector images, and are very simple like clip arts. I don’t have an epilog, I went to see one today and the salesman made a few samples of it but he couldn’t replicate the texture I get with my glowforge. I am sure it is some simple setting like height from lens to material or speed or dpi or something but he just said it would only engrave with that pattern that looks like thin lines which I am sure you should be able to do something more like the “sand paper” texture I get with the glowforge
Exactly, me too. I do my GF designs at 675, if I go too low I start seeing patterns and lines but for some reason the Epilog salesman wasnt able to understand that or I dont know if he was too “limited” I saw a bunch of options to modify stuff but he just set the focus and was just messing with speed, power and some other stuff I dont know what they were
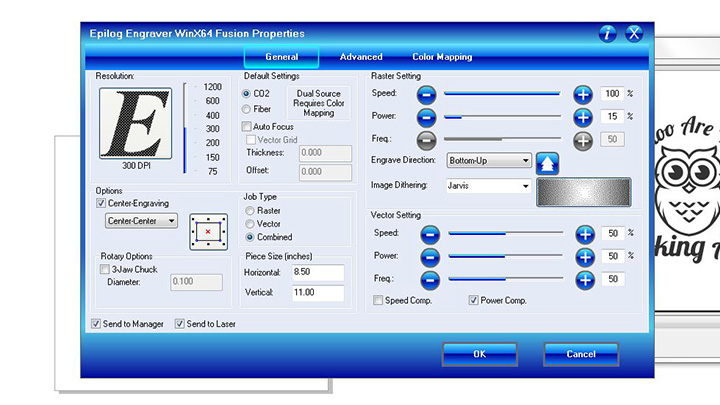
This is from the internet but that is the options he had
The GF has a variable power supply so is able to burn individual dots better than a straight Epilog set of settings even though you can replicate the dithering. You can simulate that with the Epilog using the Frequency. Not sure why that’s grayed out here unless it’s for a model that doesn’t support frequency modifications.
Practically speaking, just double it. I do the reverse to convert to GF settings. (I use 1/2 the DPI as my LPI setting, rounded up to the nearest GF allowed setting.)
I know exactly what you’re talking about because I used to work off an Epilog and tried to get the line-like texture on an GF. I did not have any success and gave up to stick with the sandy texture (it seems like most people do not notice the difference.) It is true that Epilog machines can get finer details vs the Glowforge but it is several times more expensive for a reason. My suggestion would be to try some defocused engraving and vary the dithering patterns until you like it. You can also try defocusing with no dithering (my go-to setting) such that the lines aren’t as noticeable and the texture becomes very flat.
Looks to me like the Epilog has a 1’’ focal length lens, whereas the GF has a 2’’ - that also fits with you mentioning the amazing detail. I’d try defocussing the laser a tiny bit…
Thanks for showing me the light. I really want to buy the Epilog because it is more reliable, and it is su much faster! Something that usually takes me 20min using the GF I saw it in person in front of me taking 4 minutes with that Epilog, except the background/engraving finish wasn’t what I wanted.
I would be willing to sacrifice that grainy/sand paper-ish finish that the glowforge gets for something similar with the Epilog.
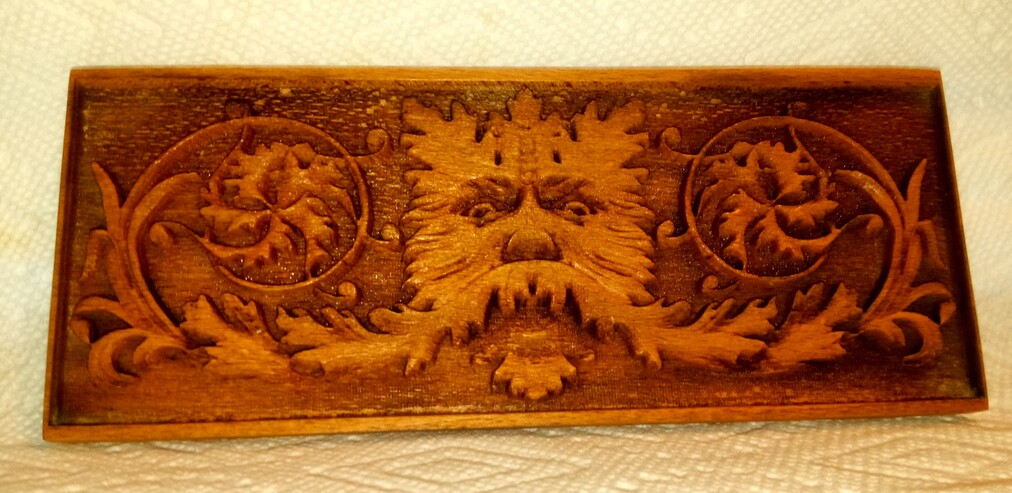
But to be honest, the real problem I am having is the texture is not making the product be “durable”. What do I mean by this? I am making some sort of coins/keychains that get handled and abused a lot (pocket, coins, keys, cellphone, etc).
With the sand paper/grainy texture I get from the glowforge it makes my product somehow kind of “scratch proof” but with the super smooth texture the Epilog engraved when the salesman showed me how it worked it scratches so easily by just running my nail over it and it leaves a “lighter” trace where the nail rubbed against. Makes sense?
That is why I would like for it to be able to engrave a rougher texture and I am sure it somehow could be doable with what you say, trying different focus or dithering settings, but I’ve never used the Epilog, not familiar with it and is not like the salesman would lend me the machine so I can play with it for a couple days until I dial it down to my liking and I also don’t want to fork out almost 10k if I wont be able to obtain the results I want
Yeah I completely understand what you mean by the light “trace”. Maybe you can turn up the power or slow down the speed a little bit to get the engraving deeper, which would may make it less “scratchable”.
And yes, the Epilog is so much faster, wish the Glowforge could be just as fast since I do long engrave jobs.
Are you allowed to return to the demo and continue troubleshooting? If this is a deciding factor they should let you continue.
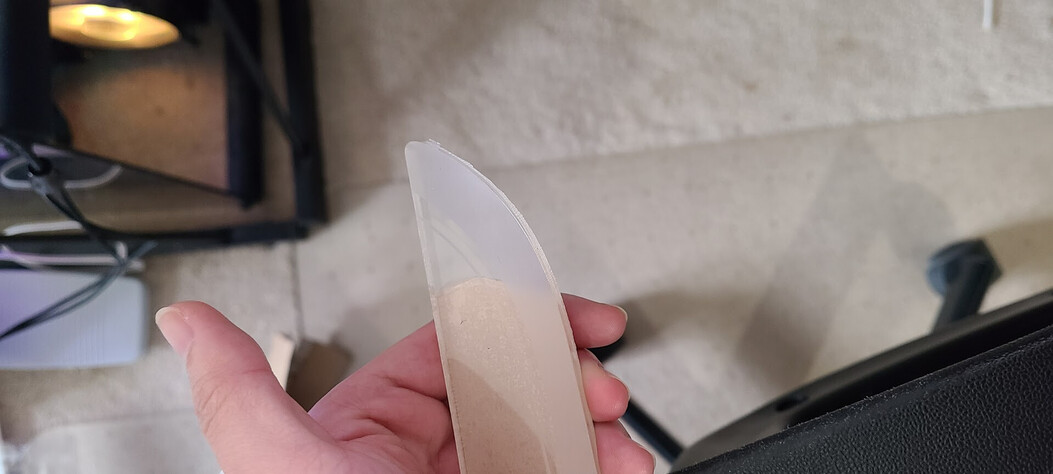
Here’s a photo of one of my Epilog engraves, it’s relaly hard to capture haha. DM me if you want more info, don’t want to share it publicly
I had access to an Epilog in the past. You can change the look of the engraved surface by changing the Freq (Frequency) setting and the Image Dithering. Didn’t have access to it and a GF at the same time so don’t know how closely you can replicate the GF’s results.