Exhaust Fan Failure on Pro Model

The Pro model I have has an exhaust fan failure: the blades are stuck to the shroud, so no turning at all. This happened at a first Print on a day following successful runs with no trouble. Trying to use the 3M Novec cleaner has not worked to un-stick the blades. Interestingly the Glowforge did not shut down when this happened; huge smoke cloud in machine did not shut off machine. Raising lid did.
The exhaust fan seems an obvious point of failure or need for access for cleaning. A removable port for the fan mount sure would have been nice.
What can I do?

  1. Install an inline exhaust fan in the venting duct to the outside?
    a. Could this work with the frozen GF exhaust fan left in place?
    b. If fan removal were necessary to increase CFM air flow, what are warranty or operational consequences if the grill in the GF were cut out exposing the fan and fan blades removed?
    c. If the exhaust fan power plug were removed from the motherboard, would the GF still function with an external inline fan running?

  2. Ship back to factory? I’m over 92-years old and wrangling this machine is troublesome. And I have no idea about the monetary cost, except it will be high.

  3. Suggestions?

It sounds like this to me:

Often in the mornings damp and condensation causes all the gunk on the fan to seize it all up.

This is especially true if your vent runs outdoors.

Your exhaust fan needs a serious mechanical clean with at least brushes and probably some sort of hard scraper.

Get a young person, preferable with small hands to have a really good clean round the fan.

I would be very surprised if it is anything other than that, since an electrical failure the fan could still be turned by hand.

1 Like

Fan is vented outside but whenever the Glowforge is turned off, it is unplugged and the outside vent is disconnected so no outside moisture can access the GF. I can’t see any access to the blades for mechanical cleaning due to the outside grill and the inside heat ex-changer cooling fins. Gunk is visible between the fan and shroud and fan and grill.
If an outside inline fan is installed, I wonder what damage the internal non-turning fan might cause.

Okay, yes you can install an inline fan. Many of us have done that - they’re generally quieter and provide more exhaust flow. You’ll want to toggle the “filter” button in the GFUI so it doesn’t try to turn the fan on.

a.) An external exhaust fan will probably work but if there is significant blockage at the grill or on the blades it may reduce airflow. If you’ve got a 400cfm external fan, that’s twice the internal’s capability so might not suffer. But it would really be better to get the fan out of there.

b.) There are no negative operational implications of pulling the fan. Cutting out the grill also helps reduce airflow blockages and makes it easier to keep clean. If you are under warranty that’s going to be a problem for future warranty repairs although legally they’d have to prove your modification caused the warranty issue. If it’s no longer under warranty then it’s a gamble. They’ve said they won’t attempt to repair anything if the machine has been modded to where it can’t in their minds (aka their lawyers) safely operated. They waffled on directly addressing a fan removal.

c.) Yes

Hello,

I expect support will tell you to clean the fan, but that seems to be a problem for you, which I fully understand. Some of the things we need to clean are hard to reach. I’m pretty certain cutting it open will void your warranty, so wait on support before doing surgery.

If you decide to do an inline fan, you can turn off the nonfunctional fan in the Glowforge interface. From your dashboard, click create and new blank design. Now click the 3 dots, and click the spot shown in this image to turn off the exhaust fan. This is what mine looks like:

Please wait to hear from support before taking any action.

My dad is 95, so I wish you all the best!

I did not know there was a way to turn off the internal exhaust fan. Is that the fan you referred to in “… toggle the ‘filter’ button in the GFUI …”?
Sounds like a good option is to order/install an inline fan. Thank you.

Yes. @celesteprobichaux reply above shows where to find the button. You’re telling the GF that the inline filter is attached. When that’s the case it turns off the internal exhaust fan because the filter has its own. In your case you won’t have the filter but you will have another fan to take over the exhaust fan duties.

There are a lot of threads here about people putting an inline fan in and links to Amazon sources for them.

This is all giving me some hope of getting GF working again!

1 Like

Just a real, real long shot - a good blast of compressed air from the back might, just might, be enough to get it turning again.

Or, you might be able to get a screwdriver or similar between the cooling fans to give it a turn.

If you could get it to turn it all it might free things up enough.

Don’t put anymore 3M into it - it’s probably doing more harm than good at this stage.

Regards removing the fan and exhaust grill - on the Pro I would say don’t bother. Just add the external fan and turn off the internal one as others have said. Your ears will love you for it.

It won’t get you out of having to clean the exhaust grill, but you will (with luck) never have to clean the internal fan again.

One last tip - when you do get the fan spinning, you can - very carefully - push a 1/2 inch house paint brush through the cooling fans onto the spinning fan to give it a good brushing - do this carefully though. You don’t want to jam the brush right into the fan.

Also, whatever you will need to clean out the exhaust grill from behind - try and clear through this as best you can.

Let’s hope support can sort you out whatever.

1 Like

You can also use bottle/straw cleaning brushes to get into the grill & blades to clean the fan up a bit. These ones are long enough to be able to finagle in there from the left inside of the machine too.

https://www.amazon.com/Hiware-Drinking-Straw-Brush-Kit/dp/B06XDK78GQ/ref=sr_1_4?dchild=1&keywords=tube+brush&qid=1629934021&s=amazon-devices&sr=1-4

Just ordered the brushes. Thank you. Next will be the inline T6 fan …

1 Like

Get the S6 not the T6. The difference is the T series has a temperature/humidity sensor for $40 more. You don’t need those.

Good to hear about the S6. Thank you.
I’m waiting to hear from Support before ordering.

Hello, @brok09 I am so sorry to hear bout the exhaust fan trouble you are having. It looks like you’re working way through some of the advice from our forum members. If you wanted to continue going this route I also recommend checking out the Beyond the Manual section of our community. Note that advice in this section is unsupported and is not reviewed by Glowforge.

There are still a few things I can check for you if you’d like to go the official route.

The cable for the fan could have been jostled and unplugged during cleaning. Please check the fan cable by doing the following:
1. Turn off your Glowforge.
2. Open the lid.
3. Gently roll your laser arm to the front of your unit​​.
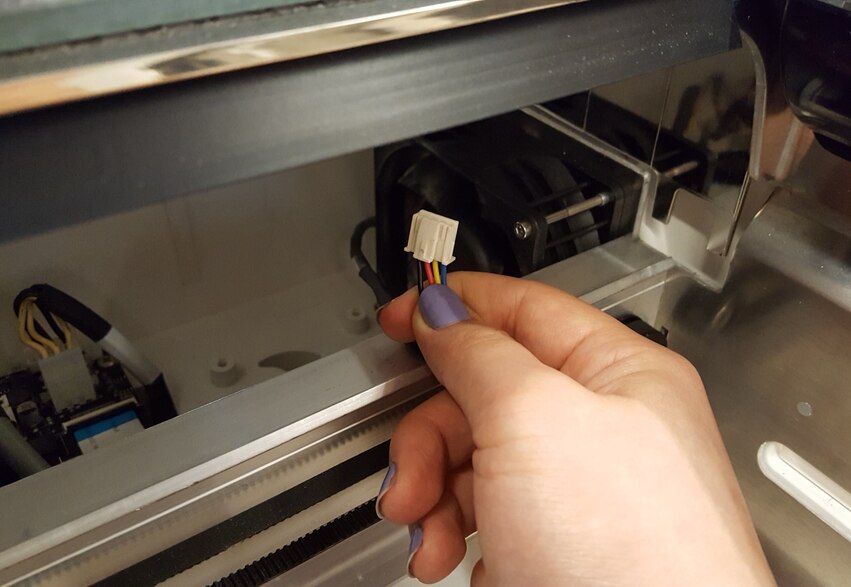
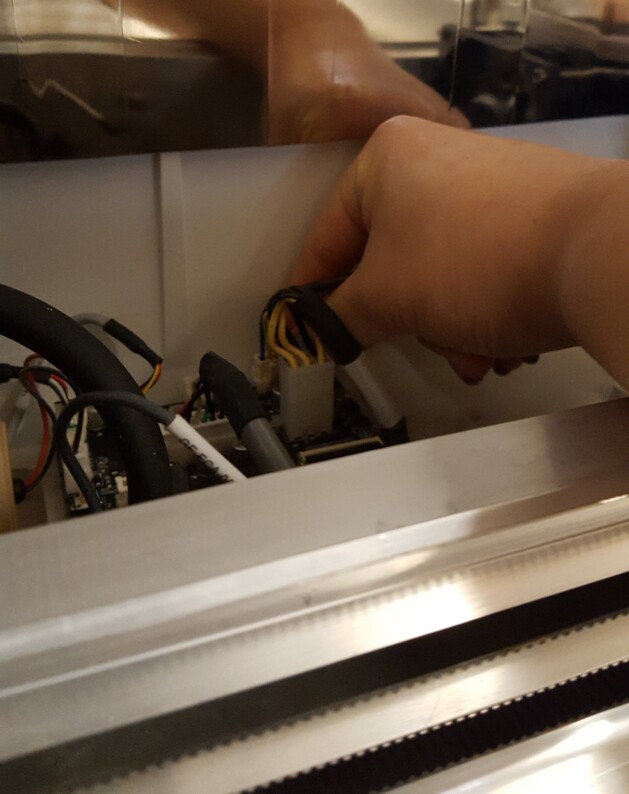
4. Look for a black cable with a white connector.


5. If the connector is plugged into the board, wiggle it very gently to make sure it is secure. If it is, skip the next steps, and let me know that it was plugged in properly.
6. If the connector is unplugged or unsecured, locate the clip on the connector​.
​​​​

​
7. Then, gently plug it into the board as shown in the photo. The clip should face towards the center of the bed of the unit.
​

​
8. Close the lid, turn your Glowforge back on, and repeat the steps for the test print we did in the last message.
9. Check if the fan spins up during the test.

Lastly, You can test if your Glowforge is functioning properly using the following test.

1. Remove any material from the bed, leaving the crumb tray
2. Disconnect the exhaust hose
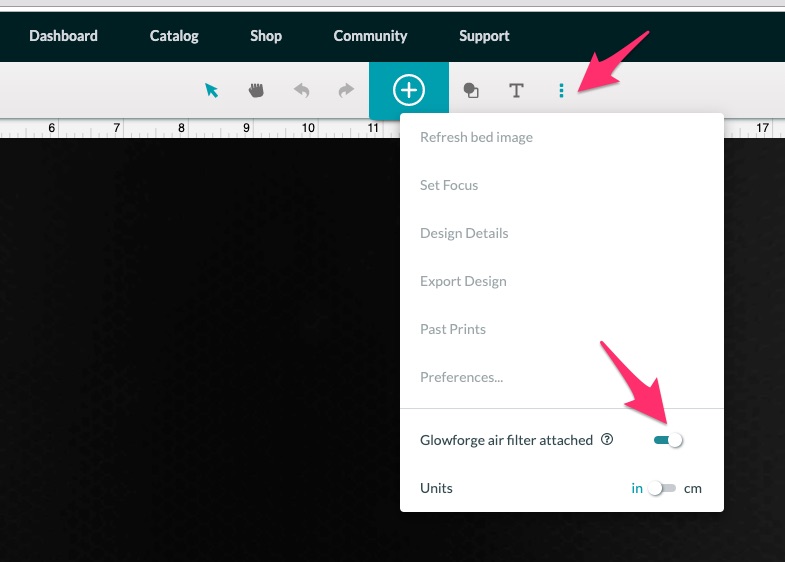
3. Use the fan maintenance page to turn on the fans in your Glowforge

  • Go to https://app.glowforge.com/maintenance/fan and follow the instructions to proceed. You will not need the degreaser.

  • Click the ‘Start Fan’ button and allow the fans to run

  • You do not need to follow the rest of the “Fan Cleaning” instructions to move the Glowforge outside or use degreaser.

  • Click ‘Finish’ to exit fan cleaning mode

4. Use a lit candle to determine if air is moving into or out of the seams along your Glowforge by holding it near the edges of the front door, lid, and the bottom corner on the front right side. If you see that the flame / smoke is being drawn towards the seams, that’s an indication that your Glowforge exhaust is functioning properly. If air is blowing out of those seams, pushing the flame / smoke away from the unit, it indicates a problem with the exhaust system.

Let me know how it goes and I will be happy to help!

8/29/2021
Checked the exhaust fan plug and found it tight.

Ran fan maintenance app successfully several times for repeatability.

Start Fan produces fan noise but the exhaust fan did not turn. With lid open and still hearing the fan noise, there was no noticeable air flow from the exhaust fan port. I did use the 3M cleaner spraying about 175 gm from can without any noticeable effect on the exhaust fan. It remains non-spinning.
I have not found a candle for your flame test, but do have the following observation. With Start Fan On and hearing fan noise, with the lid closed a small air flow was felt at the exhaust port without the exhaust fan spinning. There was air flowing out of the front seams easily felt by hand.

Test conclusion: exhaust fan has a problem.
What do you recommend?

Today I received an email Questionnaire about Glowforge’s help in resolving my problem. Since I am still waiting a response about what is now recommended, I have not sent an answer.
Support, please help.

Hello @brok09 - I’m sorry to hear that cleaning didn’t work, and I apologize for our delay in getting back to you.

If the exhaust fan is still not spinning after those checks it’s likely that at this point our best next step would be to look into replacing your printer. Unfortunately that exhaust fan is not a part we can currently spot replace.

To talk through this in a bit further detail and get some additional info from your end I’ll be sending a follow up email to you. Since we’ll be finishing up in email I’m going to close this topic, so please keep an eye on your inbox, that email should be on its way.