Bear in mind that any vent pipe connection and pipe seam downstream of your booster (if you require one) is under pressure. Best configuration is going to place your booster as close as possible to the outlet. That way all seams and possible leaks are under a vacuum. Guess how I know that… 
Like everything else in life. 
25 Likes
Uh-oh! 
5 Likes
 HVAC 101: exhaust fans are the last thing on a duct if you can help it. Those little buggers will put more pressure out than you’d expect. Live and learn
8 Likes
Not only the pipe connections and seams–the fan housing is also often very leaky.
5 Likes
Yes it is! That was the first leak I identified. Ended up sealing everything with clear silicone.
5 Likes
What type of fan did you end up using? – specifically, how many CFM? I’m still determined to provide post-zapping ventilation from my GF… My unit is only 4’ from the window, so it’s not losses from a long run or too may turns that’s the issue – it’s the build-up of burnination odors/fumes in the basement.
I’ve tried transferring the hose from the GF exhaust to a 90-100 CFM booster fan and running it between GF sessions, and that has helped some, but I’m convinced that an extended exhaust period through the GF itself would provide the most relief.
3 Likes
Venting out and up the chimney has worked great for me…except when I forgot to not turn on the attic fan!

7 Likes
Maybe. Depending on what you’re cutting it may also be your materials - either the remnant pieces of extra material or the finished pieces themselves. Some materials like leather retain the odor for a decent length of time - the solution is to get the stuff out of the area (like emptying the scrap bin every night ![]() ) and to clean up and/or seal your projects.
) and to clean up and/or seal your projects.
I agree that an extended exhaust period would be helpful, I’d bet it’s not the source of any longer-term residual smell in the basement unless you have some odor absorbing walls/furniture/etc.
2 Likes
Off-cuts and leftover materials go straight into a watertight sealed bin. Masking paper, gorilla tape, and the tiny pieces left over go straight into ziploc baggies and are sealed immediately. Finished pieces typically go into the garage or outside for a few hours, depending on the weather.
I agree that materials vary greatly in odor and I know that there’s a certain amount of outgassing to be expected, but there’s far more smoke & fumes escaping the unit during operation than I anticipated, so having the fan cut off a few seconds after the head stops moving just doesn’t get the job done, in my opinion.
2 Likes
I agree. @dan hopperized the suggestion to allow a longer fan-on duration. I think the post-operation problem is due to the crumb tray. When I open the unit up and pull off a piece of material there’s always a puff (or more) of smoke that was trapped in between it and the bottom of the tray. Since there’s no real space between the bottom of the machine and the crumb tray the smoke doesn’t go down and around and then out the unit but gets trapped in the honeycomb. The honeycomb seals tighter to the metal tray bottom than I expected - it’s the quality of the construction. One solution I thought about was to see if we could put some spacers in between the honeycomb and the bottom of the tray. Then smoke coming from under the material would be able to be pulled under the honeycomb and back up & out an exposed/open cell.
3 Likes
Have you reported this yet?
2 Likes
In tracking down a source of stink I found that you really have to tighten down that screw-clamp on the connections. that wire that re-enforces it is spiral, so it winds through under the clamp.
Put a hurting on those… but don’t strip them.
The flanges could be wound with something that offers a degree of ‘sink’ like several layers of masking tape to help achieve a seal.
2 Likes
My brother was with me all afternoon and evening as we worked on a bunch of projects. He did a great job of cleaning up the place and staging things for the trip out West. I did a small engraved door sign for a friend of his to take back when he went home. He entered his house to and was greeted with these words, " Ah, I detect the unmistakable scent of Eau d’Glowforge."
8 Likes
Yes and I sent a detailed update this afternoon – I try not to surprise the support staff with forum comments. 
5 Likes
That’s pretty much the exact same one that I’m using, but I haven’t used it inline with the GF. I guess I’ll try them in tandem.
Btw, your link says 190 CFM, but the model you linked to has the following specs:
4" Diameter 90 CFM; 110/120v; 12 watt
I have been cranking down on the clamp as much as I feel comfortable with without breaking the plastic flange on the GF. Also periodically make sure the hose isn’t punctured anywhere (hose #1 had a pinhole about 8" in).
1 Like
I must have mistyped.
Precisely. I don’t find it objectionable, perhaps just a bit more plentiful than anticipated.
2 Likes
The tightening ability on that clamp won’t come anywhere close to damaging that flange. You will strip it first.
Guarantee.
Just so you know, I am known as the man with a thousand ‘Famous Last Words’.
4 Likes
Sure, but to quote the folks that were nice enough to lend me a PRU…
Using your flathead screwdriver, tighten the clamp until it will not come off with a gentle tug. Careful: Over-tightening can damage the tube and risk exhaust leakage.
Had it come completely loose during a print. Once. ![]()
I like to live dangerously – I use a Phillips head screwdriver.
7 Likes
I think I’ve posted this idea before, but the only way I can think of to make the entire exhaust run act in suction, while keeping the fan indoors, is to build an enclosure at the end that contains the fan. A little more work, but then no need to make airtight duct connections/seams nor seal the fan housing.
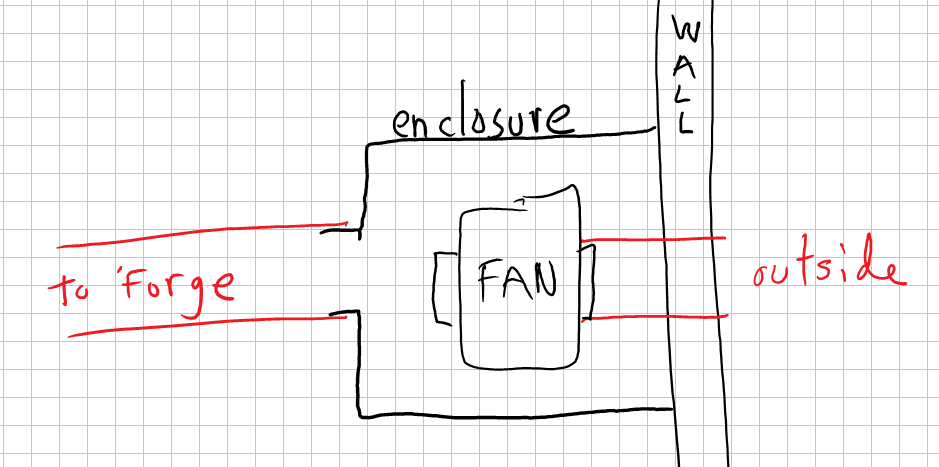
The enclosure has to be strong enough not to collapse under the vacuum produced inside it. An added benefit is that the enclosure acts as a noise barrier for the fan.
6 Likes