I asked a couple of months ago after I got the PRU when I noticed the focus height. As you noted I traditionally make the focus for cuts about 1/2 way through the material. So for a .25" thick piece, I’d set the laser focus to .125" but the GF doesn’t do that. I asked if it was automatically making the focus adjustment based on the .25" entered. @Dan said it focused where we tell it to focus and does not take the.25" and make the focus .125".
1 Like
i think that’s mostly in part to create a wider channel for molten metal to be blown out. thin pieces are focused on the surface.
Thanks @jamesdhatch.
If the GF doesn’t do that and focus “where we tell it to”, is focus a completely manual setting?
It seems to be an override vs the GF selected settings. So you can let the GF pick it for you or you tell it what to do. Or you let it make the initial pick and then you can change it - that’s what I usually do now. I have it use PG settings and then I manually change them.
When you enter a material thickness, the interface sets that value into the focal point setting for you. (The default currently is for the FP to be set on the surface of the material.)
You can override that setting by going to Manual adjustments and entering your own FP. And the machine does use your settings. It will pause and switch the focal point in the middle of an operation if you have different FPs set up for different operations.
Seen it, done it, it’s super  !
!
6 Likes
Makes sense. What are PG settings though?
proofgrade. you can look and see what the settings are when you select the material (or it autoselects it).
PG=Proofgrade. The Proofgrade sticker tells the machine what’s in there and it pulls data from the machine in the sky to use settings that GF has determined will absolutely work and are tweaked and tuned by the folks who designed and built it.
Fortunately, if the sticker is gone or you’ve dropped in a non-PG piece of material you can pick it from a menu and in effect get PG settings for non-PG materials. They tend to be pretty good substitutions although I usually need to bump the power/slow the head for some non-PG wood I’ve used.
As @Jules said, pick the PG you want (say 1/4" PG Maple Plywood) that compares to what you’re cutting (like 1/4" non-PG store bought Baltic Birch plywood). Then got to each operation (cut, score, engrave) and select the operation you want it to perform as if it’s PG material. Then if you want to override them, select Manual (cut/score/engrave) and it will retain the settings it had but allows you to override them.
1 Like
Ah got it. Thanks @Jules.[quote=“Jules, post:45, topic:8769”]
It will pause and switch the focal point in the middle of an operation if you have different FPs set up for different operations.
[/quote]
Great. But here’s a question. I presume ‘cut’ is one type of operation and ‘engrave’ another. But is it currently possible to differentiate focus depths within ‘types’? Or are ALL cuts (presumably defined by line colour in the software) subject to the same FD? Just wondering how flexible these settings are.
One typical example would be cutting 2 material types and/or thicknesses on the bed in one operation.
Ah, of course. Thanks.
Yes if they have different colors. Each color in your design allows you to separately defined the operation & parameters. Within a specific operation - e.g. engrave of the red items, you can’t change on the fly say to do the top of an object with more power than the bottom of the object - you’d need to create two objects and assign different colors in your design software.
2 Likes
That sounds great. Pretty flexible. Me likes.
Intuitively focusing in the middle feels like it would give the deepest cut and the straightest edge because you have equal power density fall off either side of the middle of your material. So you might get a bowed edge but less likely to get a slanted edge as top and bottom should be pretty equal.
Obviously I have never used a laser, so intuition could be wrong.
3 Likes
it depends on the goal. if it’s to cut a big channel through, it deffo can be. i think the difference is that for cutting thicker metal, it’s less an option and more a requirement.
It would be interesting to look at the different edge profiles resulting from cutting acrylic with the focus at different heights.
4 Likes
Can you show me a screenshot of where it is?
Exactly. That’s a frustration every woodworker had to go through that we hope to spare our customers.
It’s all very approximate, since as soon as you start using your bed it begins to deform slightly. It’s used for dewarping, but that inaccuracy is one of the reasons lid camera alignment is only approximate right now.
When you autofocus, it measures the distance to the head, and then focuses very precisely.
Right now it always focuses on the surface. Wood and acrylic both produce total internal reflection at 10600nm so that produces excellent results throughout the cut.
Indeed!
10 Likes
I love tidbits like this.
2 Likes
Indeed! Imagine this test:
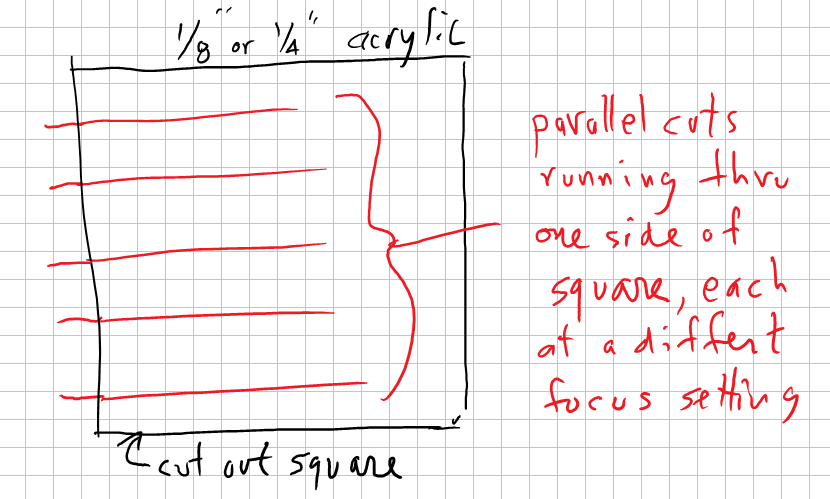
Cut the parallel red lies first a various focus settings, then cut out the square. When viewed on edge, the differences in focus may be visually noticeable, especially on the 1/4".
5 Likes
I think it was 1" before they planed it. In the UK it is marked with the finished size in mm, so we don’t have the problem although there is a tolerance of course. We get sizes like 18, 34 and 44mm for planed wood.
ish. it definitely used to be 1-inch before planing, but since we’ve moved to standardized sizing and modern industrial planers, they often start out less and remove less to maximize the lumber you can create from one piece of wood.
2 Likes