Focus issues

I’ve had my GF for a while now, and use it a lot, but only for simple things. However, it seems to have a problem focussing on what is on the bed. The QR icon is always out of focus, the material often appears bent looked at on the screen, and the positioning is nearly always wrong, sometimes by up to 1/2" from what is shown on the screen to what is actually cut. Relative to each other, multiple pieces in the same cut are always perfectly aligned, so it seems to me that that the camera is out of focus.

However, as I said, I’ve only used it for simple things and I’m loath to start fooling with it without asking first. Calibration/startup never give any problems and unless that’s an issue, I can’t find anyone else in the forum with the same issue. (Including the one I thought I’d asked myself a few months ago :cry: )

Most if not all of the cameras are out of focus, especially at the corners. Mine is too, but it most often recognizes the QR. Many cameras provide a non-rectangular view of the bed. If your unit shows errors as great as 1/2" “AFTER” putting in the correct material height then you should report it. Be sure to include the post cut image of the standard “Gift-of-Good-Measure” with the preview image overlay. Make sure the rulers are shown in the same image. Ensure that the correct Proofgrade material type has been selected.

Warning! Do not adjust the camera. It will totally mess up the alignment, and will permanently screw up your Snapmark calibration.

4 Likes

Does it at least recognize the QRC and fill in the appropriate Proofgrade settings for what’s in the bed?

Oh yes.

@marmak3261 so for the first time , tonight, it did NOT recognize it.

3 Likes

Uh oh. I jinxed it! Post some shots of the material in the bed and especially a Gift of Good Measure on Proofgrade to see how it’s aligning things with the camera.

1 Like

what do you mean by a “gift of good measure”?

It’s a free file we were all given. In your project screen (app.glowforge.com) scroll down and keep hitting “show more” until you find it:

1 Like

This is the first screenshot - I put the GoGM as close to the top left as I could, and a template I wanted to print underneath it. You can’t see it in this image, but there were grey diagonal stripes along the left/bottom/right sides.


The result was NO GoGM, and my template was printed was further away from the edge than it should have , as you can see here …

I moved the GoGM so that it was not in the “grey zone”, and then it did print … this was the image on my screen … as you can see, it is very close to the top, and to the template …

but again, it printed much lower and to the right than would have been expected from what the image on the screen implied …

finally, I’m not sure if this means anything but this shows the difference between the image on the app and what is on the bed …

At no time, once the board was laid down, did I move it.

now all you wizards out there – fix it!!! :rofl:

I noticed this last night too – the cuts are not going all the way through on median draftboard proof grade. Always at the bottom of the board (closest to the front of the GF)

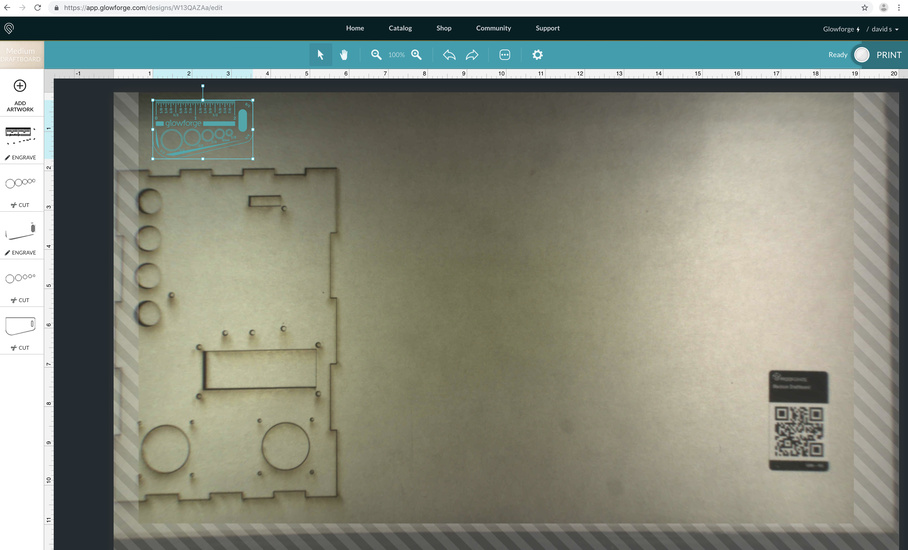
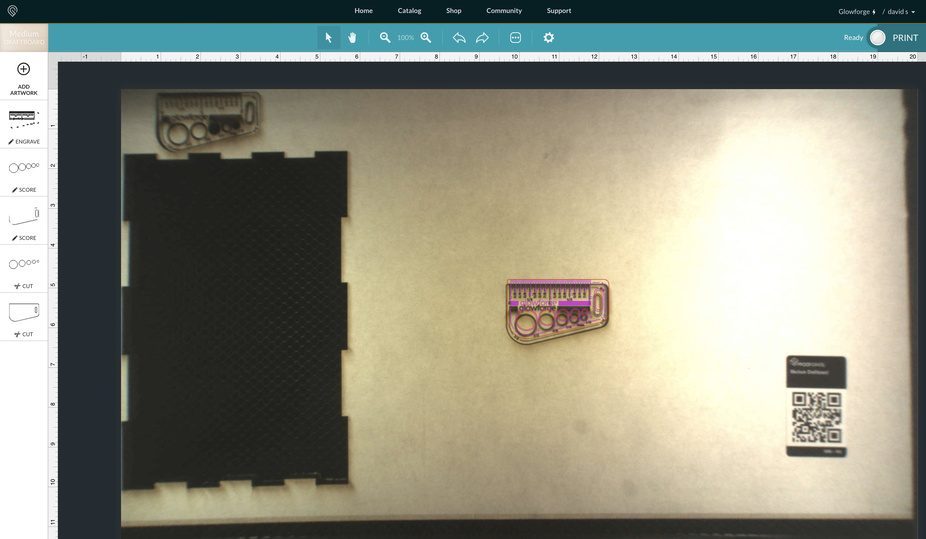
1. The striped bars are a No-Print zone. The placement of the bars will change depending on whether or not you are Engraving anything or just Cutting, and the speed of the Engrave will determine how far those bars extend out into the cutting area. (They are necessary because the head needs more room to decelerate at higher Engraving speeds.)

Just make sure to place your designs outside of the gray bar zone. :slightly_smiling_face:

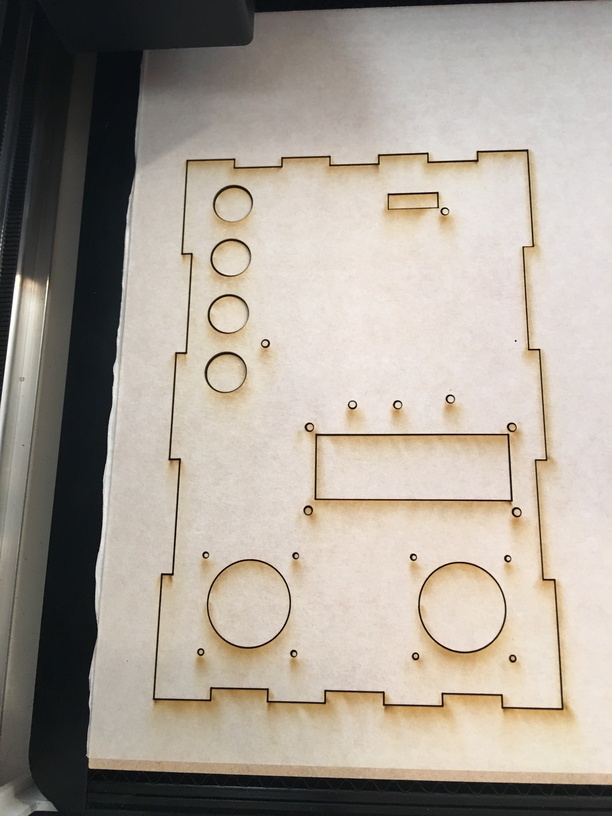
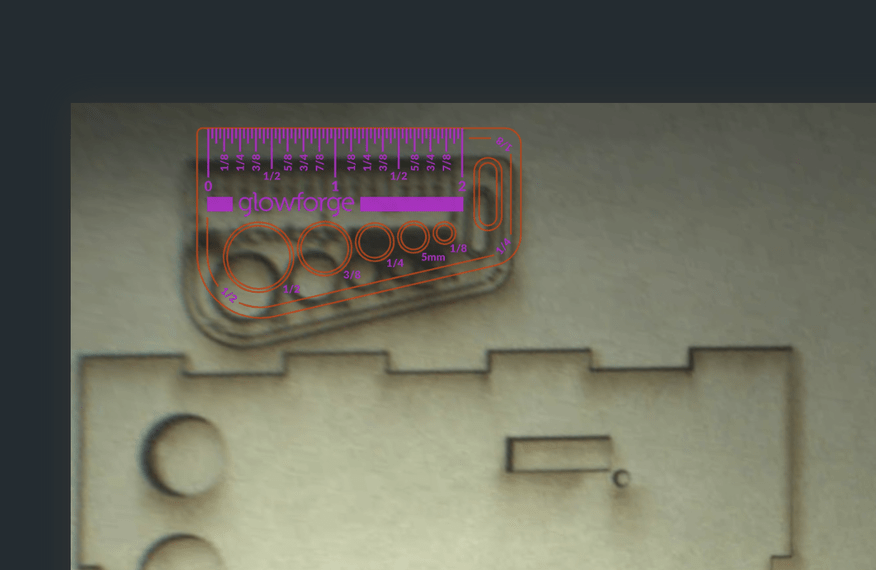
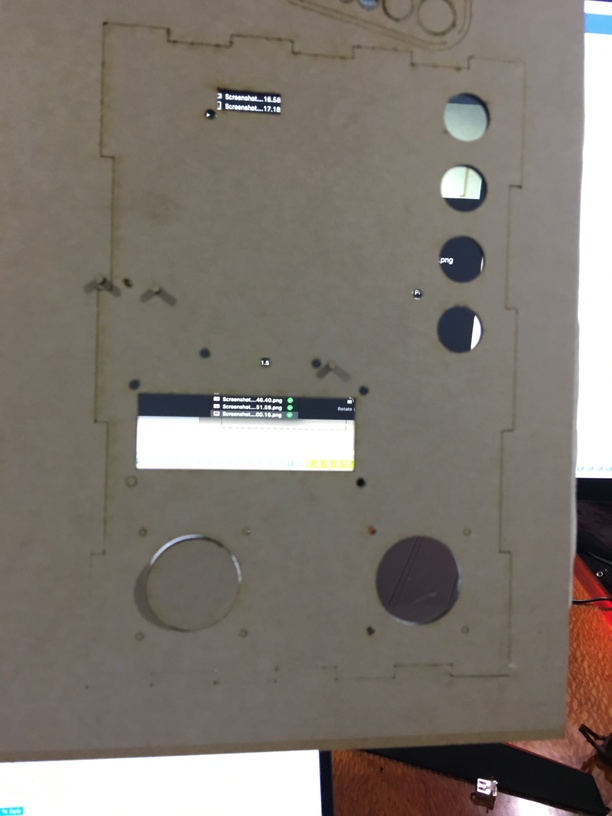
2. The placement alignment can vary by up to 1/4" at the edges of the bed, due to fisheye effect of the lid camera. If you find that you are seeing more than 1/4" variance between the Preview and the Cut, you need to notify support so they can take a look at the metrics for your machine. (Which is what you have done here.)

You did print the Gift of Good Measure, which is something that they usually ask for, but you will need to capture the rulers in the screencap if you want to show them that there is more than 1/4" variance in the results. (So you might want to run it again and capture the rulers in the shot, along with the Preview and the printed result.)

If you don’t have more than 1/4" variance, it’s considered normal variance at this time. Just place your items 1/4" away from other cutouts and edges at the extremes of the bed.

3. Your material not being cut through can be caused by several factors…the most common are:

  1. Make sure the lenses and windows are clean using the instructions here: Things That Need Wiping.
  2. Make sure that you have the material pinned down perfectly flat. I use these Honeycomb Pins. Some people prefer magnets. The slightest amount of warp in the material will keep it from cutting through in places.

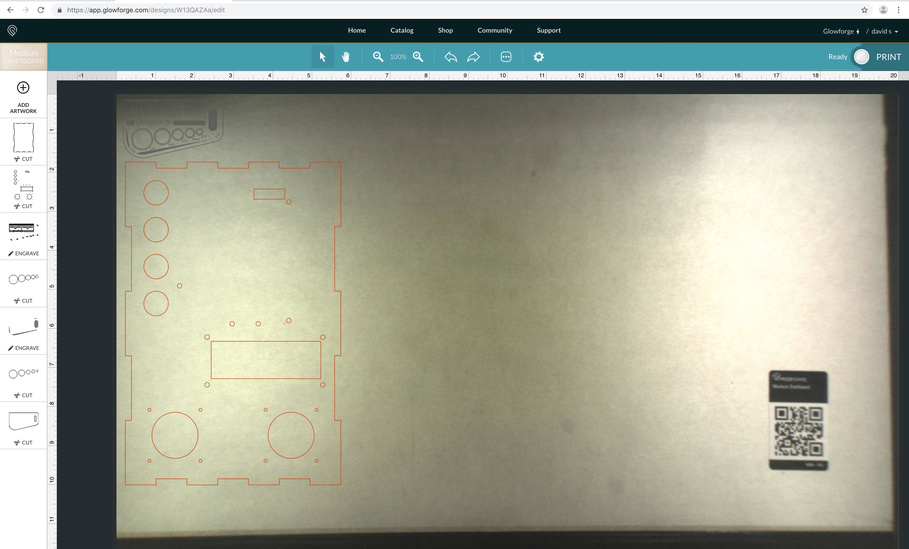
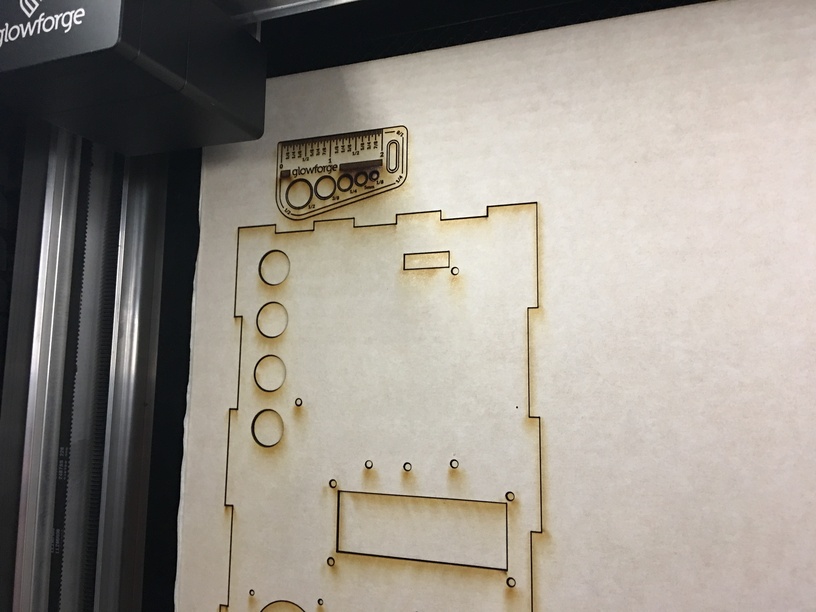
4. What you are seeing on the screen is normal. We do not see the entire sheet in the view provided to us. What we see is the cuttable area. There is always some material left at the top and left. (How much depends on whether you are engraving or not. If you can arrange your cuts against the edges, and your engraves closer to the center of the bed, you will wind up with more usable area on a sheet.)

From an official Support standpoint…they like to limit answers to one question per thread so they can assign a ticket to it and close it once there is resolution. (And i assume they’re going to want to take a look at that variance since that was the question that started this.) So you might want to take another screen cap with the rulers included so they can take a look at it.

But since you seem to have additional questions, I’m going to point you towards a list of short tutorials in case you haven’t seen them yet, that shed a little light on some of the things that go on with the machine. They can be a big time saver once you understand how everything works. :slightly_smiling_face:

Official Training Tutorials:

Print a Gift of Good Measure.
Print a Snap-n-Store Box with Customization
Make a Gift Tag
Shortcut Keys
Trace a Hand Drawing with the Glowforge
Print your Own File
Cut Out a Shape
Engrave and Cut a Photo
Print Text
Introduction to Inkscape
Prep a Photo Engrave in GIMP
Prep a Photo Engrave in Photoshop
Snapmarks - Introduction
Manual Mode in the Glowforge - How to Save your Settings

5 Likes

thanks!

1 Like

WRT #1: So really what you are saying is that I do not have a 12" wide workspace, but less than that due to the grey striped area … that sucks for one of my future planned projects :frowning:

The current Cutting area for the Basic is roughly 19.47" wide by 10.94" tall. (That’s based on my measurements, yours might be larger or smaller by plus or minus 0.02" either way). To go any larger with cutting, you need the Passthrough slot on the Pro model.)

So no, you can still cut and engrave larger than 12" wide. You cannot cut or engrave anything taller than 10.94" on the vertical axis though. Not with a Basic.

If you absolutely have to engrave something that spans the full bed size, and you can’t break it up, or do it in stages, you can increase the available engraving area by slowing down the speed of the Engrave, and simultaneously reducing the power that you are using. (Note: Do not try to do one without doing the other, you will burn through the material, charring it, and possibly start a fire. Not joking. It requires gradual step-down testing for the material to get the right settings. But it can be done.) :slightly_smiling_face:

2 Likes

thx for the info. Any safety tip that prevents me burning my home down is greatly appreciated!

Using a jig or using snapmarks for alignment, you can do a little better than that 10.94" number, but it will be, uh, a process.

1 Like

Yes it will. :smile:

Normally in these situations we make sure folks have seen our general alignment advice:

The software on your Glowforge is responsible for ensuring that the print lands on the material in the same place as the preview. When you’re done with a print, let a new image load. If the print appears on screen far from where it was supposed to go, you may have an alignment problem.

Most alignment problems come from the material being closer or farther from the camera than expected. While the software is still improving, you can take these steps for the most accurate alignment results:

  • Use Proofgrade™ materials.
  • If you don’t use Proofgrade materials, use a precision set of calipers to measure your material, and enter the thickness in the “uncertified materials” dialog.
  • Use material that is not warped or tilted.
  • Place your design near the center of the bed.
  • Clean the area underneath your crumb tray, particularly the four indentations on the floor.
  • Reboot the machine. Alignment can drift over time, particularly if you bump the head of your Glowforge while removing material.

Should you finish all of these steps, and find that you have an alignment error of more than 1/4", please contact us so we can investigate.

Also, I checked the logs for that print, and the logs indicated the crumb tray might not be seated in the divots properly.

Can you double check the crumb tray is flat, and try one more Gift of Good Measure print for me. In one of the corners. Exactly like the one previously would be perfect. Full instructions included here for your convenience.

We’d like to have you try a few troubleshooting steps for us:

  1. Turn off your Glowforge.

  2. Check for small pieces of debris or dust.

    • Check the lower door to make sure it closes all the way. It may require some force to open, but open it, wipe any dust off the edges, and close it all the way.
    • Remove the tray and clean any dust or debris from the surface underneath. Pay careful attention to remove all debris from the four dimples where the tray rests.
    • Check the lid to make sure it closes all the way. Small particles of material, such as dust or debris, can prevent it from closing completely.
  3. Check the surface your Glowforge is on to make sure it’s flat. Ensure it is not twisted slightly and that there is no debris propping up one side of the machine.

  4. Turn your Glowforge back on.

  5. We included an extra piece of Proofgrade Draftboard with your materials shipment for troubleshooting. Place the Proofgrade Draftboard in the center of the bed and print the Gift of Good Measure using the default settings.

  6. When the print finishes, leave the lid closed and wait until the fans stop and the picture updates. Without moving your artwork or your material, take a screenshot of the Workspace to show us the difference between the artwork placement and the actual print placement. Make sure to include the rulers in your screenshot and show as much of the bed as possible.

    • Mac: Press Shift-Command-4 and click and drag a box around your image. You’ll find the screenshot file saved on your desktop.
    • Windows: Click on the Start Menu and type “snipping tool”. Open the Snipping Tool > New then click and drag a box around your image. Click the Save icon and name and save your file.
  7. Send us the screenshot along with the date and time of the print, and we’ll investigate.

Here you go. 2018-11-07 17:27

@pip ?