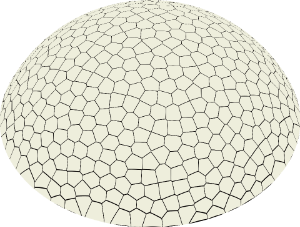
A blank dome puzzle, 15" wide, 473 pieces. You can paint it after it’s assembled. Hints are scored on the back.
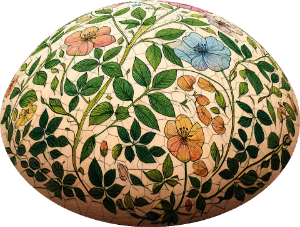
Painting suggestion:
Prerequisite Skills:
- Using a vector editor (not the Glowforge UI) to arrange shapes and create offsets
- Using manual settings for non-Proofgrade materials
Materials:
- 1/16" or 1/8" plywood (8 pieces 8"x10" or larger)
- Masking paper
- (Optional) Watercolor paper and adhesive
- Watercolor paints. (Don’t use acrylic paint; it would glue the pieces together.)
Files:
blank-dome-puzzle.zip (344.0 KB)
Overview:
- (Optional) Adhere watercolor paper to the plywood.
- Mask the front.
- Use the attached kerf tester pattern to find a snug fit. Use a vector editor—not the Glowforge UI—to adjust the piece outlines by half the number on the kerf tester.
- Place the material face down. “Score” the hints and “Cut” the pieces.
Detailed Instructions:
Click to show detailed instructions
Read all the instructions before you begin.
1. Choose plywood.
The attached file divides the project into seven 7"x10" pages. I recommend this 8"x12" basswood plywood made for Cricut.
If you want to choose a different plywood:
- Varnished wood can’t easily be painted. If you’re not using watercolor paper, get unvarnished wood. Note that Proofgrade is varnished.
- Quality wood-core plywood cuts cleaner than MDF-core.
- 1/16" is best, 1/8" is acceptable; anything larger won’t work.
2. (Optional) Attach watercolor paper.
You may wish to use watercolor paper for a better painted appearance, instead of painting on bare wood.
Test your watercolor paper first, to make sure you can apply and remove your masking paper without tearing it. A cotton textured paper will probably work.
Laminate it onto your plywood using the adhesive of your choice. There are a lot of options, including
- 3M 568 pressure-sensitive mounting adhesive: Cheaper than individual sheets, but not quite as easy to use.
- These pressure-sensitive sheets are my favorite. Note, this website won’t warn you if they’re on backorder.
- Gorilla spray adhesive: Can work but is very messy.
3. Add masking
Add masking paper to the front side (if using watercolor paper, mask it; otherwise mask the bare wood). It’s not necessary to mask the back. (I don’t, because of the risk of masking paper flying up and interfering with the cut.)
4. Find the right kerf adjustment
Getting the right level of snugness between pieces is essential for this project!
Place a sample of your masked material face-down on the Glowforge bed.
Open the attached kerf-adjustment-tester.svg in the Glowforge interface. Don’t resize this pattern or it won’t work! On the same sample, score the digits (blue) and cut the outlines (pink).
The tester has a range of different kerf adjustments already applied. Try to zip the two halves together, and you’ll see at what point the adjustment becomes too tight. Find the adjustment that is snug, but not so tight that the pieces can’t be pressed flat. You should be able to bend the two pieces at a slight angle.
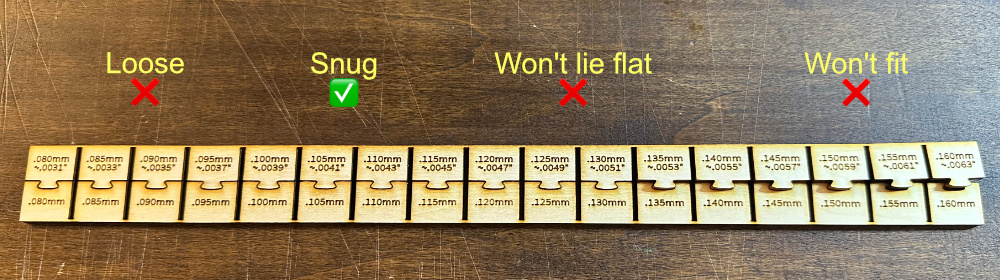
Note the number indicated on the tester. You will use half of this number for the adjustment offset.
5. Edit the vector file, apply the offsets
Open the attached blank-dome-puzzle.svg in your vector editor. Don’t use the Glowforge GUI for this, because its offset tool isn’t accurate enough.
The given file has arranged the pieces into seven 7"x10" pages. Set your editor’s units to inches, and verify that the pages’ sizes are correct in your editor. You may need to rescale them.
When the scale is correct, select all the pieces (“Pieces” layer), and apply an offset equal to half the number indicated on the kerf adjustment tester.
6. Perform the cut
Save or export the edited pattern(s) to SVG, in the usual way for your editor. Load the edited file into the Glowforge UI. Again, verify that the sizes of the pages are 7"x10".
Place your plywood face-down in the Glowforge. Of course, you can only cut one or two pages at a time; they won’t all fit at once in the Glowforge. “Score” the hints (green digits) and “Cut” the pieces (orange). (Ignore the yellow rectangle; it’s only there to help you check the scale.)
7. Tips for assembling the blank puzzle
Assemble it upside down, with the hints showing, so that you’re assembling a bowl rather than a dome. You will not be able to assemble it flat. To help smooth down sections of the bowl, you can roll a tennis ball around inside it.
Happy cutting! I’m happy to answer any questions or respond to feedback. If you make one of these, consider sharing a photo of your painting!