The Glowforge fairy left a deposit on my doorstep yesterday.
It’s a Pre-Release, so I have to give it back one day…but by all that is holy…they might have to physically remove me to get to it. (As in pry me off…crying. Or at least kicking up a hell of a fuss.)
I’m probably supposed to be all cool and adult about this…definitely not my style.
Those of you still hanging around waiting for this thing…
SMART MOVE! 


I actually had to wait until late last night until someone (who shall remain nameless) came home to help me to lift the the machine out of the box, so I just spent the day stroking it, talking to it and introducing myself.
It really is a gorgeous machine!
And it’s heavy. You need two people to get it out of the box.
Once I started setting it up it didn’t take long - maybe 20 minutes, and sorry for not timing it, I was taking pictures as I went so i could put it all back together again later.
The connection was smooth. (You are going to need to connect the machine using a device that is connected on your WiFi.)
I tried first on an unconnected computer and it doesn’t work for the setup step. Once you have established the connection between the Glowforge and your WiFi network, you can use an unconnected computer to access the Glowforge interface through the Chrome browser.
By then it was late, and hubs wanted to sleep and not listen to a machine running, so I decided to wait until morning to run the first print. (I ought to get a medal for that…after waiting all day…Grrrrrr!)
Okay, so today…Day one.
I wanted to carefully follow the instructions in the manual (which is extremely good so far…it is still under development, but I was really impressed with it)…for two reasons.
One, I am a complete laser neophyte and had no idea what to expect…I figured if I could do it by following their step-by-step guide, anyone could. And two, I was trying to catch anything that didn’t work.
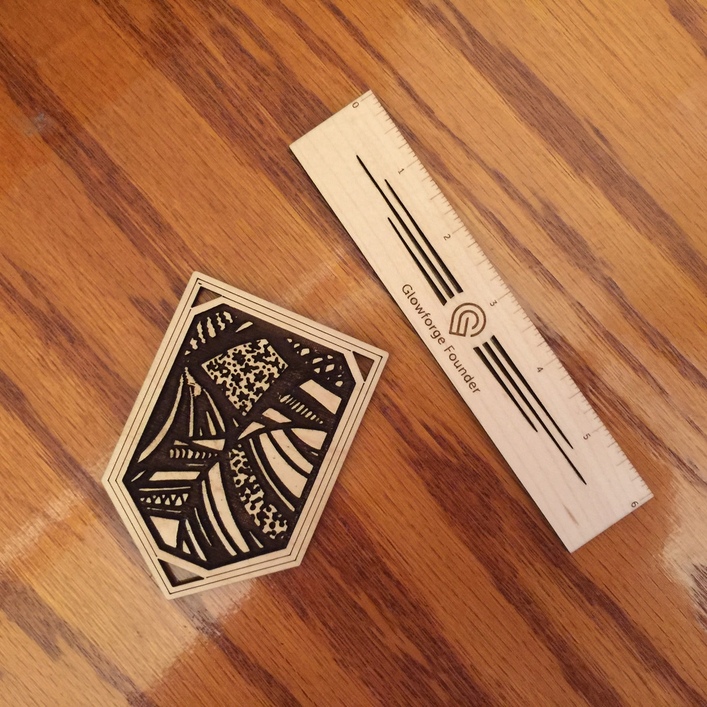
So the first thing I made was their Founder’s Ruler. You might not think that is terribly exciting, but I sure did! The engraving on it is clear, crisp, there is absolutely no edge bleed around the letters and numbers like there was in some of the show prints that we saw…it looked perfect. And the measurement on the ruler was completely accurate, I pulled out the calipers to measure it. Exactly six inches. So accuracy gets a big thumbs up! ![]()
The next thing they tell you to do is draw something on a sheet of paper for scanning and using as an engraving on a little plaque. Definitely not my strong suit, and I spent longer on the drawing than the machine did printing it. I also made the mistake of leaving way too much black area in the drawing - it took too long to engrave and lost all of the stroke mark detail…rookie mistake.
Anyway, the ruler and the little plaque thing are shown below. The GF software smoothed out my terrible drawing somewhat, making it look better than the original. We also have the option of darkening the render, or lightening it by using the CTRL key and the keyboard arrows, and I had to do that because my drawing was picking up a reflection from all that black ink.
Here they is:
Third thing we have to do is use something we designed, so I’ll bet you’ll never guess which one I picked.
(And I gave the original a few curls…just because.) ![]()
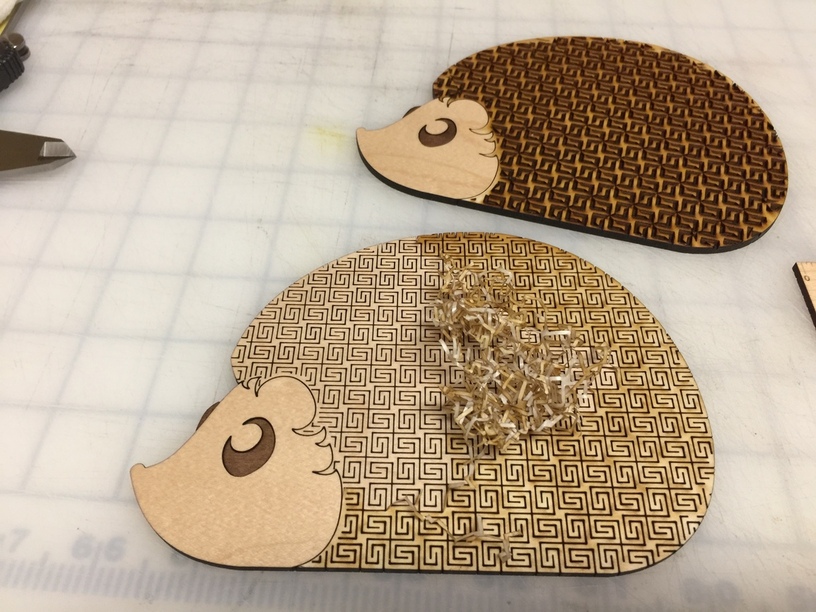
I’m posting the masking removal photo, so you will know there are some downsides to these things. (Peeling the tape off of something like this is a looooong process, and the easiest way to do it is to use a fingernail or a dental pick if you have one.)
One thing that I discovered during the printing of the hedgies, is that if you select Score for your vector lines, the engraving happens just like the cuts - the laser follows the path from top to bottom and side to side. It’s a quick process.
But if you select Engrave for a stroke line, the slower side-to-side engraving process takes place, and the program tries to fill in the width of your strokes, just like it does for a Fill. (top hedgie in the pic) So the top hedgie took 47 minutes to complete, and the bottom one took about 9 minutes. I like the effect on the top one better though, so it was a lucky accident. (Remember to take any bathroom breaks before you start a 47 minute print that you have to keep an eye on. Free tip of the day.)
Also did a small photo engrave, but it came out a bit too light - I need to adjust the settings and run it again before showing it. (That was just a quickie to see how it worked…it needs a deeper engrave to show up, and I need to learn what I’m doing.)
Soooooo… it took about a day to feel amazingly comfortable with this. For a complete beginner.
The machine delivers every bit of the excitement that Dan has been promising us from the beginning. Pat yourself on the back for sticking it out.
I’ll keep you updated with anything pertinent that I find as I go through and test this, and make mistakes, and learn…
I’ll try to keep up with the forum Highlights, but i’m also sending reports and feedback to Glowforge, so if I’m not engaging with ya, it ain’t that I don’t love ya no more!
And yes, still doing tutorials. Going to incorporate anything learned from this, either here on the forum or in an actual hints list if I can find anything that Glowforge hasn’t covered. (So far, how the machine acts for an Engrave versus a Score is the only thing I’ve noticed that isn’t covered in the manual. Which is pretty phenomenal.)
I have to go pass out now.
Squeeeeeeeeeeeeeeeeeeeeeeeeeeeeee!!! ![]()
![]()
![]()


