I honestly hate this machine buying it was a huge mistake I bought the pro version it’s complete garbage nothing but problems with the pass-through nothing but problems with the whole system in general I wish I could get my money back really really dislike the glow forge 100% I tell everybody I know that it’s a complete garbage product and I would do everything I could to give it back to the shit company which made it of course they don’t want it back because why would they want more trash in their warehouse lol if anybody’s interested in buying this garbage off of me feel free to contact me I will gladly let it go for 4500+ shipping
Not trying to downplay anything. I am really just curious…do you have an issue with periods?
Welcome to the community! I can see you have spent a lot of time getting to know your machine…period.
7 Likes
If it’s complete garbage, why would someone pay you $4500 for it?
You usually pay people to take your garbage, not the other way around.
If you want some help using it, feel free to participate in the community, we’ll help you 24/7.
If you just want a venue to sell your machine, a support ticket with Glowforge Inc is not the best place for that. Facebook Marketplace maybe.
6 Likes
This thread is for posting problem and support issues. Nothing in your post explains what the issue is with your machine. If you explain the issue then we can all help. It appears you are not interested in that.
I get it. I am on my period right now and also just want to vent and ignore that periods exist.
6 Likes
$6000 Glowforge but a broken keyboard.
4 Likes
I am thinking it is NOT the keyboard. likely the keyboard pressing interface system.
5 Likes
I was trying to not make it personal…
3 Likes
If you were to read a few posts here you might find answers to some of your issues. If you ask here you will receive helpful advice. I’m sorry you feel the way you do, but there are many many happy users more than willing to help a new user along, if you explain the issues you are having.
4 Likes
We all can identify with frustration, most of us started with little knowledge of lasering. A quick check reveals you have had your machine roughly 4 months yet have spent 23 minutes reading on the forum and your only post was to show anger and frustration. Give us some details and an idea of what you are having trouble with and I guarantee you people will try to help you solve the problem. We may or may not have right answers, but it will at least help lower your blood pressure.
8 Likes
Where are you located? If you’re in the DC metro area, I might take it off your hands.
2 Likes
Oh no, I’m sorry for the trouble @bryanmahan.
To help our team take a deeper look into the issue, could you please send me a photo of the front and back of a recent print that didn’t turn out as expected?
Please also let us know the date and time of the print (including time zone) in your reply.
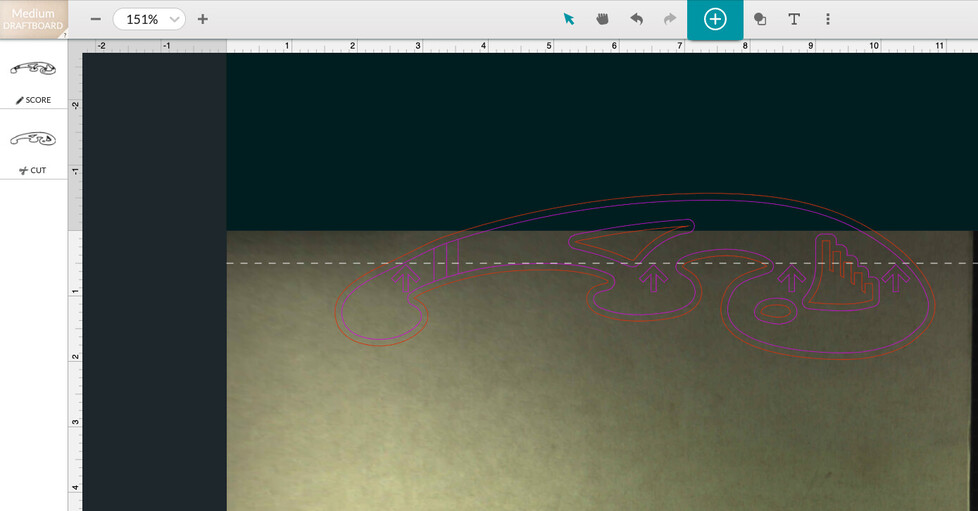
Next, if you haven’t done so already, will you read the section titled “Extra Pointers” on our Pro Passthrough support page, and then run a test print?
Lastly, here are the steps for the test:
Load a sheet of material into the Pro Passthrough slot and ensure that the portion sticking out of the printer is supported so the material lies flat on the crumb tray inside the printer.
Double-check that the material is completely flat against the crumb tray. A quick way to do this is to press gently on the material where it rests on the tray and feel if it moves. If not, you’re good.
It can help to use pins to hold the material flat against the tray. For example, a lot of customers use small pieces of scrap to print these pins available in the free laser design section.
Open the Smooth Curves Stencil from your design library.
Turn on the Pro Passthrough feature in the menu bar.
Select the entire design, and arrange it so that the dotted line at the top of the work area is at the tips of the arrows in the design
Click Print and run the first section of the design.
After the first section completes, move your material through the Pro Passthrough slot so the printed area is more than 3 inches (7.62 cm) away from the front of the Glowforge.
Follow the prompts and run the 2nd portion of the test print.
Photos of the front and back of the finished print.
The date and time you ran the test along with your time zone.
A photo of the bottom of your print head showing the lens and both windows.
Attachments
![]()
