So I’m making frames for a series of National Park prints. I posted about one a while back that I’ve finished and I’m on to the 4th one now (I still have to “finish” the other 2, but I’m waiting on custom cut glass that I still need to order).
One of them I’m trying to make is a geometric pattern that offers a 3D look around the frame. Here’s my test piece:
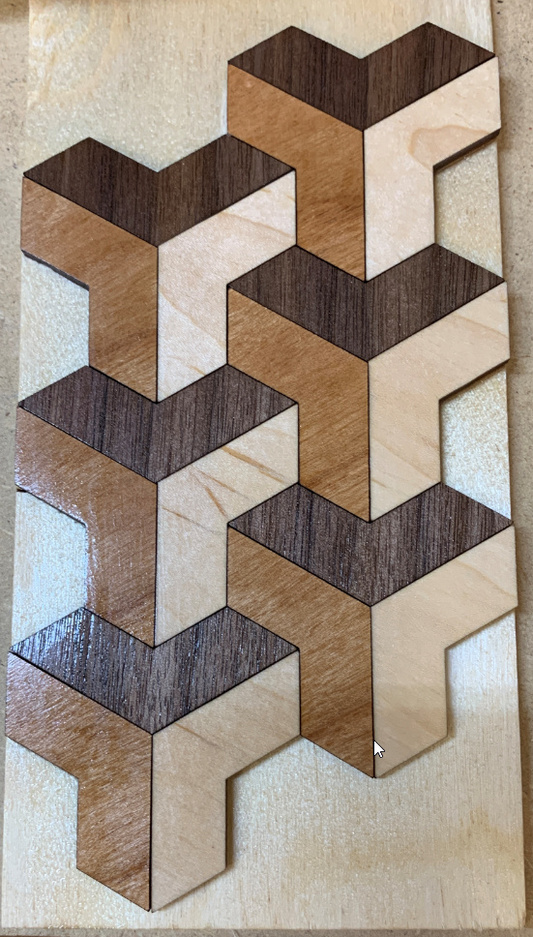
Looks great right? It’s exactly 3.5 inches across, pieces look great, they glue up well and the space between pieces actually adds to the look I want. I designed out the rest of the frame in CAD so I’d know what to cut the length for the backing and then how many pieces I’d need.
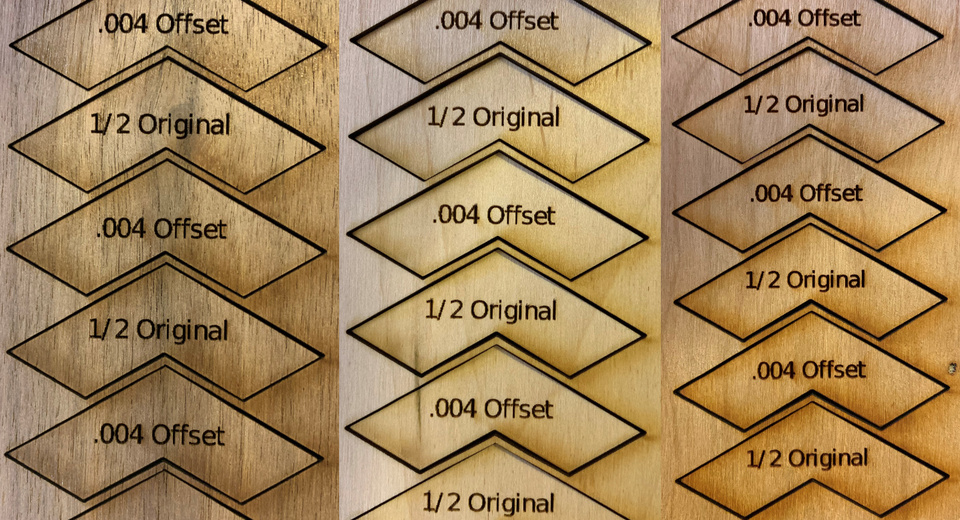
Once I had that, I created a CAD file that fit 32 pieces on a 3"x12" piece of 1/8" I got from here:
Very excited, I started the cuts, doing 3 pieces at a time - I needed 4 pieces of each species to make all of my needed segments. As the wood cut, I noticed the weird cut pattern / order (I still need to get that nailed in AutoCAD I thought so it cuts more efficiently and from one end to another) and then I noticed that the wood was moving, even though I had it pegged down to the honeycomb. As it cut the longer edges, I could see parts moving / curling. Bah - I’m going to end up with some weird pieces that I’ll have to compare to others as I go, but they should be smaller / weird so I can tell and I’ll throw em, cut more as needed.
As I cut and collected the first round, I pulled out the scraps and set them aside. Once I had cut 2 rounds of 3 sheets each, I took the scraps upstairs to throw away. As I was walking up the stairs, I noticed that the scraps didn’t line up - meaning the edges that should have been exact because of the cut pattern, were off - they didn’t line up at all. Weird I thought and had a slight pang that something was amiss, but I figured perhaps I wasn’t comparing the same side of the cut (I was) or there were differences in the wood that would cause a shrinkage effect (THERE WAS SHRINKAGE! :D). It should have triggered me to stop cutting, measure, do a temp layout, etc. But I didn’t - forge ahead! (See what I did there?)
So I get all 360+ pieces needed cut, into separate bags and ready to go. Last night I cut 4 strips of baltic birch ply on the table saw, cut them to length, Kreig Pocket Hole screwed them together, and got the backing frame ready. Started the first row, did about 5 or so on the right edge and then started going left with the pattern.
It was OBVIOUS right from the start something was amiss. There were significant gaps in different areas, the pieces didn’t line up and as I started testing more and more out to the left, everything was out of alignment.
It was then that all of my tangential info came back to me and hit me like a bag of hammers. The wood was wet. The cut pattern didn’t account for ANY kerf. The wood bent as it cut and edges were 1/8 to 1/4 up in the air at some points when it cut. The pattern was off (verified later) and I had drawn / copied a CAD error around the cut file. It would have been ok for 1 side, but I had copied that shape around a CAD file for the whole layout. Problems compounded with problems.
I told my wife last night as we went to bed - I screwed up the geo frame. She asked what happened and when I told her, she said well you can always start over. Yep - that’s what I have to do but MAN I hate losing all of that work / effort.
So, now I’m starting over. Really all I need to do is cut another side of the backing, screw it in place and re-draw / cut all of the pieces. My test piece worked flawlessly because I drew the shape as a single piece and then copied it across the wood for cutting - wasting wood in the process, but giving me a flawless piece to work with. I selected proofgrade thick Walnut from the settings and it cut all 3 species perfectly. So that’s what I’ll have to do if I want perfect pieces to work with. And I do - one small kerf being off and it’ll throw the whole frame out of whack. Plus I have 2 pieces left of each so I can start while I’m waiting for the other pieces to show up.
I don’t really know why I’m posting this other than to vent and sum up my thoughts. It’ll be a cool frame once done, but for now, I’m starting over. I gave some small thought to figuring out kerf in my CAD file layout, but as long as the other way works and wastes a little wood, I’m fine with that. Besides I can get the grain in the direction I want it that way.
Thanks for reading / listening!