Like many on here I am having like problems. I can say I love my Glow Forge and surprisingly use the PG material more than I expected. With that said I have been using the laser problem free for a about 2 months now and I guess been lucky I have not had some of the problems other have. With any rollout you can expect bugs, and I know they are being worked out.
I know this topic has been discussed but I am posting again because I have reviewed all like issues other have had, tried their solutions and nothing has worked.
All I need it for the GF to cut the PG material out. No matter which PG it is the automatic settings will not go through. I do not a have an excessive amount of hours to which the tube should be starting to loose power, I HOPE. I am hoping this can be solved by a simple re programming.
I have to slow the PG cut by 20 points in order to cut completely through. I have cleaned all the mirrors, removed any scraps, do not use any warped material if I do clamp it down, etc etc. Simply said I have followed all normal cause for the GF to not cut through.
This is getting frustrating as one of the biggest selling points for me as my wife likes to use the GF and be able to not have to worry about any settings. Just put the PG in and go.
Absent of all the tricks and common reasons for this can somebody offer advice, support take a look at my system and check for bugs or updates or something to get this thing to work like it is supposed to.
The success of the PG material is going to rest on this feature. If one has to program everytime, they might as well use cheaper substrate. Though I know PG has good qualities, I suspect most use it because it takes most of the thinking out of the equation.
You have a window on the left side of the gantry (it’s tucked under the left side of the machine, so it can be hard to see)
You have a laser head window that is on the left side of the laser head.
You have the lens which is removed using the blue lens removal tool. (Make sure this is placed back in the same orientation as you took it out - the lens is biased towards one edge of the lens holder, and the lens glass should be on the bottom, closest to the crumbtray)
And then you have a mirror that is underneath the removable top of the laser head (make sure that you put that back in the same orientation as you took it out)
You have already done this - so support needs to chime in. The comments below are for others not yet at your stage.
Clean is always important.
However, Flatness is extremely important to cut through and has been the culprit to every failure I have run into (so far).
To that end, when I find a magic sweet spot with a Goofgrade material, I drop 5 points off the speed. (An Alternate option is to increase power slightly, but no guarantee this is not already max). This assures me that if I missed seeing a slight warp, it will still cut.
Acrylics also do this. Some colors resist cutting and that sweet spot for all the others fails.
Same can be done with Proofgrade if you are getting nervous.
When all is done (material selected, actions set and ready to hit print), go to each action and select manual, then drop speed a few points.
May sound like an overkill method, but will stop the disappointment of a failed cut because of a missed warping.
I know it’s time to clean when PG stops cutting on PG settings. It’s easier to make sure it’s flat every time as I magnet everything. But I do cleaning on fails (& re-run the cut).
This is what I missed when cleaning, and it caused problems on EVERYHING, including proofgrade. When I did clean it, it didn’t leave much muck on the wipe, but, it immediately returned my cuts to great form.
Also the bottom of the head - I always wipe that off too. The led height sensing laser is there and I figure dirt makes that measurement less precise.
I also clean the lid camera and the two little lights flanking it. Helps my bed scans & calibration. I wipe the head at the same time to clean schmutz off the GF logo.
@mike20
I’m so sorry your prints still aren’t cutting through perfectly. Could you please do the following?
Turn off your Glowforge, then turn it back on.
We included an extra piece of Proofgrade Draftboard with your materials shipment for troubleshooting. Place Proofgrade Draftboard in the bed and load the Gift of Good Measure design.
Set the score and engrave steps to ‘ignore.’ Print the Gift of Good measure using the default settings. Allow the print to finish.
When the print finishes, leave the lid closed and wait until the fans stop and the picture of the bed updates.
Check the completed print:
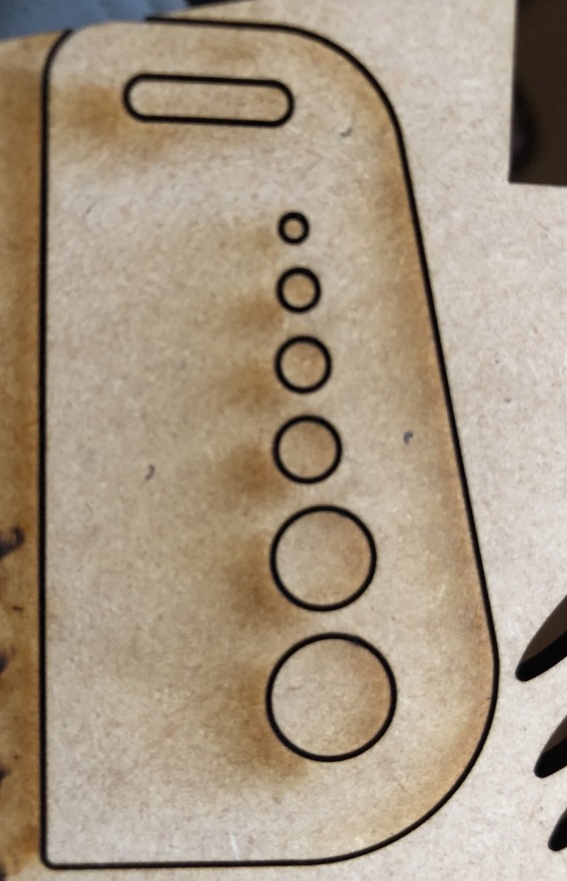
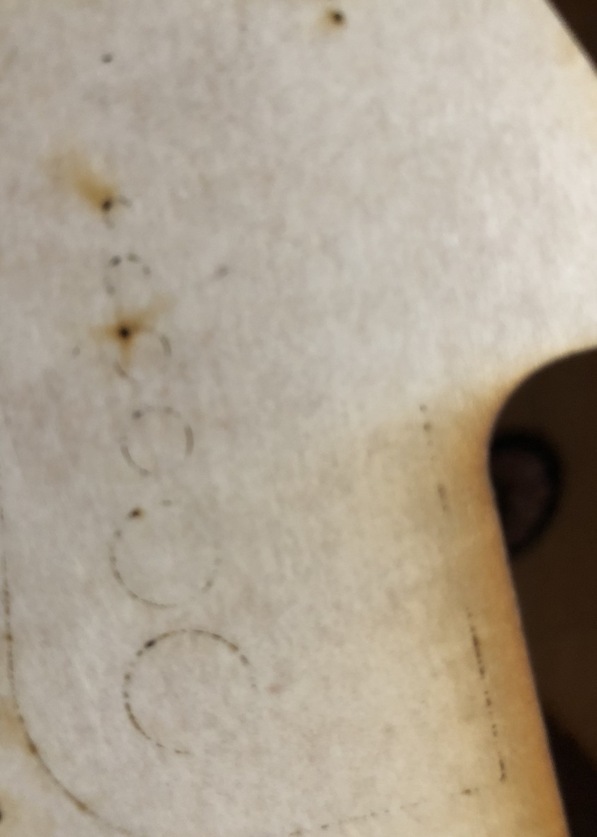
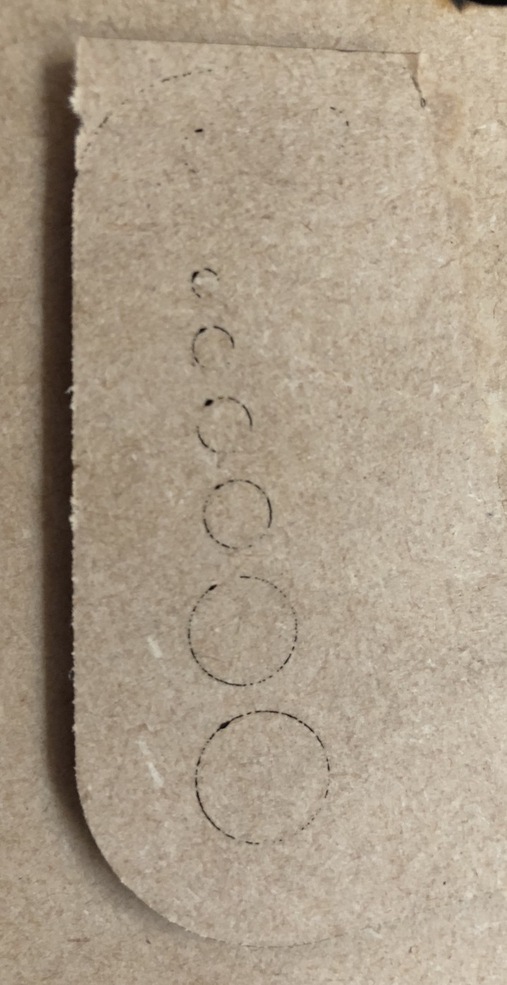
If the Gift of Good Measure fails to cut, please let us know the date and time of the print and post photos of the front and back of the print here.
If the Gift of Good Measure cuts successfully, please try another print of the design you saw the issue with, and let us know the results.
Also this is the metric Gift of God File, the standard will not load. And some the others. DO you have an idea what this is? When I hit open it quickly goes to the cut screen but does not load the file?
I’m so sorry for the frustration because that wasn’t clear up front.
When you edit a design on your Workspace, the changes are automatically saved as you make them. That means that if you close your browser, navigate to another page, or just hit refresh, your work will pick up right where you left off.
Should you make a change by mistake, you can use undo any time until you leave or refresh the page.
If you want a clean start on a personal design, you can always go to your dashboard and click the upload button to upload the file again. If you got the design from the catalog, then you can start fresh by opening the design, clicking on the three-dot icon, and choosing “Reset Design” to remove all changes.
Regarding the cut through issues your Glowforge is experiencing, unfortunately, I’ve determined your unit has an issue we can’t solve remotely. I want you to have a reliable unit, so I’m recommending we replace this one. I’ll be in touch via email to sort out the details.