Every time I try to set my focus I’m getting an error. I’ve tried everything on my browser and resetting the machine with now positive results. It sounds similar to this issue: Set Focus errors
I’d prefer if the GF staff would begin answering questions in the forums instead of emailing users offline. I never get to see the resolutions that way. Here is a screenshot of the error I’m getting.
They revert to email when the poster has also sent an email in addition to posting here. So if people would stop emailing AND posting here, we’d see a lot more of the resolutions.
(Unless the issue involves personal information, then it’s all handled by email.)
I would double check that the windows on the bottom of the head (one on each side of the lens) are both clean.
Also, what size of material is this happening on? Are you aiming at the edge, or at a very small piece of material? If the red dot it emits is missing the material, it could error out.
Also, if it’s not able to see the red dot - which could be unmasked clear material, or dark material without masking.
I’m sorry for the trouble with your Glowforge. In order to avoid any confusion, we try to keep support topics to a single ticket per issue. I sent a response to your email ticket before I noticed that you have this forum thread open as well. If you’d like, we can close the email ticket and continue to assist you here on the forum instead. Please let me know how you’d like to proceed.
Here are the next steps I shared via email:
I’ve reviewed the most recent logs from your unit, and it looks like your Glowforge is having trouble communicating with the printer head. There are two key connections I’d like you to check for me.
Could you please do the following?
Turn off your Glowforge.
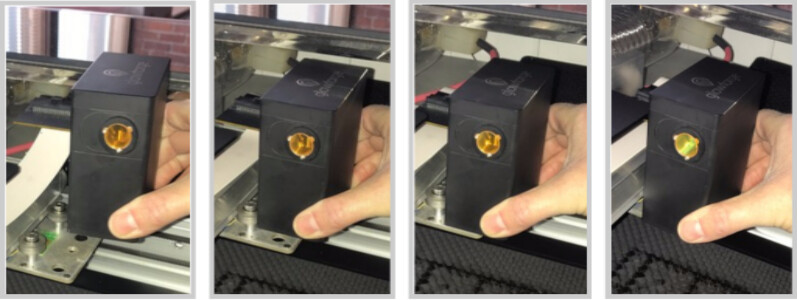
Holding only the finished black surfaces, grasp the printer head as shown. Pull gently up and back to disengage the magnets and remove the head.
There is a small tab in the center of the wire ribbon. Push down fully on the tab to release it, and gently pull the wire ribbon plug from the printer head.
Pick up the printer head and wire ribbon. Make sure the tab on the wire ribbon is facing up. Slide the ribbon back into the head until it clicks.
As shown, lower the printer head over the metal plate so that it rests next to the two round posts. Then push it gently away from you – you’ll feel a “click” as magnets pull the printer head until it sits snugly atop the metal plate.
Take a photo of the circuit board. If the cable I’ve indicated above with the red arrow appears to be loose, please reconnect it and try printing again. This cable should ‘click’ back into place.
Turn your Glowforge back on.
Send us the photos you took in step 4 and step 9.
Please let us know what you find. We’ll review the images you send us and then follow up with next steps.
They do that when people open duplicate tickets by emailing and then also posting in Problems & Support. They will always close the duplicate forum ticket and continue with the email one, in that case.