In case anyone else out there would find this little applet helpful I’m sharing here for others to use.
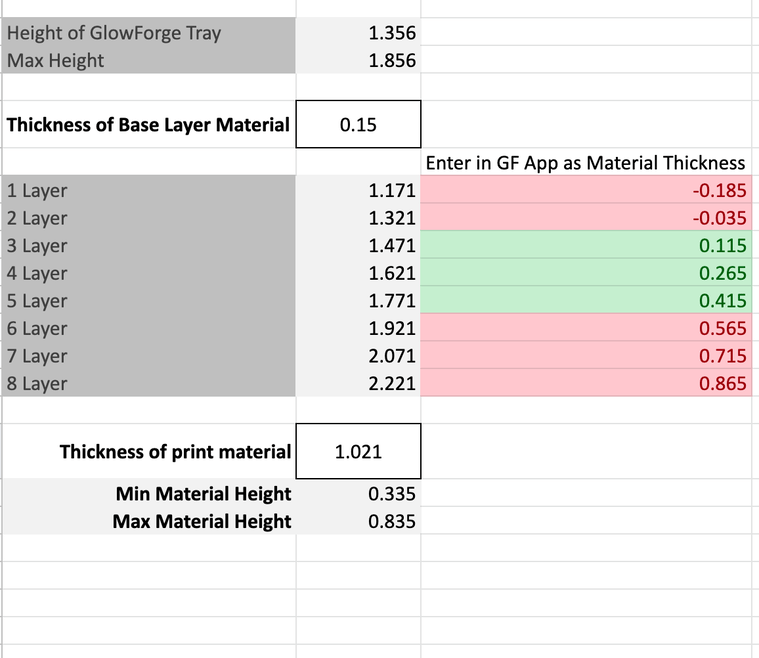
The challenge I faced was when using un certified materials thicker than the .5" window determining how big of a shim to use under to get to the right range. This little sheet let’s you calculate the number of shims at a given thickness you need to to get within approved range of 0"-.5" and then the final ‘material height’ setting to enter into the app. It will also give you the min and max thickness of the shim you need to use then you can plug in your material thickness in that range and it’ll tell you final material height in the “1 layer” row. Pretty simple but helps me a lot.
11 Likes
Hi Steven, welcome to the community!
Very kind of you to work that up and share it with us. Like you, several users have come up with solutions for that use case, but many of us, myself included have opted for a simple sight gauge shared by @dwardio … No Math Focus Ruler
With the crumb tray out, open the front door so you can sight across the surface of the material and shim it until it is between the marks. The lens has the ability to move 1/2" for autofocus, so anywhere between the marks works.
Thanks for joining us. ![]()
6 Likes
thank you!!
When you say shims, what are you using? Standard wood shims seem to vary by quite a bit!
Do you know about Set Focus? It’s under the 3 dot menu to the right of the big teal plus sign and it bypasses the need to enter a material height in the app. Terribly useful function!
4 Likes
Ultimately, it is the height of the blower on the back side of the carriage that either hits or does not hit and there is a bit of variability between machines on that point as well as the height of the material from place to place on the same piece, so if I am trying to engrave a piece of wood that is close I turn the machine off and move the carriage about to make sure it cannot hit anywhere. I have not engraved anything that needed removing the tray as yet.
There is another caveat however and that is that anything that interferes with the smooth flow of air from that blower will mess up the cut. If your engraving is closer to the top (Y direction) of the piece than the distance from the fan outlet to the laser, the drop-off will severely hamper the smooth flow of air and make a mess. In many cases I have just placed another piece of equal height material against the top “Y” direction of the material to solve that issue. Still care must be taken as even a bed pin sticking up can mess with the air flow.