Despite doing all of the following steps and more, my one-year-old Pro does nothing at startup. It was working fine last night and then I decided to check out the passthrough beta. That’s when the Pro got stuck. I have tried so many different things including different wifi networks, wifi extenders, cleaning of all lenses and mirrors, lights off, covering the top so no light gets in.
I moved the logo on the head under the camera, no go. I moved the head logo under the camera again and then lifted the lid and turned it on for 20 minutes and then closed the lid and the head actually moved, but rammed into the front of the machine.
I looked at all of the ribbon cables. They look good. I checked all the belts. I checked for any loose connections on the motherboard. Everything looks good.
I read all of the forum topics I could find. It just ain’t moving on startup. The button also does not light up at all on startup unless I want to reconnect to the wifi network.
From what I have read it seems the most likely explanation is bad ribbons on the top cover.
Please help!
First thing to check and eliminate is Wifi issues.
(A dropped signal will commonly cause the screen to lock up, but it’s pretty easy to clear.)
- Turn off the machine. Turn off the computer. Unplug the router.
- Wait a couple minutes.
- Plug the router back in and let it fully start up.
- Turn on the computer and let it fully start up.
- Turn on the Glowforge and let it complete the startup calibration.
- Then open the app.glowforge.com and check the status for “Ready”.
- Try a print of the Gift of Good Measure on the sheet of draftboard that they sent with the machine for testing purposes, to see if it’s working again. (Or any small print that has a score, an engrave and a cut.)
- If it’s still locked up, wait a couple hours and try again. Your internet service provider might be having issues somewhere along the line. (No other way to tell if it’s a service provider issue.)
- Set up a WiFi hotspot on your phone and connect your Glowforge to it; this will rule out for sure whether it’s a WiFi issue.
Second thing to check for is visibility issues.
- Make sure the lid camera lens is clean. (Use a Zeiss wipe to clean it if needed.)
- Make sure the Glowforge logo on top of the head is clean and clearly visible.
- Make sure there is no glare on the machine from a sunny window or bright overhead light.
- Dark materials on the bed can prevent the laser from taking the Auto-focus reading. Use a light colored masking on dark or shiny materials.
Third thing to check is cable connections.
- Turn off the unit.
- Check the connection on the white ribbon cable in the laser arm. Make sure it is fully inserted until it has clicked into place and that the pins are in good shape.
- Check all of the ribbon cable connections in the lid. The connectors need to be fully closed.
- Turn off your unit.
- Open the lid.
- Using both hands, gently roll the laser arm to the front of the unit.
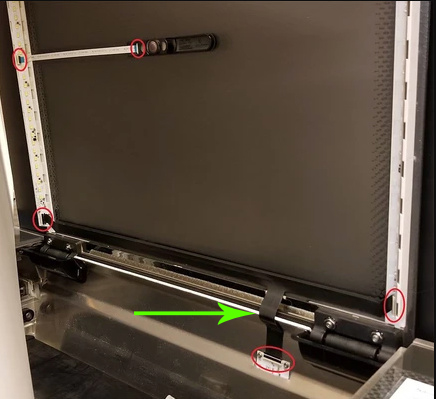
- There are 5 clips pictured below. Check each one to ensure it is closed. The clip should lie flat, and you shouldn’t be able to flip it in any direction. Check that the cable is not kinked or bent where it passes over the metal lip at the green arrow shown.
- There has been a recent outbreak of issues related to a problem with how a ribbon cable was installed on a batch of machines, and repeatedly opening the lid all the way upright (90°) can cause wear on it and break the wires inside prematurely. That can be replaced, but you’re going to need to hear from support for that…I think they can look at the logs to see it, and they’ll get you a new cable with email instructions on how to change it, which should eliminate the problem.
- If any of the clips are open, ensure the cable is inserted straight into the clip and close the clip.
- If any of the cables are misaligned in the clip, take a photo of the clip and cable and send it to Support before you proceed.
Do NOT try to adjust or reseat the cable without the okay from Support.
You can ![]() the electronics.
the electronics.
- If all the clips are aligned and closed…close the lid.
- Turn your unit back on and wait for it to calibrate.