My glow forge is stuck in calibrating. I was in the middle of running a print and halfway through it stopped, the light turned yellow, and started calibrating. I’ve tried restarting my browser and logging out of the app. I have unplugged the machine and turned it off and back on, and moved the print head under the camera. Hoping something else will work. I’ve already contacted support.
Make sure that you don’t have bright light shining down into the GF. This can confuse the cameras.
Yeah there weren’t any lights on and the curtains weren’t open in my craft room.  I hope I don’t have to get it replaced.
Hmm interesting, mine is doing the same thing. In the app, it shows calibrating, then it goes to offline and back and forth. I wonder if there’s something going on in the back end. The status page says everything is up and running.
Bummer!! I hope we can get this all sorted out. Another person with the same issue had to get theirs replaced.
So as a last ditch effort, although everything else in my office worked, I rebooted my router.
After the reboot it was able to connect and would finish calibrating… Not sure why that worked. But might be an idea to try.
Thanks! I’ll try it when I get home!
Rebooted my router and still the yellow light. I tried to run setup again and it wouldn’t let me. =(
I’m so sorry to hear you ran into trouble. Thanks for letting us know about this.
Could you please do the following for me?
- Turn off your Glowforge.
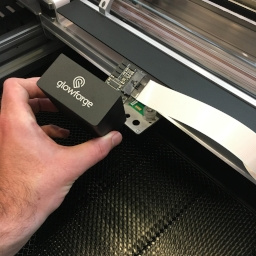
- Holding only the finished black surfaces, grasp the printer head as shown. Pull gently up and back to disengage the magnets and remove the head.
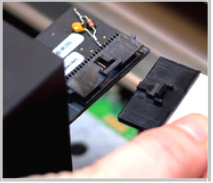
- Push down fully on the wire ribbon tab to unplug the wire ribbon from the printer head. Pull the wire ribbon gently away and tuck it into the laser arm.
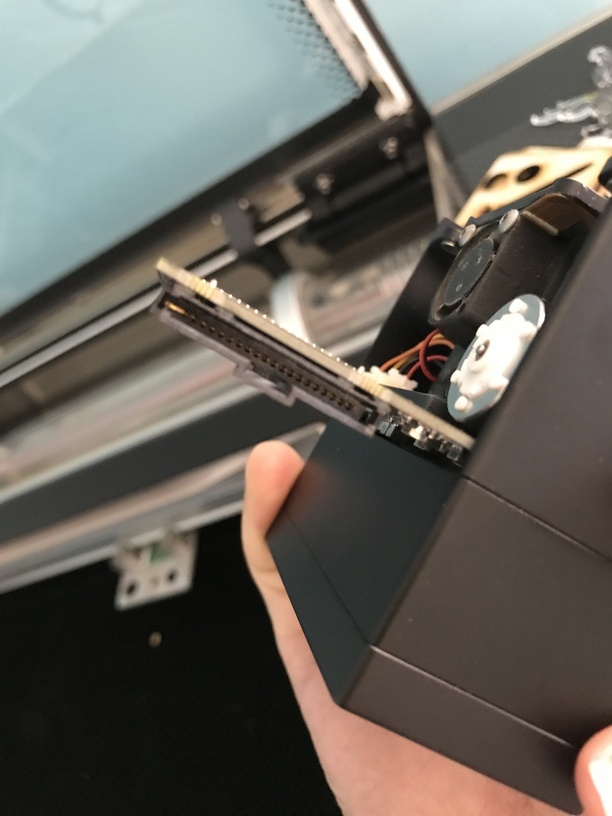
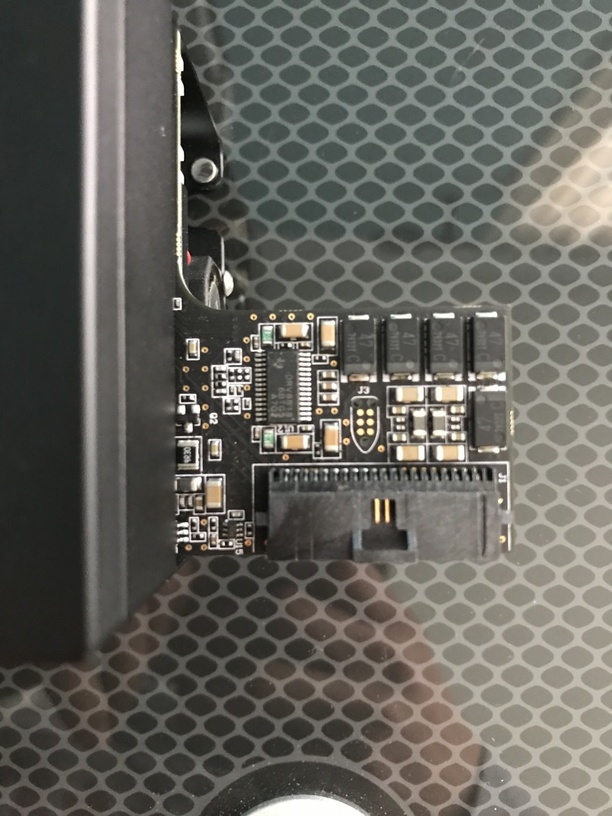
- Take a clear photo of the gold pins inside the printer head where you just unplugged the wire ribbon.
- Pick up the printer head and wire ribbon. Make sure the tab on the wire ribbon is facing up. Slide the ribbon into the head until it clicks.
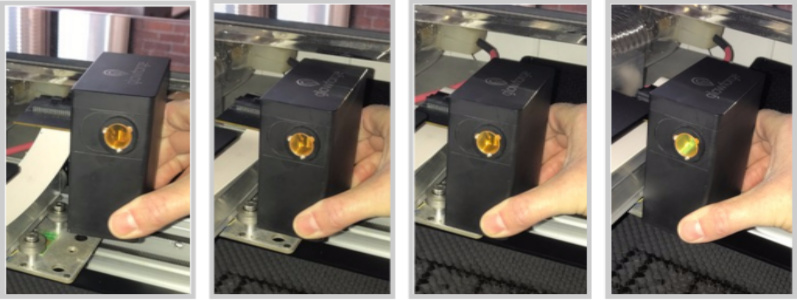
- As shown, lower the printer head over the metal plate so that it rests next to the two round posts. Then push it gently away from you – you’ll feel a “click” as magnets pull the printer head until it sits snugly atop the metal plate.
- Gently move the printer head so it sits under the camera.
- Turn your Glowforge back on.
- Send us the photo of the gold pins from step 4.
Thank you in advance!
Here are the photos. I think unclippig the ribbon and clipping it back in seemed to work. It is now functioning normally again! 
That’s a new one. Head disengaged leads to endless calibration. Makes sense.
2 Likes
Looks like the end pin on the left of the photo is bent. Did you straighten it?
No. It just started working. I can take a look at it again.
It could be the case it works without the end pin if it not used or duplicated but it would make it hard to get the other contacts to mate, so might explain the problem.
I opened it again and I see what you mean. I was wondering why my ribbon never “clicked” in and now I know the culprit. I don’t know how to go about straightening it. I guess I’ll just wait for a response from GF.
If it is just bent at its root you can sometimes bend it straight with a small flat blade screw driver but if it has been bent in the middle then ideally you need a pair of sniped nose or needle nose pliers to straighten it.
@monicajsmith, I know it should go without saying, but I think somebody should. ![]()
To be clear, don’t pull on the pin. Gently squeeze the pin to straighten it and line it up to the correct pin spacing. Be careful putting the ribbon cable on… That pin might not be as strong as the rest now and may be slightly misaligned and need just a little coaxing to get into its home.
3 Likes
If the printer head is connected and your Glowforge is printing, there’s no need to take additional action.
I’m going to close this topic. If you have any other questions, please post a new one.