I love that “anyone” will be able to use the Glowforge but at a certain point with the requests, it feels like it is being turned into the lazy mans tool. You guys seem to be doing amazing thing from the software side of things to make life easier, but a lot of the requests seem to be to make the print interface a full fledged design suite. Their is a reason Corel and Adobe charge as much as they do for the capabilities they have - it feels like so many of these design features are being requested to be integrated into the GF software.
6 Likes
It’s called contour cutting and is something vinyl cutter software routinely does. I asked about it months ago but never got a reply.
The reason it is useful is say I want to stamp a design on paper and cut it out with a thin border of space around it. I don’t have a separate stamp of the border to form the cut line. Could this go in the hopper @dan?
4 Likes
@dan - two reasons:
-
it’s very hard to add a perfect cutline - creating a perfect buffer zone distance - around the perimeter of the drawing using hand drawn techniques. It’s naturally inconsistent. That would be very challenging for a person (ie. child), but a cinch for a computer with camera vision.
-
using a cutline requires further marking the material just for making the edge to cut. Granted, by comparison, using a laser will cause far more damage to the material than a felt pen ever could… but I was mostly thinking of reason 1 when I made the suggestion.
7 Likes
While it won’t work for absolutely every shape, you can already do it with a work around with what Dan showed in the demonstration. Copy the shape. Delete all the interior whatever, just keeping the outline. Scale it up (just like he scaled it down), and then center it around your design. Offsets tend to be less detailed than the outline this gives you, and it doesn’t work for everything, but it works more times than it doesn’t.
The other workaround is to set up the design in the glowforge, and then take a thick marker and physically trace the edge of the stamp or design. Stick that in the glowforge as a second design, but tell it to cut the outside edge, not the whole thick line. Then put that cut line around the undoctored image of the stamp. This would give you a really accurate offset, and you wouldn’t have to try to keep a line consistently 5mm even all the way around. Plus the marker will naturally result in a much less detailed outline, even when you’re tracing fine details, just like an offset feature.
3 Likes
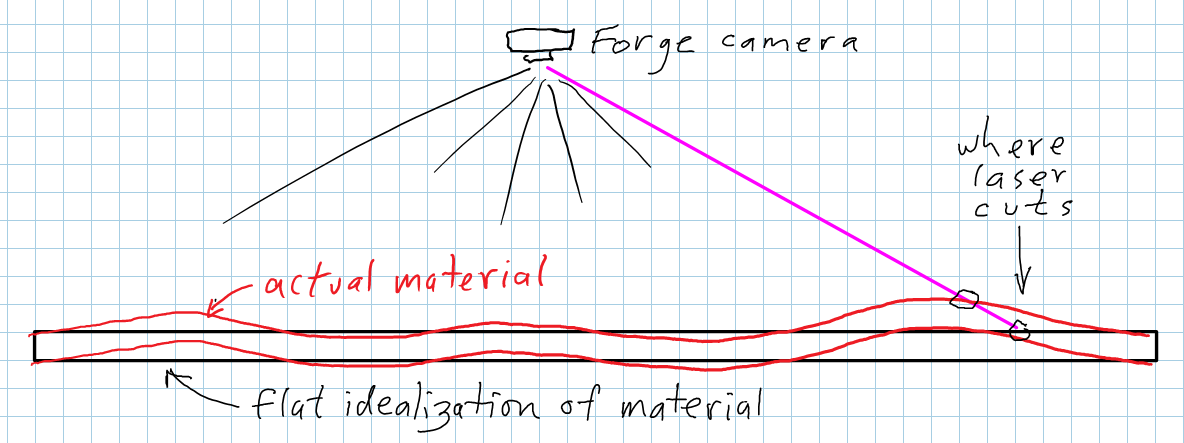
It dawned on me that the Forge scan could deviate significantly from the scan we’d get from a flatbed scanner if the object is not very flat, say, a piece of plywood with some warp in it.
5 Likes
It’s not so much the detail that’s the problem, it’s the geometry of scaling up. That would be fine for shapes that have no protrusions (like a basic geometric shape; circles, squares etc), but try doing that with, say, a cartoon character that has hands. “More times than it doesn’t” is incredible subjective, and I’d wager most graphics where this is used is more than basic geometric shapes being scaled up.
If I understand your workflow properly, you’re suggesting adding (for discussion sake) a 4.5mm area of black marking to an area that was intended to be 5mm of unblemished “whitespace”. That doesn’t solve the problem, it accentuates it, unless I mistook your example.
1 Like
If the issue is drawing a line smoothly and evenly 5mm from the edge of the design then what I’m trying to say should solve the problem. I’m not suggesting you try to draw a 4.5mm edge, no. I’ll try to remember to upload some photos of what I’m talking about tomorrow after work. I’m not every good at describing things. If that’s not the issue then I’m also not good at understanding things ![]()
1 Like
Sorry I missed this one. Reading comprehension at 5am. Oi vey. The reason I mentioned the detail is because oftentimes people want a less detailed offset for stickers, stamps, etc. And yes, you are absolutely right that it won’t work for every shape and what I said was quite subjective and based only on my experience.
That’s probably because that’s what I asked at the end of my post. lol
I agree. It would be nice to have it be able to generate an expanded border without having to pull it into Photoshop. That’s one thing that I do on more cuts than anything else.
4 Likes
![]() Sorry, I moved onto reading comments just before the “junglist” picture posts in your OP, and didn’t realize you had. Bad habit in an effort to catch up.
Sorry, I moved onto reading comments just before the “junglist” picture posts in your OP, and didn’t realize you had. Bad habit in an effort to catch up.
2 Likes
Haha I think most people had stopped reading by that point (some people didn’t make it past the first sentence). It’s good you reiterated with more detail so at least the question was addressed. Cheers!
2 Likes
A similar feature is to create a cut line around an engrave. No offset, just a crisp cut. Makes the engrave more distinctive. That would be nice not to have to do AI/Core/etc.
6 Likes
Yup. I do this on all my engraves as well. Especially on foams that can curve up at the edges and have to be engraved on the lowest power which really just changes the surface texture instead of removing material.
1 Like
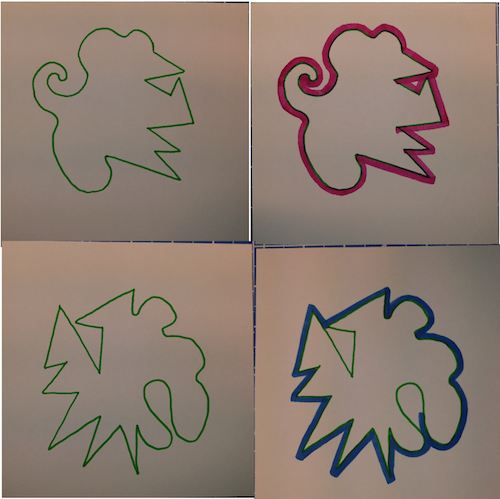
So… turns out I don’t really have any markers. I thought I had a bunch. So I tried my best to show what I was talking about with superfine tip crayola markers. Which is probably the opposite of a thick marker. Lol. I also tried to draw a random shapes that would not work just with duplicating the shape.
Here’s two shapes and the traces. Most markers, except for brush, have firm nibs and, when held at roughly the same angle, you get a really consistent width. You’d get more width with larger markers – maybe chisel nibs would be easiest? Anyway, even with the less-than-ideal markers, this was fast and really easy (again, subjective. My 7 year old nephew couldn’t do this. My 11 year old niece could). Tracing an existing line is way easier than trying to make a second parallel line freehand.
Here’s how those cut lines would work.
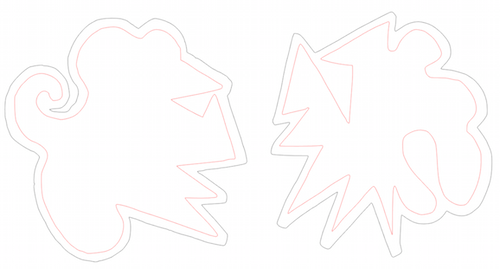
Not perfect. Learned some things that would make for better results next time. Different markers would also be helpful. Again, just a work around. Certainly not the only way to accomplish the exact same thing. Just a quick alternative to just trying to draw a second line around the shape.
4 Likes
I just skimmed through this quickly, so forgive me if I missed some explanations along the way…you guys are discussing an Offset path function.
(I’m pretty sure we aren’t going to get one in the initial release, but it might be an idea for the hopper if we asked later.)
The good news is, with a few extra steps, it’s pretty easy to create that effect in any of the drawing programs - AI, Inkscape, CorelDraw.
The bad news is…a few extra steps.
You would need to scan the drawing, perform an auto-trace from within the drawing software to create the outside cutting path, then Offset it, before saving it.
(Basically by-passing the trace function in the Glowforge entirely.)
We could probably work up a few easy tutorials for anyone who might want to try it…we’ve got lots of experts running around. It really is just a few steps.
Anyone interested?
9 Likes
Please
I know I would benefit, and I’m probably not alone!
No prob. Give me a day or two to make it pretty and I’ll knock a couple out. 
My neighbor has just lost his dog, we’ve got an all out dog-hunt in progress. (Little escape artist.)
3 Likes
No rush at all, thank you!
had a neighbor who’s greyhound bolted through the door and we started chasing it, I took about three strides before I realized what I was doing. Yeah, chase down a greyhound, you bet!
8 Likes
This discusion of tracing and outlines and offsets is what got me to try out my stick figure stickers. The Silhouette software put cuts on either side of the 4 pixel wide path, when I chose the inside and outside cut and not just outline cut.
2 Likes
I came to the same conclusion when a German Shepherd chased me on my paper route as a kid. There was no way to outrun him so I just stopped mid-stride and froze. He was unable to stop ran right into me a microsecond later. He was confused by events long enough for the owner to catch him.
3 Likes